Although some push notifications are necessary, most of them are just annoying. There are several ways to stop notifications from apps you don't even use anymore.
Here's how to disable all of your iPhone's notifications, remove them from the lock screen, and hide all of your previous notifications.
{autotoc}
How do you disable app notifications on an iPhone?
Go to Settings > Notifications on your iPhone to turn off app notifications. After that, choose an app and deactivate the slider next to Allow Notifications. This procedure will need to be repeated for each app you want to disable.
- Open the Settings app on your iPhone.
- Then click Notifications.
- You will see a list of all of your installed apps under Notification Style; choose the app you wish to disable next from this list.
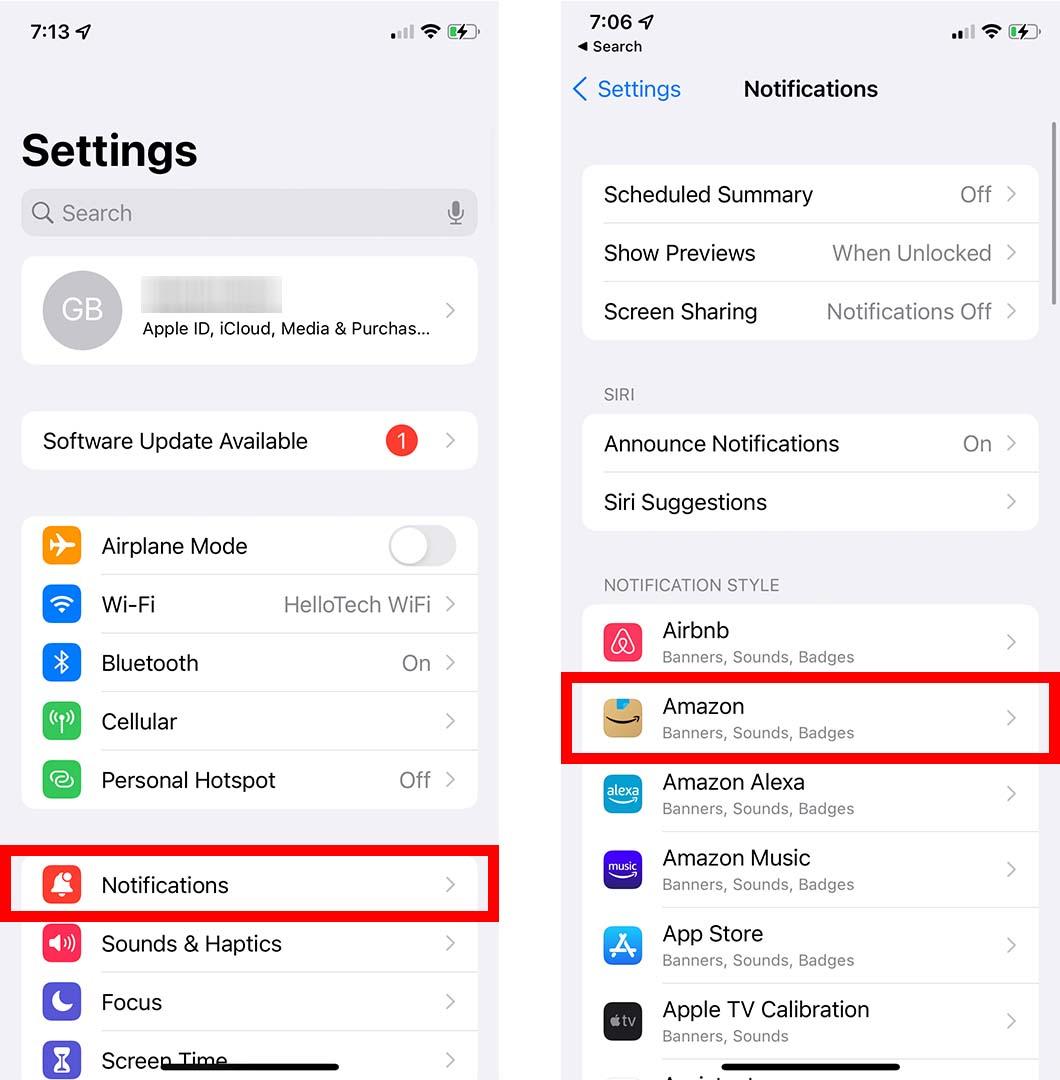
- Turn off Allow Notifications last.
- The steps must be repeated for each app you want to disable, though.
You can modify the settings for specific apps from this page if you don't want to completely disable notifications for those apps.
- You can disable alerts in the Alerts section of the settings app to prevent notifications from showing up on your lock screen and notification center
- You can switch the Banner Style from Temporary, which means it will vanish after a brief while, to Persistent, which means it will stay at the top of your screen until you swipe it away.
- The red badge icons that appear in the upper-right corner of the apps on your home screen and notification sounds can also be turned off.
If you don't want to disable them individually for each app, you can pause all of your iPhone's notifications simultaneously by using Do Not Disturb mode.
How to Pause All Notifications on Your iPhone
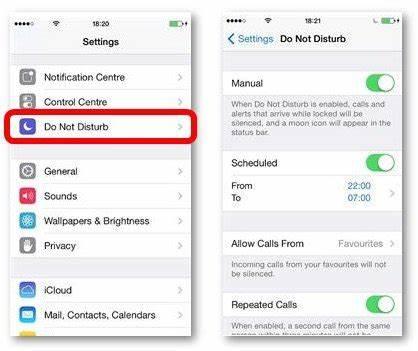
Go to Settings > Do Not Disturb and activate the slider next to Do Not Disturb to instantly pause all notifications on your iPhone. Ensure that Always is selected under Silence if you want to silence all incoming calls and notifications.
- Open the Settings app on your iPhone.
- Tap on the Do Not Disturb button.
- Toggle the slider next to Do Not Disturb after that.
Note: From this point, tap Schedule to decide when and for how long to activate Do Not Disturb mode.
- Lastly, select Always under Silence. When Do Not Disturb mode is activated, all notifications and incoming calls will be silenced.
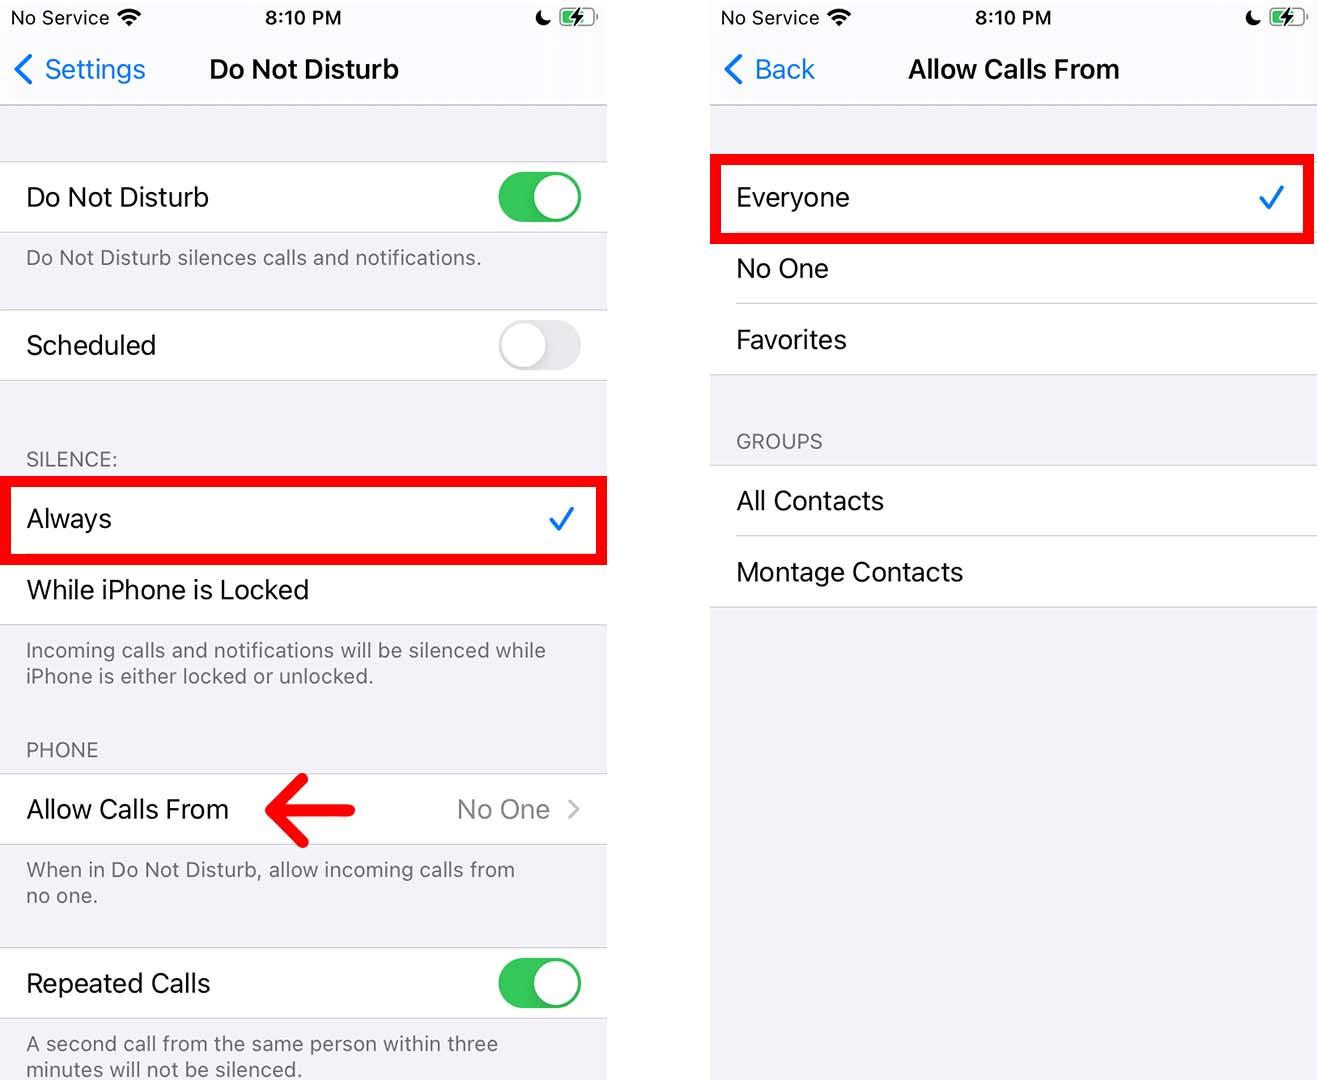
Remember to tap Allow Calls From and choose Everyone if you still want to receive calls while Do Not Disturb mode is active.
You ou can also activate Do Not Disturb mode by swiping down from the top-right corner of your screen to access the Control Center.
The Do Not Disturb menu can then be accessed by tapping and holding the moon-shaped icon. You can select the duration of the Do Not Disturb mode from here or tap Schedule to modify more settings.
You can quickly hide all the data in your notifications if you don't want to activate Do Not Disturb mode. This is how:
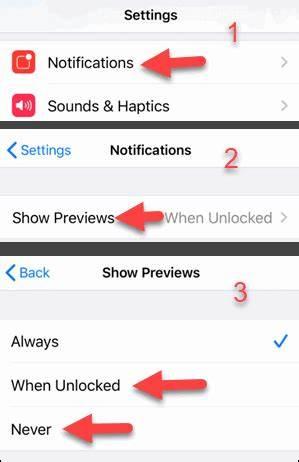
How to Hide Notification Previews
Go to Settings > Notifications > Show Previews and choose Never to turn off all notification previews on your iPhone. You will only see the app's name and icon as a result, with the details in your notifications hidden.
How to Silence Notifications on iPhone with Do Not Disturb
To silence notifications on an iPhone, you can use the following methods:
-
Silent Mode: Flip the physical switch on the side of your iPhone. If the switch is set to the "Silent" or "Mute" position (indicated by an orange dot or line), your iPhone will not play any sound or vibrate when notifications come in. Please note that alarms and calls will still produce sound, so adjust those settings accordingly.
-
Control Center: Swipe down from the top-right corner of your iPhone's screen (on newer models with Face ID) or swipe up from the bottom of the screen (on older models with a home button) to access Control Center. Tap on the bell icon to enable "Do Not Disturb" mode. This mode silences all notifications and prevents them from appearing on the lock screen or generating sounds or vibrations.
-
Settings: Go to the "Settings" app on your iPhone and select "Notifications." From there, you can choose specific apps and adjust their notification settings. You can disable sounds, vibrations, or banners for individual apps, or turn off notifications entirely for those apps.
-
Customize Notifications: Within the "Notifications" settings, you can further customize how notifications behave. For example, you can opt for "Banner" style notifications that appear briefly at the top of the screen, or choose "None" to disable notifications for a particular app altogether.
-
Bedtime Mode: If you have enabled Bedtime Mode within the Clock app, your iPhone will automatically dim the screen, silence calls and notifications, and create a more peaceful environment during your designated sleep hours.
Turn Off All Notifications on Your iPhone FAQs
How do I turn off all notifications on my iPhone?
Here's how to disable all of your iPhone's notifications, remove them from the lock screen, and hide all of your previous notifications. Go to Settings > Notifications on your iPhone to turn off app notifications. After that, choose an app and deactivate the slider next to Allow Notifications.
How do I hide message content in the iPhone notification bar?
If all you want to do is hide message content from appearing in the notification bar on your iPhone, follow these instructions. Go to Notifications and select that option to view previews. Select "Never" if you would prefer that no app's content ever appears on the lock screen. You can select "When Unlocked" in order to enable notification content when the device is unlocked using Face ID.