Are you trying to find how to take a screenshot on Mac? You may have up to four different ways to take a screenshot on macdepending on which Apple computer you have: MacBook Pro, MacBook Air, or iMac.
If you want to capture what's on your Mac right now, whether it's event tickets, an email you just received, or a Mac screenshot of your desktop, knowing how to take a screenshot on Mac is a must-have skill for Apple users.
{autotoc}
How To Screenshot on Mac
There are three ways to take a screenshot on Mac with keyboard shortcuts, and a fourth method if you have a MacBook with a touch bar.
We'll show you how to take a screenshot on Mac using the various keyboard shortcuts listed in this guide. We'll also show you how to use the Mac screenshots you've taken. Apple provides a number of options for quickly saving, deleting, and opening a screenshot for annotation.
If you're looking for more information on how to use your Mac, check out these other tips for getting the most out of your Macand Apple devices.
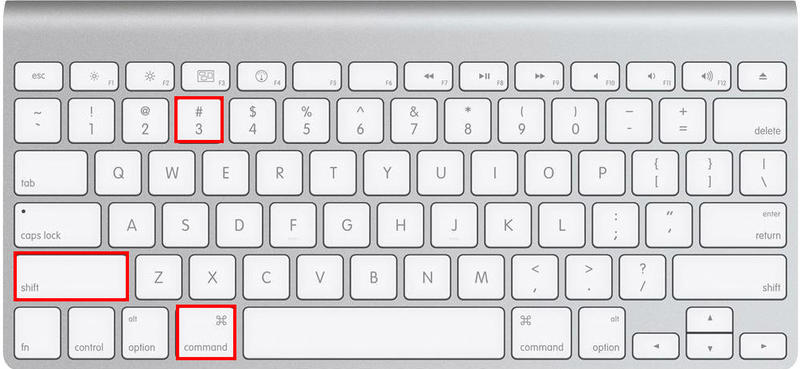
1. Command + Shift + 3 (Full Desktop Screenshot)
This keyboard shortcut captures a screenshot of your entire screen.
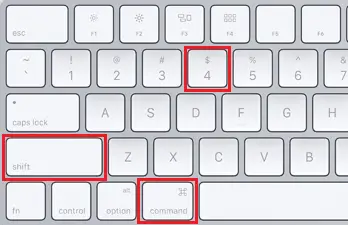
2. Command + Shift + 4 (Select Area for Screenshot)
This key combination will transform your cursor into a crosshair, which you can drag to select a portion of your screen to capture. To take the screenshot, release the mouse button or trackpad.
After pressing Shift-Command-4, you have a few more options:
When you press and hold the space bar, the crosshair transforms into a small camera icon that you can move over any open window. To take a screenshot of a window, simply click on it. This method produces a screenshot with a white border around the window and a slight drop shadow.
After dragging to highlight an area but before releasing the mouse button or trackpad, press and hold the space bar.
This keeps the selection area's shape and size but allows you to move it around on the screen. If your initial selection area is a few pixels off, simply press and hold the space bar to reposition it before releasing the mouse button to take a screenshot.
After dragging to highlight an area but before releasing the mouse button or trackpad, hold down the Shift key. This locks in each side of the selection area made with the crosshairs except the bottom edge, allowing you to move your mouse up and down to position the bottom edge.
To reposition the right edge of your selection area, release the Shift key while keeping the mouse button pressed. Keeping the mouse button or touchpad pressed while pressing the Shift key allows you to switch between moving the bottom and right edges.
3. Command + Shift + 5 (Various Mac Screenshot options)
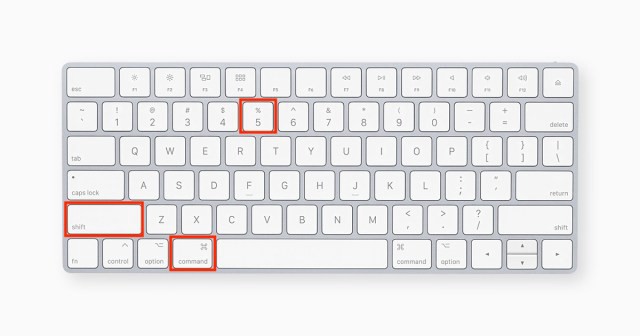
This combination brings up a small panel at the bottom of your screen with your screen capture options, which was introduced in MacOS Mojave (2018). You can take a screenshot of your entire screen, a window, or a portion of your screen using one of three buttons.

Similarly, you can record your entire screen or a portion of it using the two video recording buttons. The X button on the left closes the screenshot panel, but you can also exit by pressing the Escape key.
An Options button is located on the right side. It allows you to choose where your screenshot will be saved (Desktop, Documents, Clipboard, Mail, Messages, Preview, or Other Location) as well as set a 5- or 10-second delay so you can line up items that would otherwise be lost when you use your screenshot tool.
The Show Floating Thumbnail option is enabled by default, which displays a small preview thumbnail of your just-captured screenshot in the lower-right corner of your screen, similar to how iOS handles screenshots. On your Mac, unlike the iPhone, you can turn off the preview thumbnail. Finally, you have the option of displaying your mouse pointer in a screenshot or video.
If the screenshot panel is blocking your view, grab its left edge and drag it to a different location on your screen.
4. Command + Shift + 6 (Touch Bar MacBooks)
Did you know that if you have a 16-inch MacBook Pro or another model with the Touch Bar, you can take a screenshot of what's currently displayed on it?
To take a very wide and skinny screenshot of your Touch Bar, simply press Command-Shift-6.
Easy annotation
If you use the Floating Thumbnail, you'll be able to use Markup tools to annotate your screenshot quickly. You can swipe away the Floating Thumbnail or let it go on its own, and it will be saved to the location where you last saved a screenshot. When you click the Floating Thumbnail, it will open in a Markup View preview window (rather than Preview), with all of the markup tools available in Preview.
You can do the following with a right-click on the Floating Thumbnail:
- Save the screenshot to your desktop, Documents folder, or clipboard
- Open it in Mail, Messages, Preview, or Photos
- Show in Finder
- Delete
- Open in the Markup preview window described above
- Close (and save)
Long-time Mac users may be slow to adopt the new Command-Shift-5 shortcut for Mac screenshots, but we find myself using it more for the ability to annotate screenshots without opening Preview and quickly delete screenshots that we know we made a mistake with.
The 5-second and 10-second delay options are also welcome additions.
These are all of the various options of how to take a screenshot on Mac!
Screenshot on Mac FAQs
How can I save a screenshot as a picture on a Mac?
Press Command + Shift + 5 and select the Capture Selected Window option in the toolbar to take a screenshot of a specific window or menu. The pointer will be replaced by a camera icon. To save an image, move the camera over a window to highlight it, then click.
Where are all Mac screenshots saved?
All screenshots taken on your Mac are saved to the Desktop by default, with the date and time marked on them. When you hold down Control while taking a screenshot, it will be saved to the clipboard rather than the hard drive.
How do I change my screenshot preferences on a Mac?
- Open the Screenshot app from the Utilities folder. You can also use Command + Shift + 5 to launch the Screenshot app.
- Then select Options. Your Save to options will be displayed in the menu's top tile.
- Select a location to save it to. </ul >