
When it comes to calculating shipping charges, it's not just about the distance covered —the weight and size of the items being shipped play a role as well.
Unless all of your products are the same weight, you'll need to make sure your store is set up to adjust shipping rates for items of varying weights.
This is where WooCommerce shipping classes come into play.
WooCommerce shipping classes are a fantastic way to charge different shipping rates based on the products you sell.
You can automatically adjust your shipping rate during checkout to cover those costs if you sell really heavy items (which tend to be more costly) and lightweight products (which tend to be less expensive).
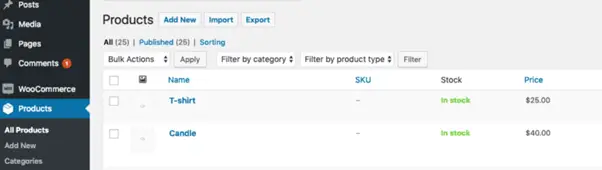
Let's say you have a store that sells candles and t-shirts.
If your candles are all about the same size and weight, you can create a WooCommerce shipping class for them and assign shipping prices to them.
T-shirts can be grouped together into a new WooCommerce shipping class with their own set of shipping rates.
That way, you and your customers know exactly how much shipping costs so there are no unexpected surprises.
It's worth noting that not every store is a good fit for shipping classes. I your customers frequently order multiple items at once, package weights (and thus shipping rates) will vary too much to be reliably grouped into one class.
Creating classes is a great way to easily calculate shipping per item if your store is more of a "one-and-done" type of store.
Step-by-step instructions for setting up WooCommerce shipping classes:
- Add Your Product Groupings as WooCommerce shipping classes.
- Assign items to the correct class
- Calculate the shipping costs for each item
- Make a list of your shipping zones
- Create a table with each product's shipping class, zone, and rate
- Update WooCommerce with your shipping information
- Create shipping labels with Shippo
{autotoc}
How To Set Up WooCommerce Shipping Classes
Setting everything up is easier than you might think
1. Add Your Product Groupings As WooCommerce Shipping Classes
When your shipping costs differ significantly from item to item, whether due to package weight, service level, or other factors, WooCommerce shipping classes come in handy.
You might also want to create them based on carrier service levels' weight limits. Create one class for items weighing less than 16 ounces (which will be shipped via USPS First-Class Package Service), and another for items weighing one pound or more (which would ship via USPS Priority Mail).
For expedited orders, one more option is to create a priority shipping class.
If you sell perishable items, for example, you might want to create a class for those items that require expedited shipping (likely USPS Priority Mail Express or similar).
Determine Your WooCommerce Shipping Classes
Because our store only sells two items, we'll create two WooCommerce shipping classes for our example:
- Candles weighing five pounds including packaging.
- T-shirts with packaging weighing 14 ounces.
Create the Shipping Classes in WooCommerce
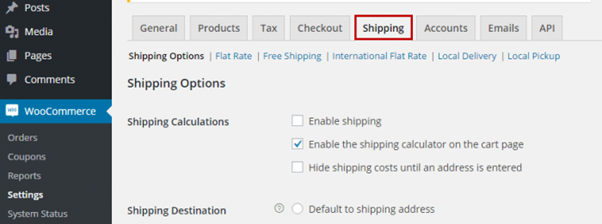
Once inside your WordPress dashboard, go to WooCommerce > Settings > Shipping > Shipping Classes.
Then, under Add Shipping Class, fill in the relevant details for the item for which you want to create a class.
If necessary, click Add Shipping Class again to add more classes.
2. Assign Products to the Appropriate Shipping Class
It's time to assign your products to the appropriate shipping class now they have been added to WooCommerce.
When you add your products to your shopping cart after they've been assigned a shipping class, they'll trigger the appropriate shipping price.
Go to Products in your WordPress dashboard.
Now, select one of your products by clicking the blue hyperlink. (we’ll use T-Shirt for this example) > Shipping > Shipping Class
Then, choose the appropriate class for that item.
3. Determine the Shipping Rate for Each Product
After you've created your shipping classes, you'll need to create your shipping zones and prices.
These determine the shipping cost that appears during checkout.
To begin, you'll need a firm grasp of your shipping costs. Skip this step if you already know your rates.
If not, we'll show you how to calculate how much your carrier will charge to ship your items.
Determine the Package Weight for Each Product
Calculate the total weight of each product, including all packaging materials.
In this post, we'll assume that our store sells two different products: a five-pound candle and a 14-ounce t-shirt, both with their own packaging.
Select Your Service Level
The next step is to choose a carrier and service level.
We'll be using two popular USPS service levels:
- Priority Mail from the United States Postal Service is a great option for packages weighing more than one pound and has a delivery time of 1-3 business days. When we ship our candles, this will be our service level.
- USPS First-Class Package Service is a great option for packages weighing less than 16 ounces that need to arrive within 1-3 business days. This is the level of service we'll use for our t-shirts.
Note the Rates for Each Zone
The majority of carriers base their prices on the package's weight, dimensions, and distance traveled.
The distance between the origin and destination addresses is divided into different zones. The higher the zone, and the more expensive the package, the greater the distance.
4. Identify Your Shipping Zones
The next step is to identify and configure WooCommerce shipping zones.
It's critical that you charge your customers for shipping during the checkout process using WooCommerce shipping zones.
The reason for this is that the major carriers charge different shipping rates depending on the distance between the origin and destination addresses.
Shipping zones are used to divide these distances.
You can pass along the correct shipping rate to your customer by using WooCommerce shipping zones in the shopping cart.
We'll assume you've already set up your WooCommerce shipping zones.
5. Build a Table with Shipping Class, Zone, and Rate for Each Product
Create a table with the information you gathered above, listing each product and the shipping rate per item to each zone.
The table we made with our sample items is shown below.
|
Product |
Rate |
|
Zone 0, 1, 2 |
|
|
Candle |
$7.89 |
|
T-shirt |
$4.24 |
|
Zone 3 |
|
|
Candle |
$6.25 |
|
T-shirt |
$4.98 |
|
Zone 4 |
|
|
Candle |
$9.12 |
|
T-shirt |
$5.02 |
|
Zone 5 |
|
|
Candle |
$10.33 |
|
T-shirt |
$7.12 |
|
Zone 6 |
|
|
Candle |
$15.67 |
|
T-shirt |
$5.24 |
|
Zone 7 |
|
|
Candle |
$17.92 |
|
T-shirt |
$5.38 |
|
Zone 8 |
|
|
Candle |
$20.40 |
|
T-shirt |
$5.53 |
|
Zone 9 |
|
|
Candle |
$28.84 |
|
T-shirt |
$5.59 |
6. Add Your Shipping Information to WooCommerce
Now, using the table you created earlier, add these rates to each Shipping Zone's shipping classes.
Here's how to do it:
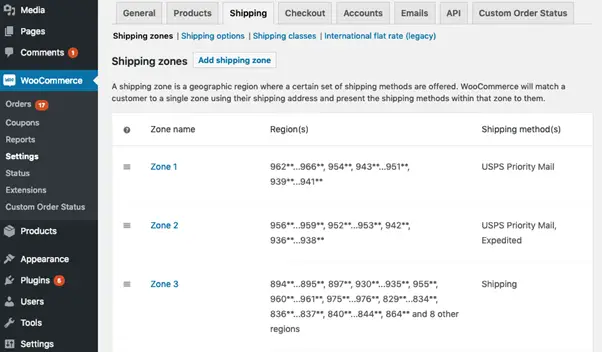
- Go to WooCommerce > Settings > Shipping > Shipping Zones.
- Click the blue hyperlinked Zone Name. We’ll set up Zone 1 for this example.
- Click the blue hyperlinked Shipping Method to edit (USPS).
Now, using your table as a guide, fill in the appropriate rate for each shipping class in the field.
We add $7.81 for the candle shipping class and $4.94 for the T-shirt shipping class to Zone 1.
You can also choose a calculation type on this screen–we're using "per class" so that all items are charged separately and totaled at checkout.
- Save your changes.
- Do this for all nine shipping zones.
7. Use Shippo to Generate Shipping Labels
After you've set up your WooCommerce shipping classes, you'll need to connect your store to a shipping software like Shippo
It has a WooCommerce shipping plugin, so you can create shipping labels for the same price you're charging your customers.
Shippo is a free WooCommerce integration that works right out of the box.
- Shippo imports your WooCommerce orders into the dashboard automatically.
- After that, you can choose your orders and create labels (either one at a time or in a batch).
- When you create a label in Shippo, the fulfillment status in WooCommerce is automatically updated.
- When you make a change to your WooCommerce address or order status, it will sync with Shippo.
- In just three simple steps, you can sync your WooCommerce store with Shippo. Instructions can be found in our Help Center article.
Congrats! Your WooCommerce shipping classes will be set up after you complete these steps, and you'll be ready to ship orders to your customers.
Create a few new orders and use different ZIP codes to see how it works!
WooCommerce Shipping FAQs
Does WooCommerce offer shipping?
WooCommerce itself doesn't offer shipping services, but it provides powerful tools to help you manage and customize shipping methods for your online store. You can set up shipping zones, methods, and rates based on your business needs, and integrate with popular shipping carriers such as USPS, FedEx, and UPS to streamline the shipping process.
How does WooCommerce shipping work?
WooCommerce shipping allows you to define shipping zones, methods, and rates based on your business needs. Once set up, customers can choose from the available shipping options during checkout, and you can print shipping labels and track packages directly from your WooCommerce dashboard.
What is the difference between WooCommerce shipping class and shipping rate?
A WooCommerce shipping class is a way to group products together, such as the bulky shipping class, which only contains large items. A shipping rate is a fee that the customer must pay in addition to the purchase price, depending on the shipping class. As a result, any bulky items may incur a $50 surcharge.
How to make a shipping class In WooCommerce?
Go to WooCommerce > Settings > Shipping > Shipping Classes from your WordPress dashboard. Then, under Add Shipping Class, fill in the relevant details for the item for which you want to create a class.
Does WooCommerce offer free shipping and tax?
WooCommerce shipping tax is a feature that allows you to include tax in the price calculation. You can also set the tax percentage and enable tax based on location with WooCommerce. You can enable or disable the tax option for locations and zones under Standard rates.
Is there a WooCommerce shipping plugin?
Yes, there are many WooCommerce shipping plugins available that can extend the platform's shipping capabilities. Some popular options include WooCommerce Shipping, Table Rate Shipping, and UPS Shipping Method for WooCommerce. These plugins can help you customize shipping rates, offer real-time shipping quotes, print shipping labels, and more.
What are the WooCommerce shipping methods available?
WooCommerce offers several built-in shipping methods, including flat rate, free shipping, local pickup, and international delivery. Additionally, you can add custom shipping methods with plugins or extensions. Popular options include table rate shipping, weight-based shipping, real-time carrier rates, and more. With these options, you can tailor your shipping options to meet the needs of your online store and customers.