
Keeping backups is one of the most important things any website owner can do. It allows you to prevent losing your website entirely due to unforeseen circumstances like server crashes, hacking or website misconfiguration.
Thankfully, WordPress has dozens of plugins (including BlogVault) that will help you create and keep a backup of your website so you can get back up and running should the worst happen.
Here comes the dilemma: with dozens of backup solutions out there, it can be hard and confusing for you to choose which one suits your own needs.
If you have a website that generates quite a bit of traffic at the very least and good revenues, then you’ll certainly want to have a backup solution that is proven, trusted, and easy to use.
Among the dozens of backup plugins out there, there is one that meets all of these criteria and more: BlogVault.
In this article, we’re going to take a look at and perform a full BlogVault review.
We'll see how it became (probably) the best WordPress backup plugin. If you're interested in WordPress plugins in general, please visit the WordPress plugins menu to see our other articles.
Let’s get started!
BlogVault Summary
| Overall Rating | 4.5/5 |
|
Ease of use |
4.5/5 |
|
Reliability |
5/5 |
|
Support |
5/5 |
|
Value |
4.5/5 |
| Price | From $89/year |
| Free Trial | Yes - 7 days free trial |
| What we liked | Super-easy to use - Easy to set up and get started |
|
Fast backup and restore |
|
|
Free staging |
|
|
Simple migration |
|
|
Reliability - Set and forget, with full peace of mind |
|
|
Works on all web hosts (even free ones) |
|
|
Supported and embraced by major vendors such as WPEngine |
|
| What we didn't like |
Pricing can be somewhat confusing |
|
Requires FTP access (strict) |
|
|
Downloaded backups need to be restored manually |
|
|
Can get pricey |
|
| Visit website now to learn more |
What is BlogVault?
BlogVault is a WordPress backup plugin that offers backups, security, maintenance, and staging solutions for websites of any size.
It also has a powerful suite of tools that will aid you in the backup, restore, migration, management, and security of your website.
BlogVault is currently one of the best WordPress backup plugin and few other options can rival it for its breadth of functionality.
It’s not just a backup plugin that helps you create, manage and restore your backups.
It’s basically an all-in-one plugin and backup service.
![]()
Features
To better understand what BlogVault is, let’s take a look at some of its top features.
Backups
One of the main features of BlogVault is creating and managing backups.
Let's perform a deep dive into the functions it offers.
BlogVault’s backup feature is different than that of its competitors. This is because it uses incremental backup technology, reducing the stress and storage needs on your server.
Even for websites under heavy load, at any given time, BlogVault can start a backup that will have a near-zero effect on your website performance.
The service automatically backs up your database and files on a daily basis.
When it backs up your site for the first time, it is done in small packets of data to avoid server overload.
Once the first backup is completed, the subsequent ones will be incremental. This means that it will only sync files that have had any changes, eliminating unnecessary server access and usage.
For WooCommerce powered sites, it also has a real-time backup feature.
This will trigger anytime there’s an order placed and a transaction is made, to ensure that no transactions are ever lost in case of failure.
Another feature that separates BlogVault from its competitors is its ability to backup, restore and migrate an entire multisite network.
Depending on which plan you’re on, backups are kept for up to 365 days before being overwritten by newer ones.
They are kept encrypted on BlogVault servers and have multiple copies maintained for full redundancy and integrity.
One-click Migration
Okay, maybe it’s not really one click. However, the entire process is as easy and simple as it can get.
We were first introduced to this service when we performed a migration via WPEngine, as part of our review of the hosting service, and we were very impressed then.
For the migration, you’ll just have to get the FTP details of your new website or host, choose what version of your website’s backup you want to migrate, select the folder containing the new WordPress installation on your new host, click migrate and that's it!
Sound easy? It really is!
We've migrated many WordPress installations and using BlogVault for migration makes it dead easy.
You’ll find more details about this and other features in the Getting Started section below.
Website Recovery
As with migration, the process to perform a full website recovery is fairly easy.
Simply make sure you have your FTP credentials to hand and you’re good to go.
Let's say one of the following problems brought down your site:
- Your site got hacked
- A new plugin or theme broke the site and you cannot recover
- A new WordPress core update failed and left your site in an unusable state
- Hardware failure
- Malicious or accidental website data loss
in all these cases, you can easily revert back to a previously working version of your site taken with BlogVault.
Your website is backed up on a daily basis so you can easily return your site to the state it was the day before your website experienced a problem.
If you have real-time backup enabled, you can even restore your site to what it was mere hours before whatever catastrophic event happened to your site!
Security
BlogVault comes with built-in security features such as a firewall, site scanning, admin login and log out tracking.
In particular, you can analyse who logs in to your site and what kinds of bots are visiting.
It also helps you find any malicious files that might have infiltrated your WordPress site and helps you to restore to a working version with the functionality we described before.
Multiple Website Management
BlogVault allows you to manage updates, backups, security, and other features for multiple websites.
This is an especially useful feature for web designers or agencies that manage client websites.
Adding a site to BlogVault not only keeps it secure and backed up, but it also helps you manage it.
You can add as many sites as you want (depending on your plan) and manage them directly from the dashboard.
You can
- Update, install, upload, activate, deactivate, or delete themes and plugins
- Upload themes and plugins to your site through BlogVault
- Update WordPress core
- Add, edit, or delete users
- Generate beautiful reports that display in-depth website activity for a selected period of time
WooCommerce Transaction Backups
BlogVault comes with a real-time backup feature for WooCommerce sites. This feature is available as part of the Advanced plans.
This triggers a back up anytime an order is placed or when a transaction is completed. This ensures that you don’t lose any order or transaction in case of any failures.
Those are some really nice features, aren’t they?
We'll soon get to see them (and more) in action in the next section.
Getting Started with BlogVault
Now you have an idea of what BlogVault has to offer, it’s time to see it in action!
In this section, you’ll see how each of its features work and get a look at what the dashboard looks like.
We’ll go through the installation, activation, and usage of BlogVault.
You can get a free 7-day trial of BlogVault, where you can check out all the features on your own sites.
You might want to start a trial now so that you can follow along with this article to see the features in action for yourself.
Let's get started!
Installing BlogVault
The first thing you want to do is to register to BlogVault.
Once you’ve registered and have confirmed your email, the first thing you’ll see is a dialogue box asking you to add the site you want to back up to your BlogVault account.
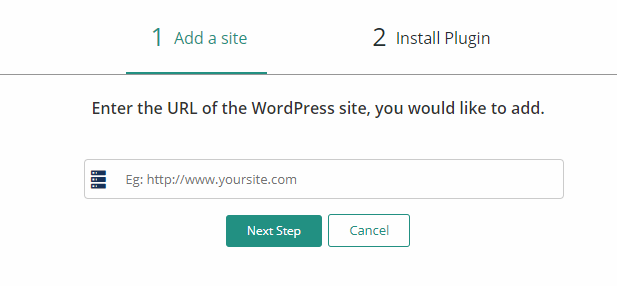
The next page will allow you to choose to either install the BlogVault plugin manually to your site or have BlogVault install it for you automatically.

Choose your preferred method and once the plugin is installed, click the Plugin already installed? Check now! button at the bottom to allow BlogVault to check whether the plugin was successfully installed or not.
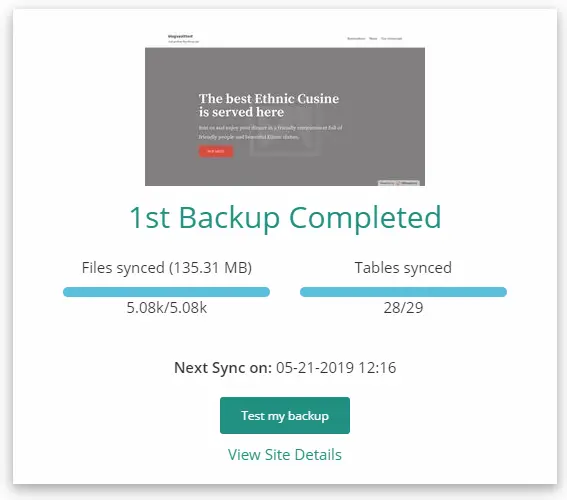
Once the service detects that the plugin is installed and activated on the target site, it will start the first-time backup and sync.
Once the initial backup complete successfully, you’ll see the following screen, showing you the details of your first backup:
And that's it, you’re done!
You don’t have to do anything else if you only want to perform website backups.
BlogVault will now continue to automatically backup your site on a daily basis (or in real-time if this is available in your plan and you have enabled it).
BlogVault Dashboard
When you have connected a site to your BlogVault account, the site can now be managed directly from the BlogVault dashboard.
In the Dashboard, you can see the list of all sites that are connected to your BlogVault account.
The icons allow you to preview each of your site’s status, such as whether there are WordPress plugins that need an update, or whether a certain BlogVault feature is enabled or not.
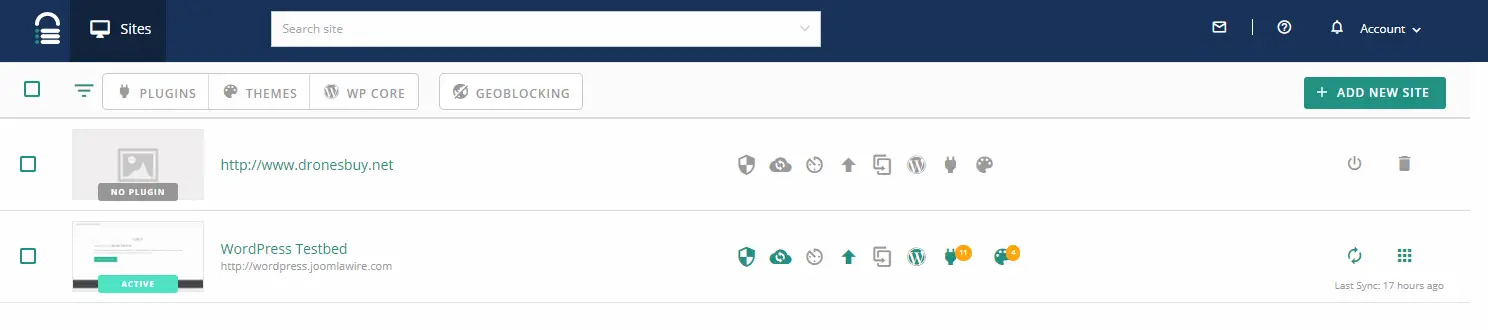
The screenshot above displays a BlogVault account with two sites connected.
One of them doesn’t have the plugin installed and the other has the plugin installed and activated.
You can notice the icons on the second site, which has the BlogVault plugin installed and activated, displaying that there are themes and plugins that need updating.
The green-colored icons indicate that the feature or service is currently active.
From left to right, these are security, backup, real-time backup, uptime monitoring, staging, WordPress core version, plugins, and themes.
If the latter three need updates, they’ll have badges on them.
The Site Dashboard
Clicking on one of your sites will bring you to that particular site’s dashboard containing a detailed overview of its status.
There are different sections displaying various information about the site.
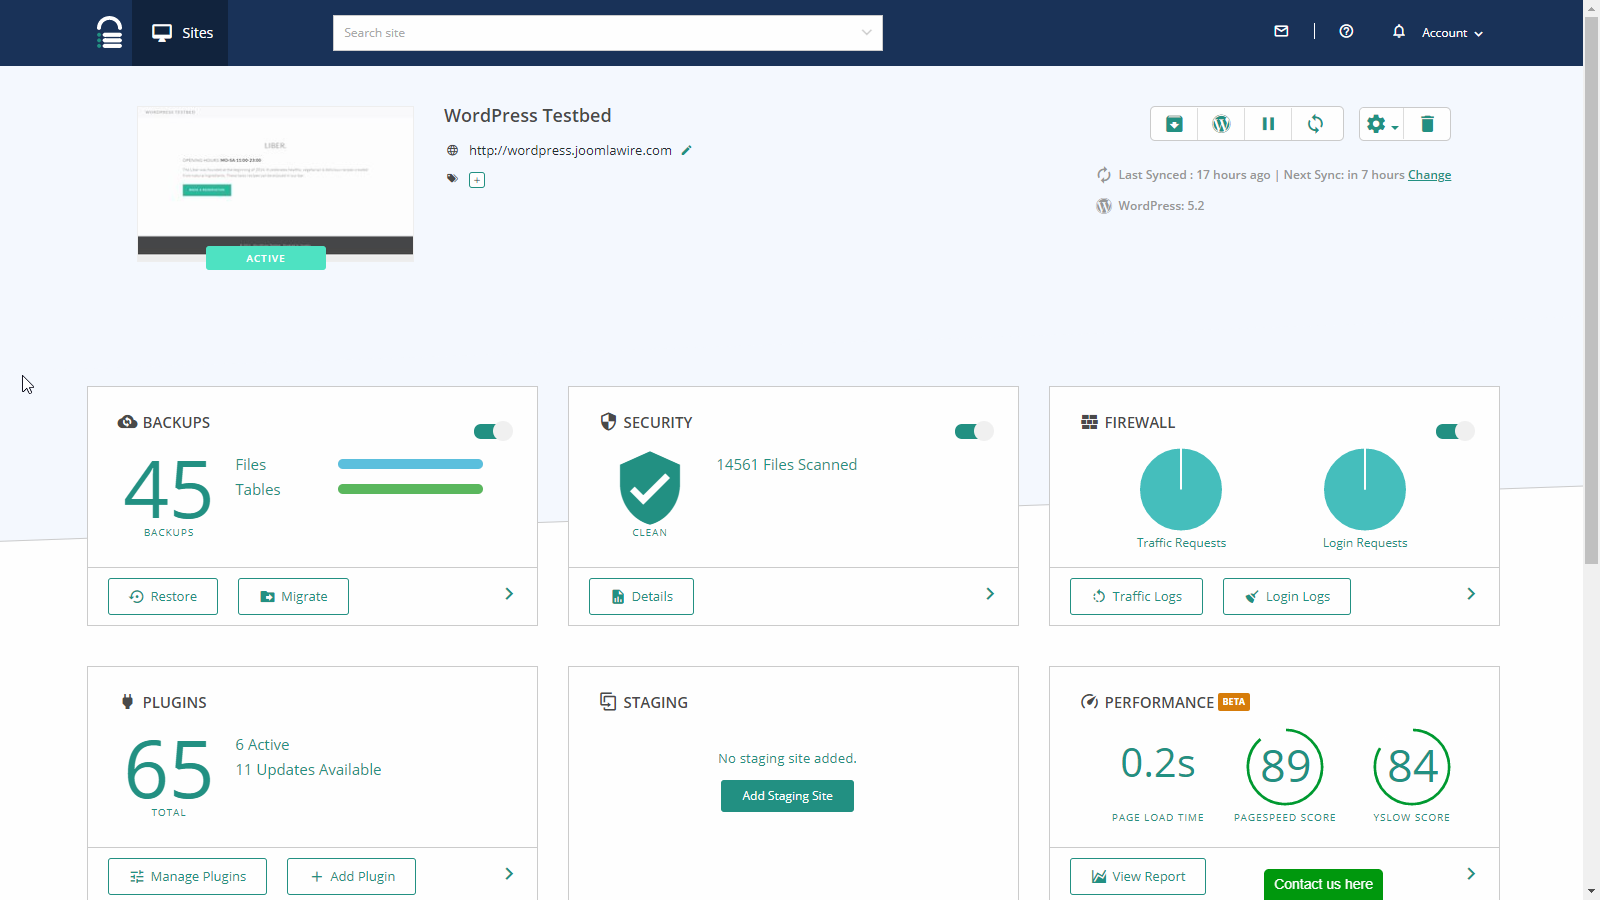
You can see how many backups were created, how many themes and plugins are installed, and which of them are active or not.
You can also see details about your site’s performance, its security status, whether there’s a staging site set up or not, your website’s uptime status, how many WordPress users your site has, and other details.
Clicking on the right arrow in the lower right corner of a section brings you to their specific page. This allowis you to view more detailed information related to that section and to access and configure additional settings for it.
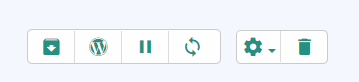
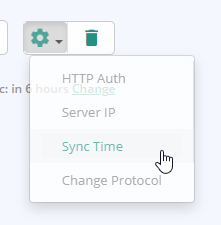
On the upper right corner of the site dashboard, there are quick links that allow you to reinstall the BlogVault plugin on your site, access your site’s WordPress dashboard, pause syncing (backup), trigger manual sync, access site settings and delete the site from your BlogVault account.
Clicking on the gear icon brings up a submenu containing additional advanced settings you might want to configure.
This section should only be used by advanced users.
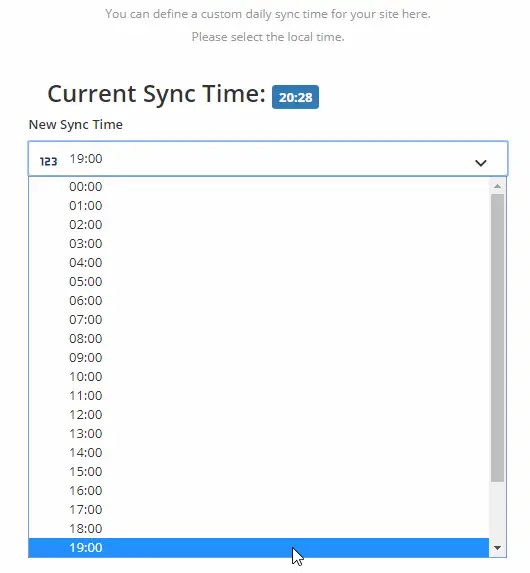
Sync Time setting.
This setting will let you set your own preferred sync time.
So, for example, if you update your site with new content and perform other updates every day at 10 AM, you might want to set the daily sync to happen either before or after you post new content on your site.
WordPress Management Made Easy
From this dashboard, you have can install new themes or plugins, activate or update them, create, delete or edit WordPress users, and much more.
It’s quite similar to the MainWP WordPress Manager but is more focused on backups, restore, and migration.
If you want features similar to MainWP, but only have a couple of sites to manage, BlogVault could be the better choice.
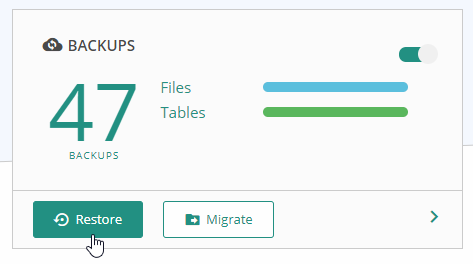
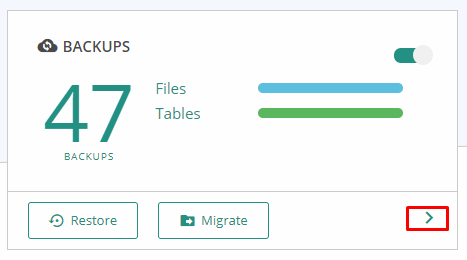
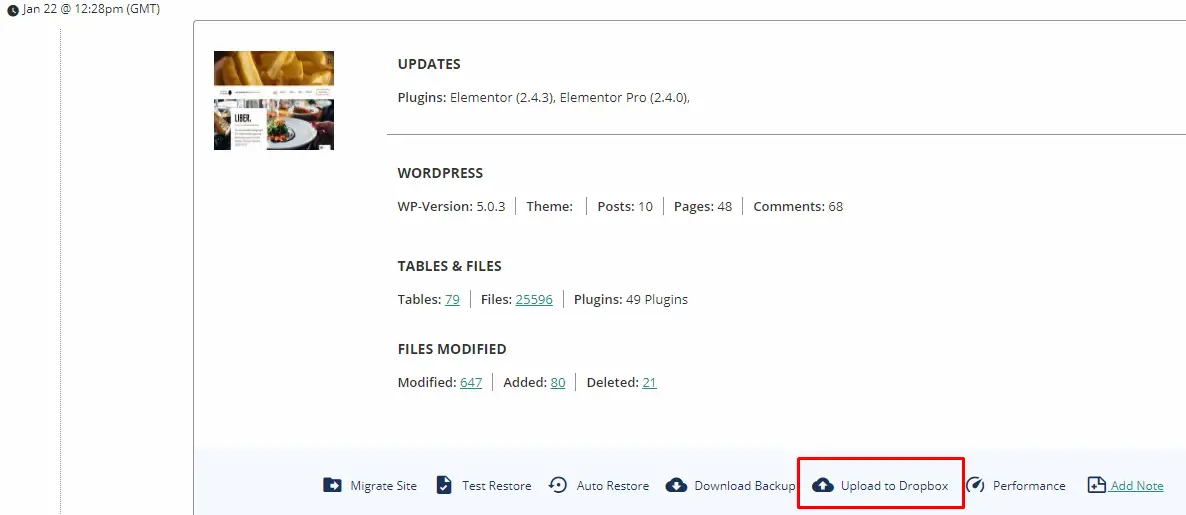
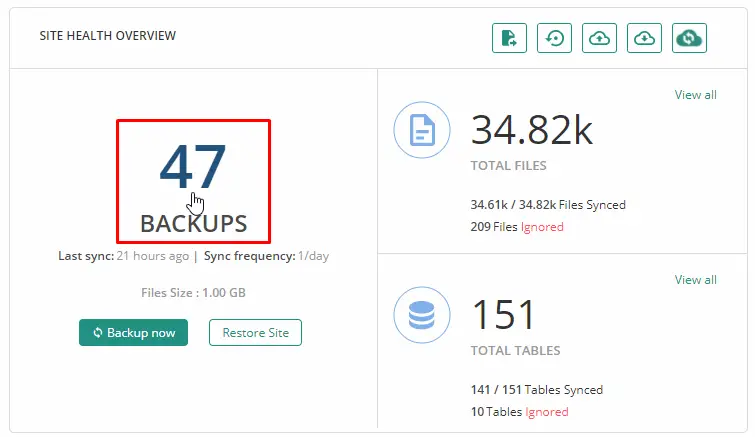
Backups
From your site’s dashboard, clicking the right arrow on the Backups section will bring you to the Backups Dashboard where you can see more detailed info about your site’s sync status.

Here, you can choose to include or exclude certain files and database tables from your backups.
This is also the place to enable or disable real-time backups if enabled for your plan.
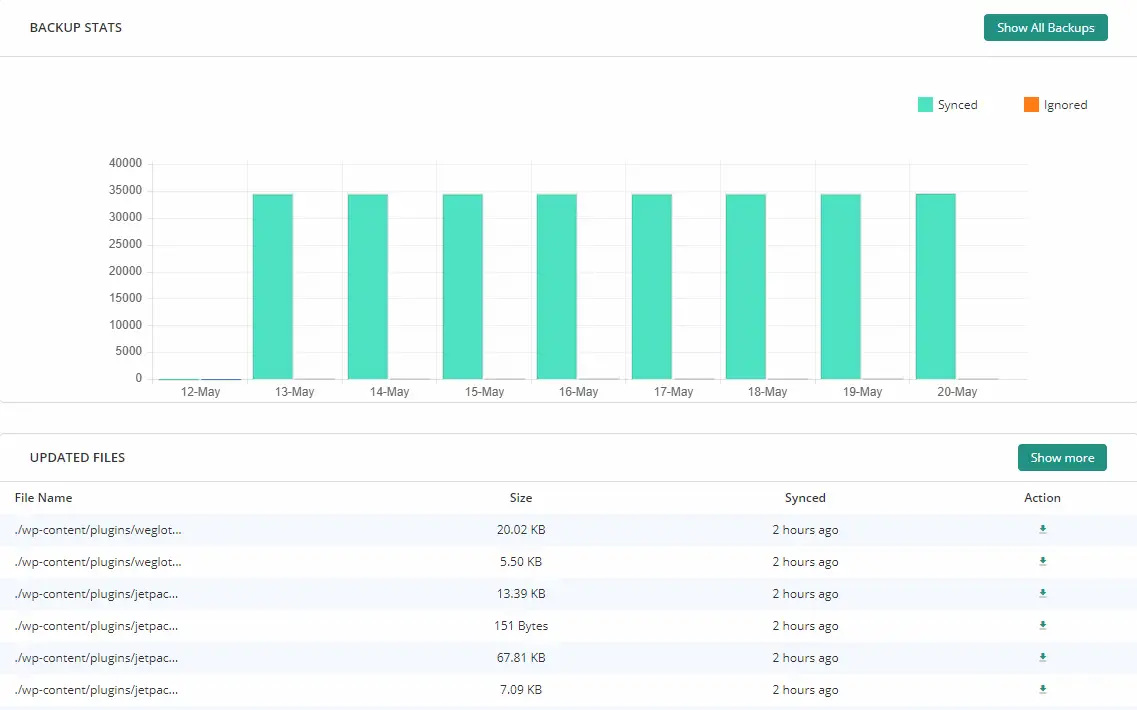
Scrolling down to the bottom of the page shows an overview of the backup stats, showing you how many files were synced and how many were ignored along with a list of files that changed since the last sync.
You can include files outside of your WordPress installation if you want to by clicking on the red ignored text under the stat for your files backup, the same goes for your database backups.
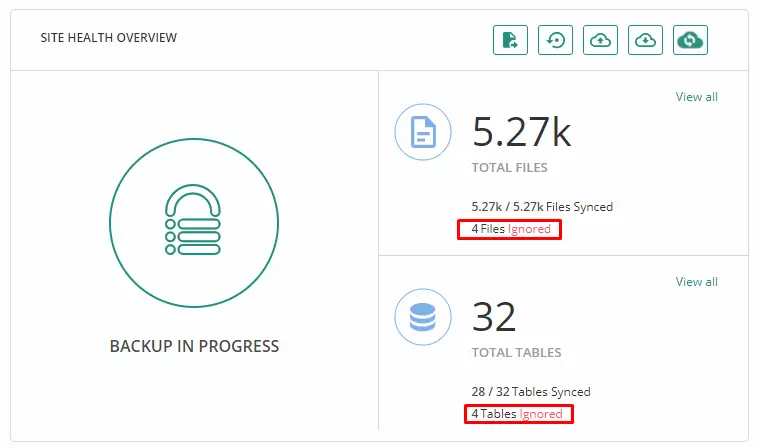
Clicking on the Files Ignored text will bring you to a file browser, as you can see below.
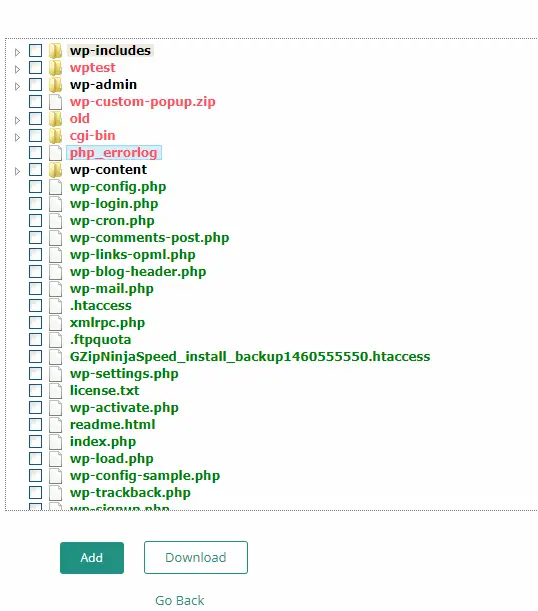
Files and folders in red are not included in the backup.
You can include them by clicking the checkbox next to them and then clicking the Add button at the bottom.
Alternatively, you can directly download any of these files and folders by doing the same, but pressing the Download button instead.
Uploading Your Backups to Dropbox
As part of the Backups dashboard, you can access the “Upload to Dropbox” option.
This allows you to directly upload the latest backup of your site to your Dropbox account.
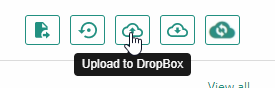
If you prefer to upload a different backup version, you can click on the number that shows how many backups you currently have.
This will take you to the list of all backups created for your site. Once you’ve found the one you want to upload to your Dropbox account, all you have to do is to click on the Upload to Dropbox link.
While Dropbox is the only direct upload supported by BlogVault, you can still use any cloud storage of your choice as additional backup storage.
Simply click the Download Backup link which is located beside the Upload to Dropbox link and it will download a zipped backup file of your site.
You can store it anywhere you want, either on your own hard drive or to another cloud storage platform like Google Drive, BOX, Mega or anywhere you have cloud storage available.
How to Use Downloaded Backups
If you downloaded a backup copy of your site or uploaded on to your Dropbox account and you want to restore it, you have to do the upload manually.
At the time of the writing, there is no way to upload a downloaded copy of your site’s backup to BlogVault so it can do the restoration for you.
Downloaded backup files from BlogVault contains the entire copy of your WordPress site along with its database dump (a .sql file).
To restore these, you’ll have to do it manually yourself.
This can be done by removing all existing files and replacing them with the ones from the backup, and dropping all of the tables from the existing database and import the SQL dump of the database in the backup.
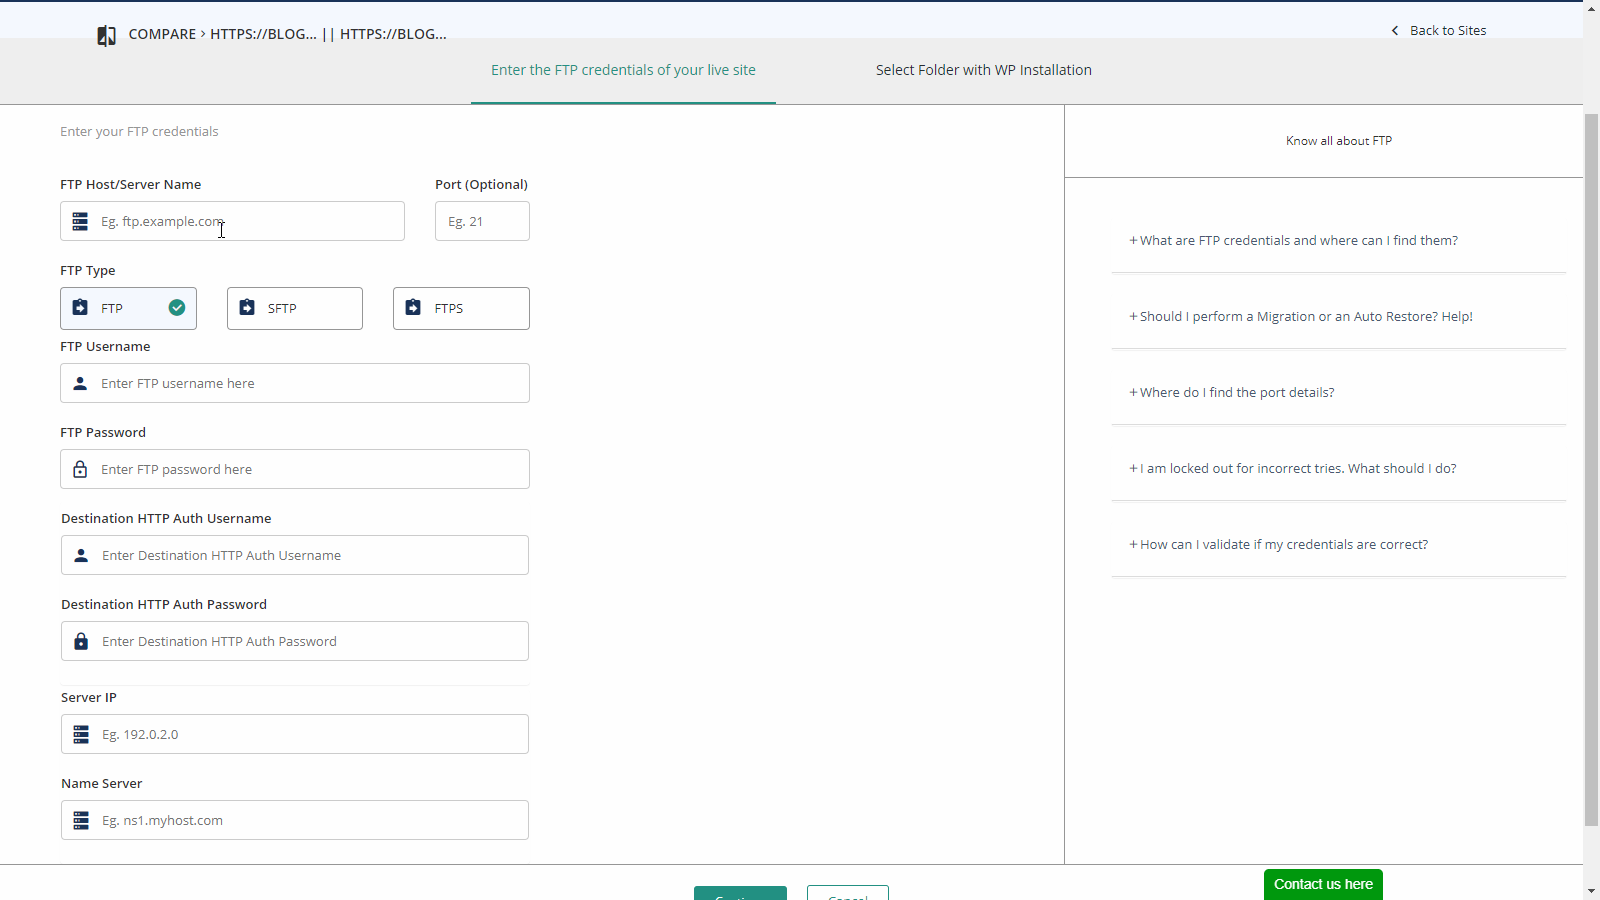
Migrating Your Site
If you want to move your WordPress installation to a new server, click on Migrate either on the site’s dashboard or within the Backups page.
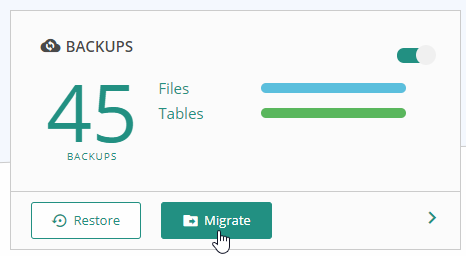
Migrating a WordPress site using BlogVault is very easy. Moreover, it is fully automated!
All you need is your new site’s FTP credentials and a fresh WordPress installation on it.
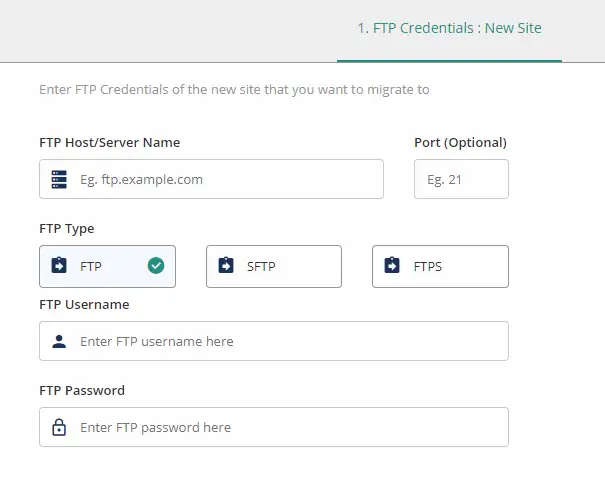
Once you enter the correct FTP details of your new website, BlogVault will initiate an FTP session to your new website’s server.
You can now view your server’s files just like in a regular FTP client.
In this step, you need to choose the folder where the new WordPress site is installed.
In the example below, it’s in the public_html folder of the new server. Yours might be different! Make sure you select the correct folder!
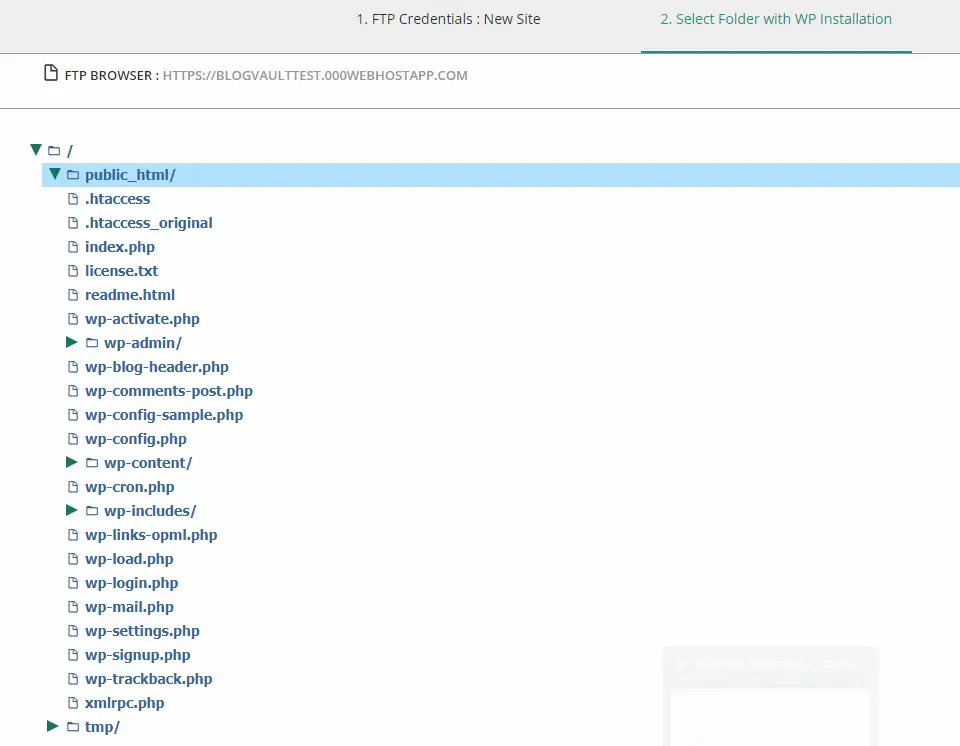
Once you’ve selected the correct folder (the highlighted one is where BlogVault will migrate your site), you’ll be taken to the next step of the migration.
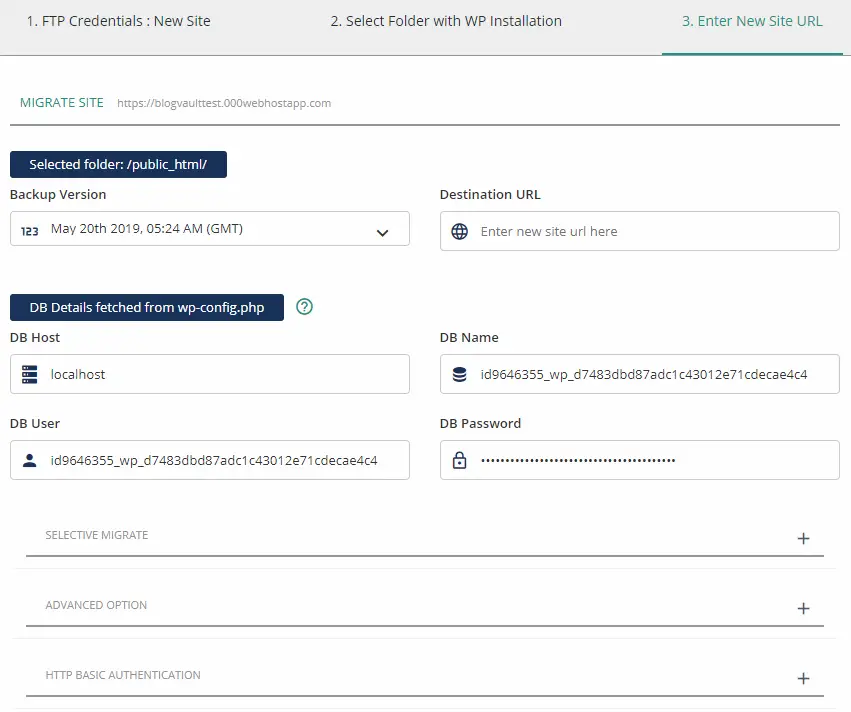
BlogVault will automatically pick up the new site’s database details from its wp-config.php file (that’s why you need a fresh WordPress installation).
If you think something here is incorrect, you can fix it before proceeding.
You can then choose which backup version you want to use for migration.
As the final step, don’t forget to enter your new site’s Destination URL.
At the bottom of the basic settings, are a number of additional settings, which, most of the time, you won’t have to modify.
But, for the sake of completeness, we’re going to go through and describe briefly what they do. You might find these useful if you got into any trouble while migrating your site, or if you want to do advanced tweaks as you are migrating the site.
- Selective Migrate - this allows you to choose which files and database tables you want to migrate.
- Advanced Option - this is where you can input your new location’s name servers and server IP address, instead of the actual domain name. This is useful if you just changed your DNS or you haven’t updated your DNS yet.
- There’s also an option to Copy File Permissions of your files and folders to the destination server. By default, all folders and files’ permissions will be set to 755 and 644 respectively (as per the standard WordPress settings). If you have a valid reason for these to be different, you can use this option.
- HTTP Basic Authentication - if your new server is protected by HTTP Basic Auth, you can put your credentials here to authenticate the server so that the migration cab proceed without any issues.
Once you’ve configured everything, you’re now ready to press the green Continue button at the bottom and the site migration will begin.
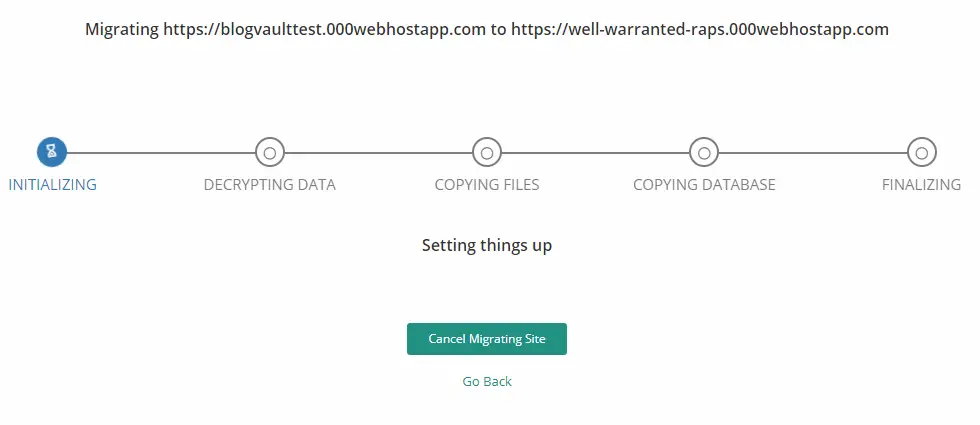
If you’re familiar with the web hosting industry, you might have noticed that in the screenshot above, we’re doing this migration test on a free web host.
Even with such limits as are imposed on free services, everything went smoothly and the migration was executed perfectly.
Everything was correctly migrated and the new URL just works.
We wanted to test BlogVault how far we can push the service. And it does seem that the service truly has a 100% recovery rate!
While it may take some time for the entire process to complete, this is to be expected from a completely free web hosting package. We also tested migrating a test site from one free web host to another free web host.
The result is the same: flawless and perfect migration.
You can try it yourself by signing up on any free web host with FTP access and then signing up for BlogVault’s free 7-day trial.
Restoring a Backup
Restoring a backup follows pretty much the same steps as migrating your website but you don't have to input your new site’s URL or new host credentials.
Basically, you just need to enter your site’s FTP details, choose the folder where your WordPress site is installed.
Then select which backup file you want to use for recovery, click on Restore and wait for the service to restore the chosen backup to your site.
Testing a Backup
Sometimes, it is possible that a backup gets corrupted during the backup process. When you restore such a backup file, you could end up with a non-functioning WordPress site.
BlogVault has a Test Restore feature that allows you to preview what your site will look like when after restoring a certain backup file.
You can test a backup file by clicking the number of your backups and selecting which backup you want to test.
Once you've found the backup version you want to test, you can start the Test Restore by clicking the "Test Restore" function, as shown below.

When you perform a test restore, what happens is that BlogVault will create a temporary replica of your site on their server using the backup file you chose for testing.

Once the test restoration has finished, you can view the test site and check whether everything looks ok or not. You can even log in to the test site's WordPress dashboard, install new plugins, and anything else just like this is your live site.
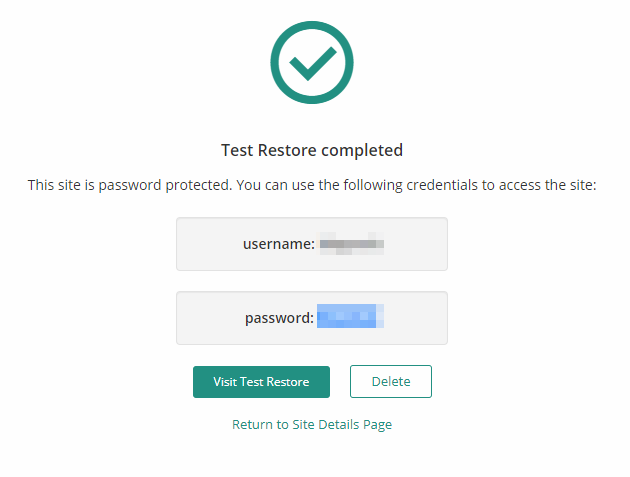
The test restore site is protected with Basic HTTP Authentication. You can see your credentials after the test restore is complete.
Securing Your Website
Aside from keeping backups of your site, BlogVault also comes with powerful security features.
From your BlogVault site’s dashboard, clicking on the right arrow in the Security section brings you to the security page which displays your site’s current security status.
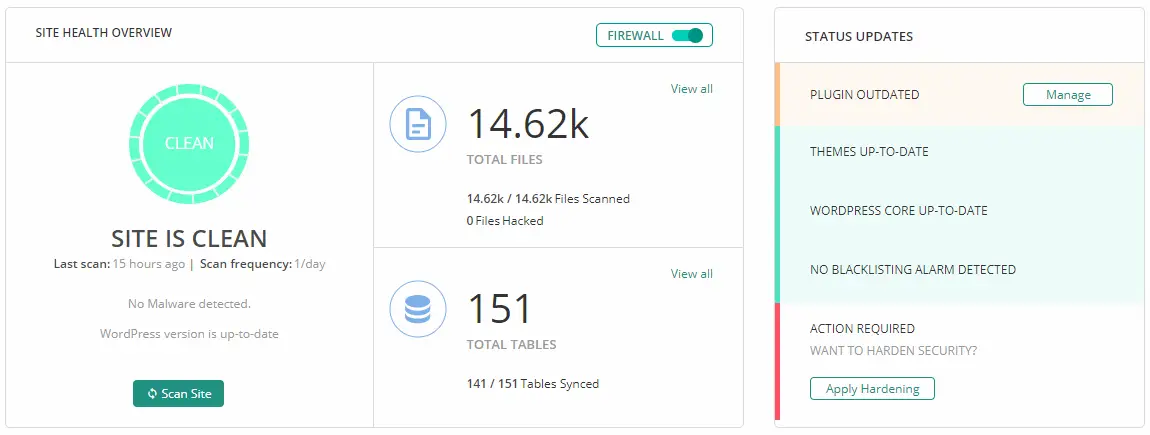
It will notify you if there are any outdated themes or plugins, or if WordPress core is missing any updates.
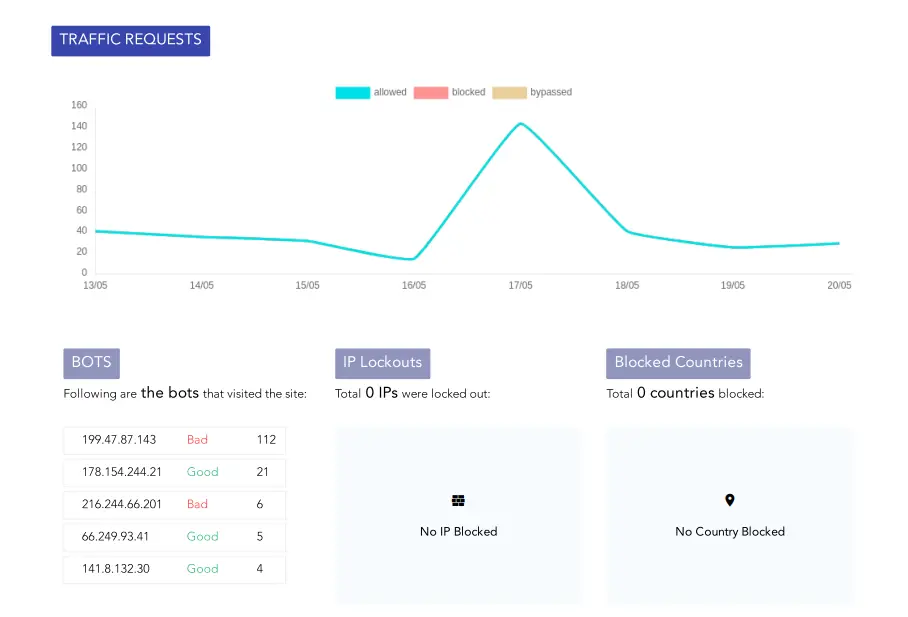
It will also display all admin logins of the past 14 days.
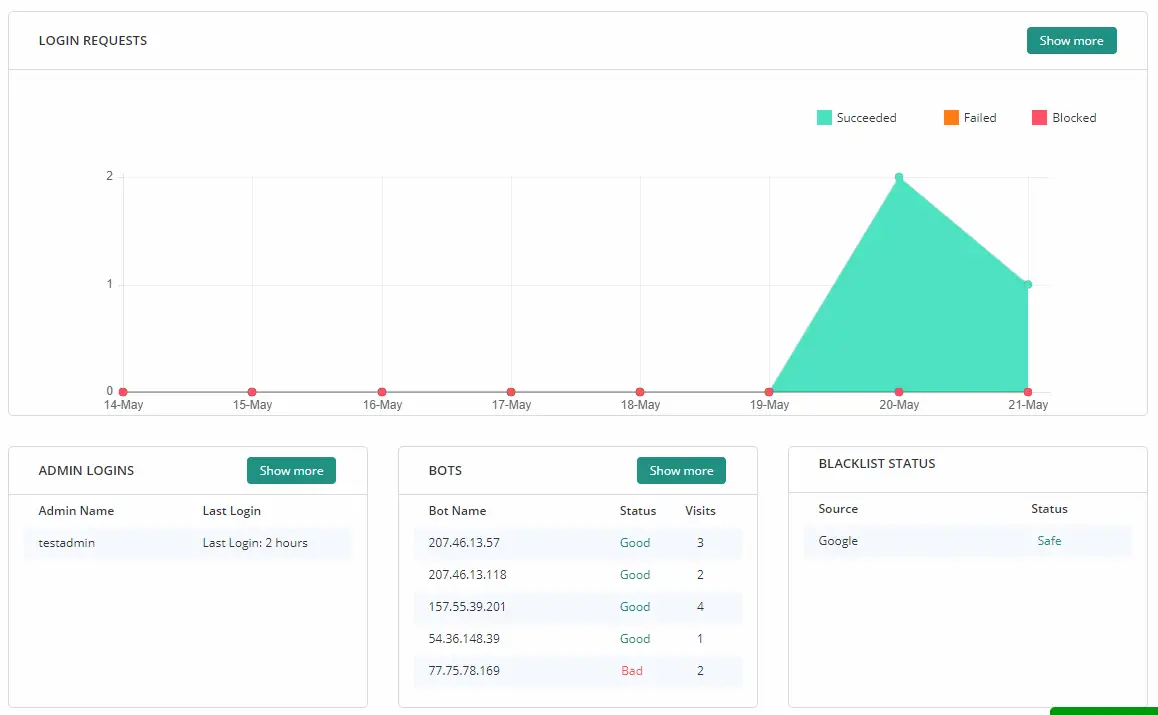
There’s also a list of bots that visited your site. BlogVault advises whether these are good or bad bots and whether your site is blacklisted on a particular search engine or not.
Firewalls and Hardening
Directly on the Security page, you can enable or disable the Firewall and Hardening options.

Turning on the firewall is done through a simple flick of a switch. If you want to see more data coming from the firewall, you can do so by selecting the available options in the firewall section located in the site’s dashboard.
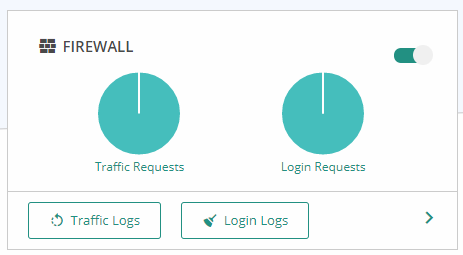
You can view traffic logs and what was allowed by the firewall and what was blocked.
You can also check who logged in and logged out of your WordPress site, their IP address, the time of access, and other details.
Hardening is an advanced security feature that requires some intermediate tinkering to further lock down your site’s security.
If you want to enable it, click on Apply Hardening on the right side of the screen.

Clicking on that brings you to a new page where you can select which hardening features you want to enable.
Specifically, you can enable or disable the following settings:
- Block PHP Execution in untrusted folders
- Disable the files editor (the one where you can edit your theme and plugin files)
- Block plugin and theme installation
- Change security keys
- Reset all passwords
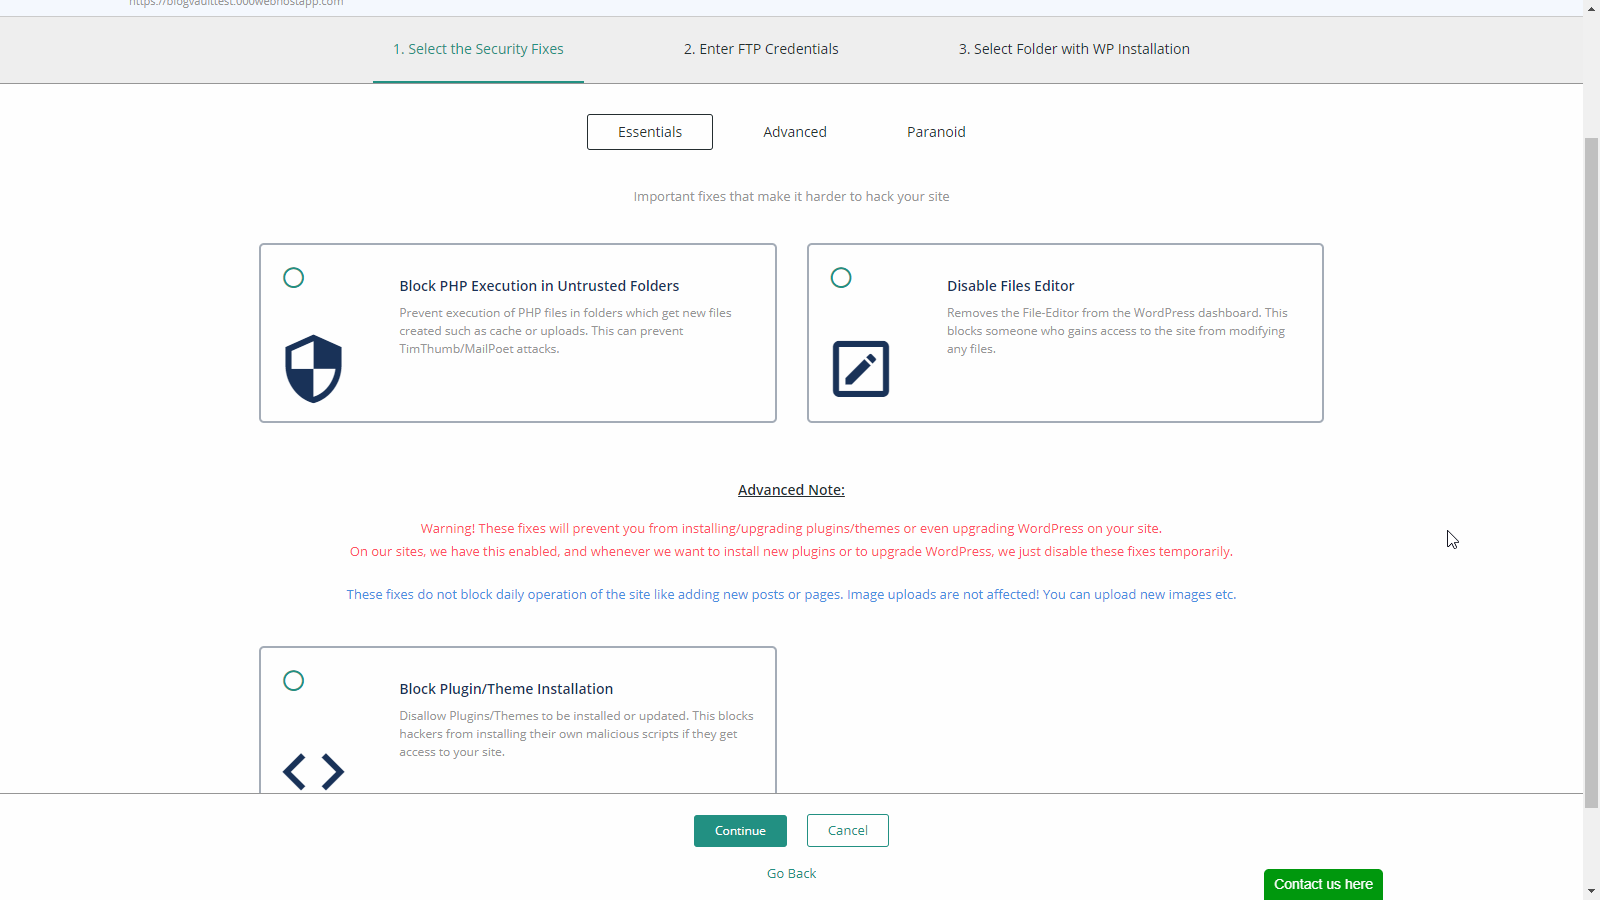
You’ll need to enter your FTP details for BlogVault to apply any of these security fixes.
Managing Plugins and Themes
You can access the plugins and themes sections from the BlogVault dashboard. You can see how many themes and plugins are installed, which ones are active and inactive, their current version and so on.
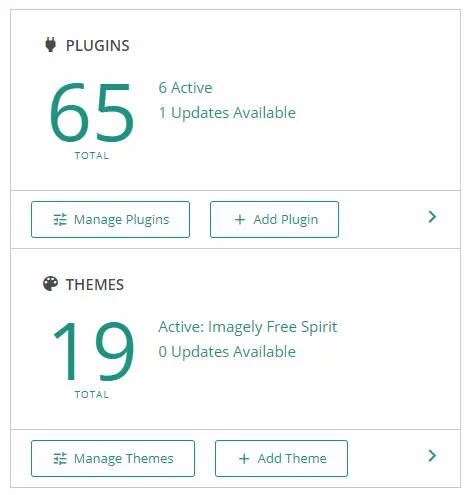
You can directly manage and add themes and plugins to your site through BlogVault’s dashboard.
There's no need to login directly to the WordPress dashboard to perform such updates.
This is a very useful feature and a massive time-saver for those who manage several sites simultaneously.
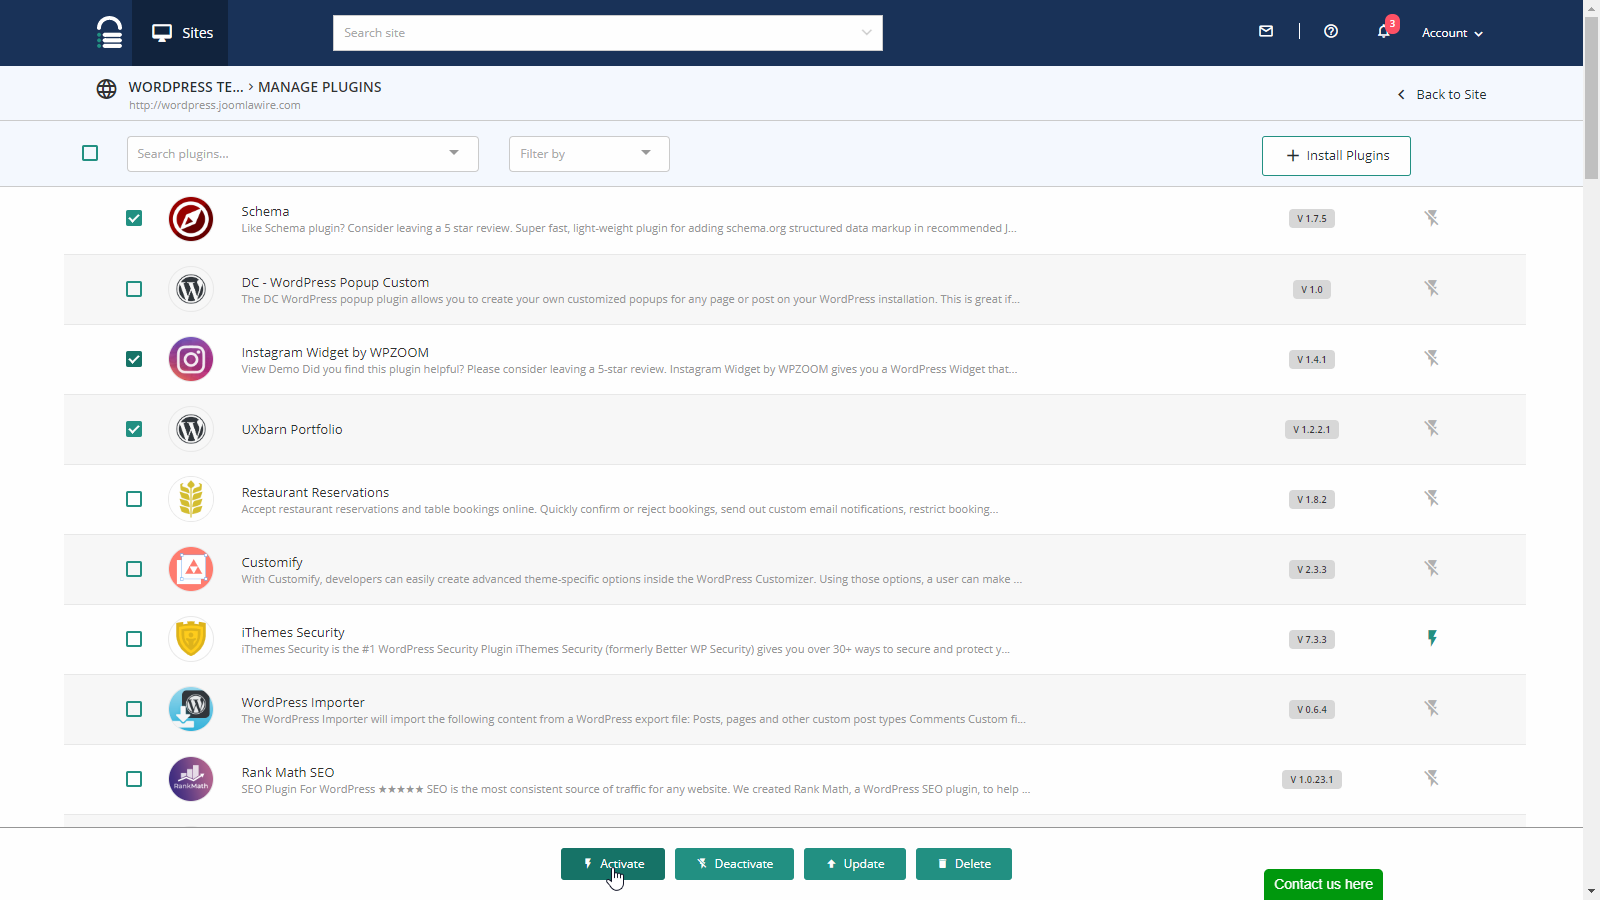
The image above shows BlogVault’s plugin manager. You can select a plugin by clicking the checkbox next to it.
Once you select at least one plugin, you can see additional options at the bottom of the page, allowing you to activate, deactivate, update, or delete the selected plugin(s).
This also applies to theme management.
User Management
Like plugins and themes, you can also manage your WordPress users directly from BlogVault.

You’ll be able to see how many users are currently present on your site or multisite network.
In the case of a multisite network, it shows the total number of all users in your multisite network, but you can only edit and access users of the specific site connected to BlogVault.
Clicking the Manage Users button displays a list of all accessible users.
You can edit them just like you would inside the WordPress dashboard. You can edit their role, change their password, or remove them completely from the site.

You can also add new users by pressing that green Add User button at the upper right corner.
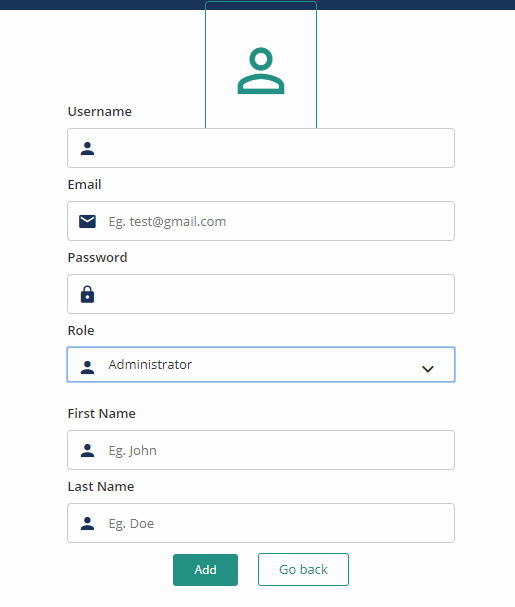
Add users by setting a username, email, password, role, first and last name.
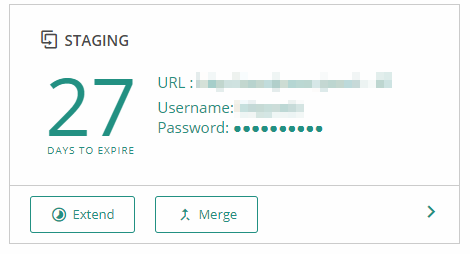
Create, Manage and Merge a Staging Site
A staging site helps you test changes and new features before pushing them to your live site.
This will help you avoid any possible conflicts or unexpected errors that may result in website downtime or broken features.
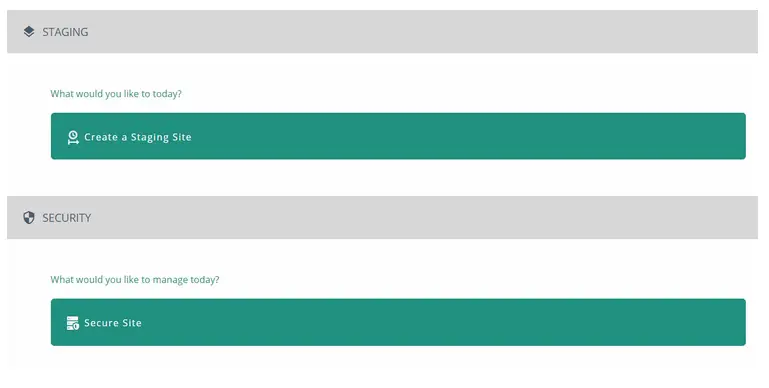
Creating a staging site is fairly simple.
Click on the Add Staging site in the site dashboard and you’ll be taken to a screen that allows you to choose which backup and PHP version to use.
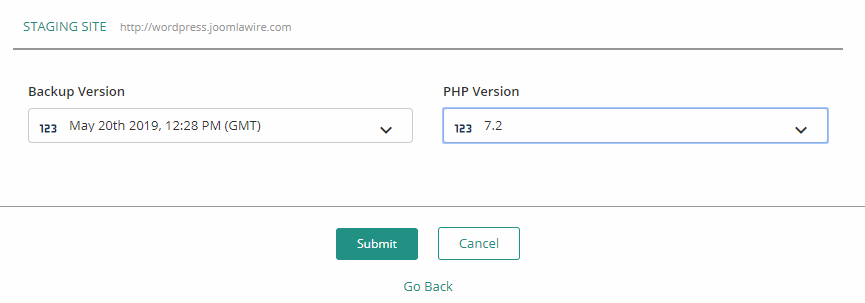
Once you’ve selected which backup file and PHP version to use, your staging site will be created.
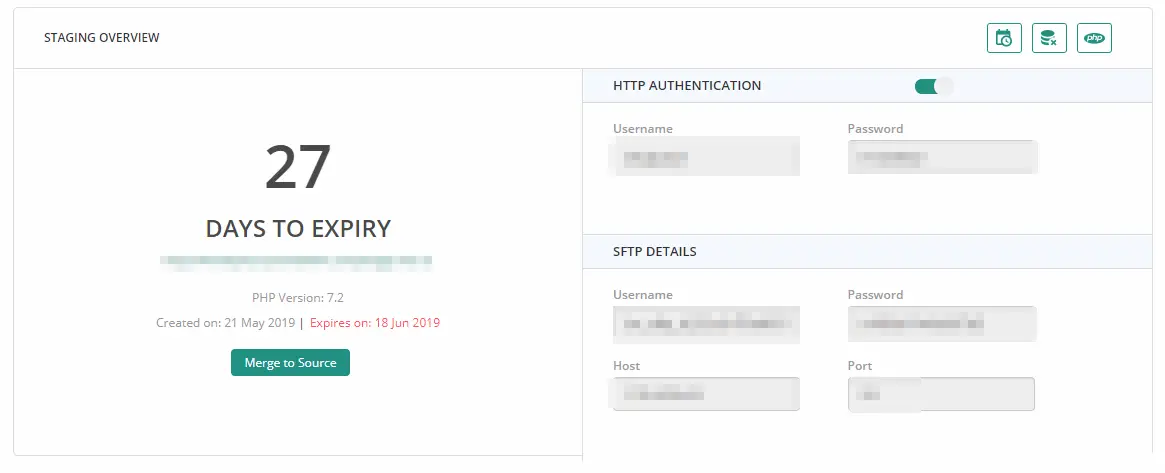
Of course, it will have its own custom URL but it will mimic your website’s appearance, content, and settings based on the backup version you selected.
Staging sites will expire after a certain amount of time, but you can extend the expiration time by 14 days if you want to by clicking on the Extend button on the site’s dashboard under the Staging section.
The staging site is also protected by HTTP Basic Authentication to prevent crawlers or user access from unauthorized access.
Once the staging site is created, you’ll be shown a username and password that you can use to access it. Once you’ve logged in via HTTP auth, you then can log in to your staging site using the same WordPress credentials as your live site.
You can disable HTTP auth if you want by going to the staging site’s settings.
Be careful if you disable password protection. This means that crawlers such as Google might discover the site and crawl, wreaking havoc on your SEO.
Anybody would be able to access the staging site if the password-protection is disabled.
You can now perform any change you need in your staging site and view the results.
Changes to the staging site will never affect your live site - until you confirm that you want to apply them to the live site.
When you want to push the changes you made on your staging site to your live site, you can do so by clicking Merge on the site’s dashboard under the Staging section.
Once you do that, BlogVault will initiate a sync and compare the staging site and the live site. It will then display the differences in terms of files and database and gives you the option to choose whether to merge them or not.

After you’ve chosen which files and database tables you want to push to your live site, you’ll be prompted to enter your live site’s FTP credentials.
Once you’ve entered the FTP details, you’ll also need to select the folder where your live WordPress site is installed.
Once this is done, the service will start merging the changes from your staging site to your live site.
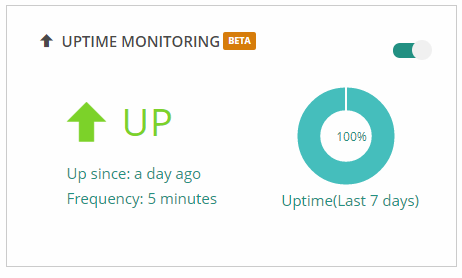
Performance, Uptime Monitoring and Reporting
Finally, BlogVault allows you to view your site’s performance, check its uptime, and generate a report about your site’s status for a specific period of time.
For performance, you can view your site’s PageSpeed and YSlow score along with detailed information about your site’s performance.
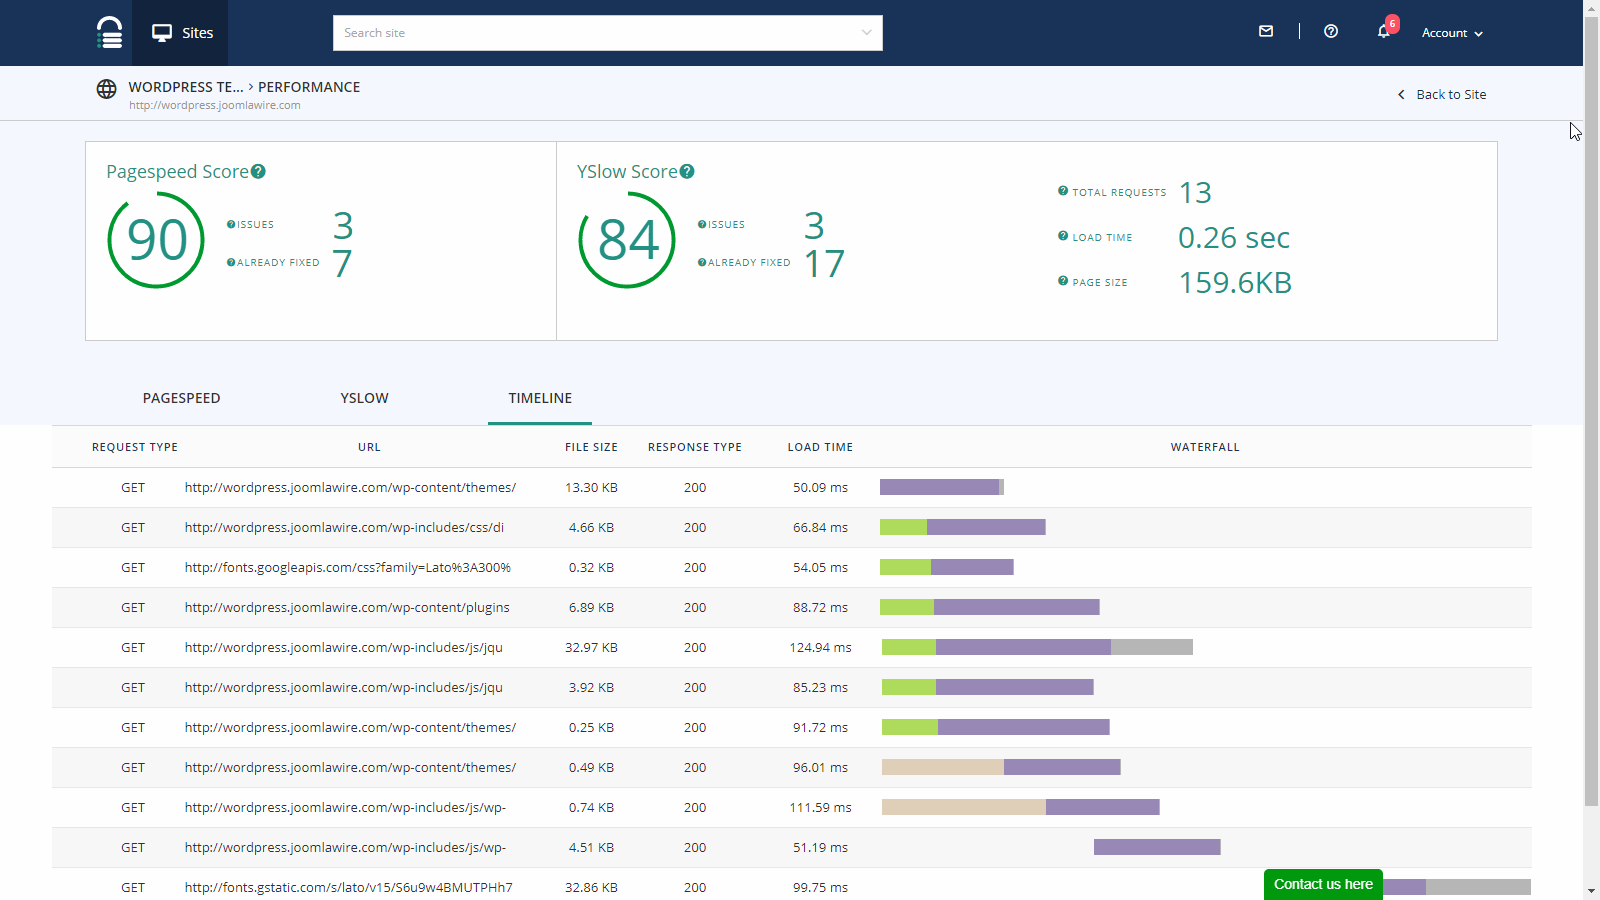
Uptime monitoring displays an uptime graph showing your website’s uptime status over time.
Finally, the Generate Reports allow you to set a schedule for report generation, generate a new report, and access any previously generated reports.
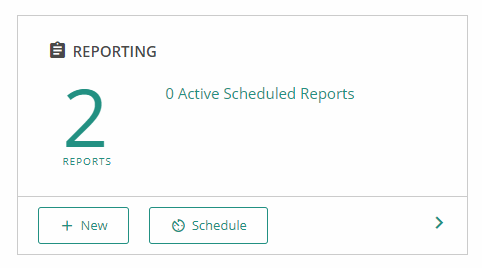
When you generate a report, BlogVault creates a PDF file containing stats about your site within a (configurable) time period.
The PDF will contain reports about the site’s traffic, active plugins and themes, what new plugins and themes were installed, the ones that were removed, a record of logins, logouts, and other details.
Below is a page from a sample report generated by the BlogVault reporting feature.
And there you have it!
That was quite an exhaustive list of what BlogVault has to offer and how to use each of these features.
Pros and Cons of BlogVault
Now that you’ve seen the entirety of BlogVault, let’s dig a little deeper into its pros and cons. We've already seen some of the pros and cons section at the beginning of the article but let’s discuss them a bit more in detail here.
Pros
There are some significant highlights of using BlogVault:
- It's extremely easy to set up.
- Once you’ve installed the plugin to your site and added it to your BlogVault account, there is literally nothing you need to do if you only want regular backups.
- If you need a little more customization or if you want fine-grained control, then you have plenty of options and settings to play with.
- Its migration feature works flawlessly with any kind of web host and requires very little input from you.
- All you need to do is to provide FTP credentials and select where WordPress is installed and everything will be taken care of for you - no matter if you’re doing a restore or a migration.
- The processes are mostly similar and straightforward.
Cons
There are also some downsides to it:
- It needs FTP to be set up on your web hosting and your FTP credentials. This is usually not a problem at all.
- Another possible downside of BlogVault is pricing. For a total beginner, it can get somewhat pricey, even on its lowest-tier plan. Of course, once really can't put a price on peace-of-mind and loss of business in case of website failure.
We do believe that BlogVault’s pros still heavily outweigh its cons.
BlogVault Pricing
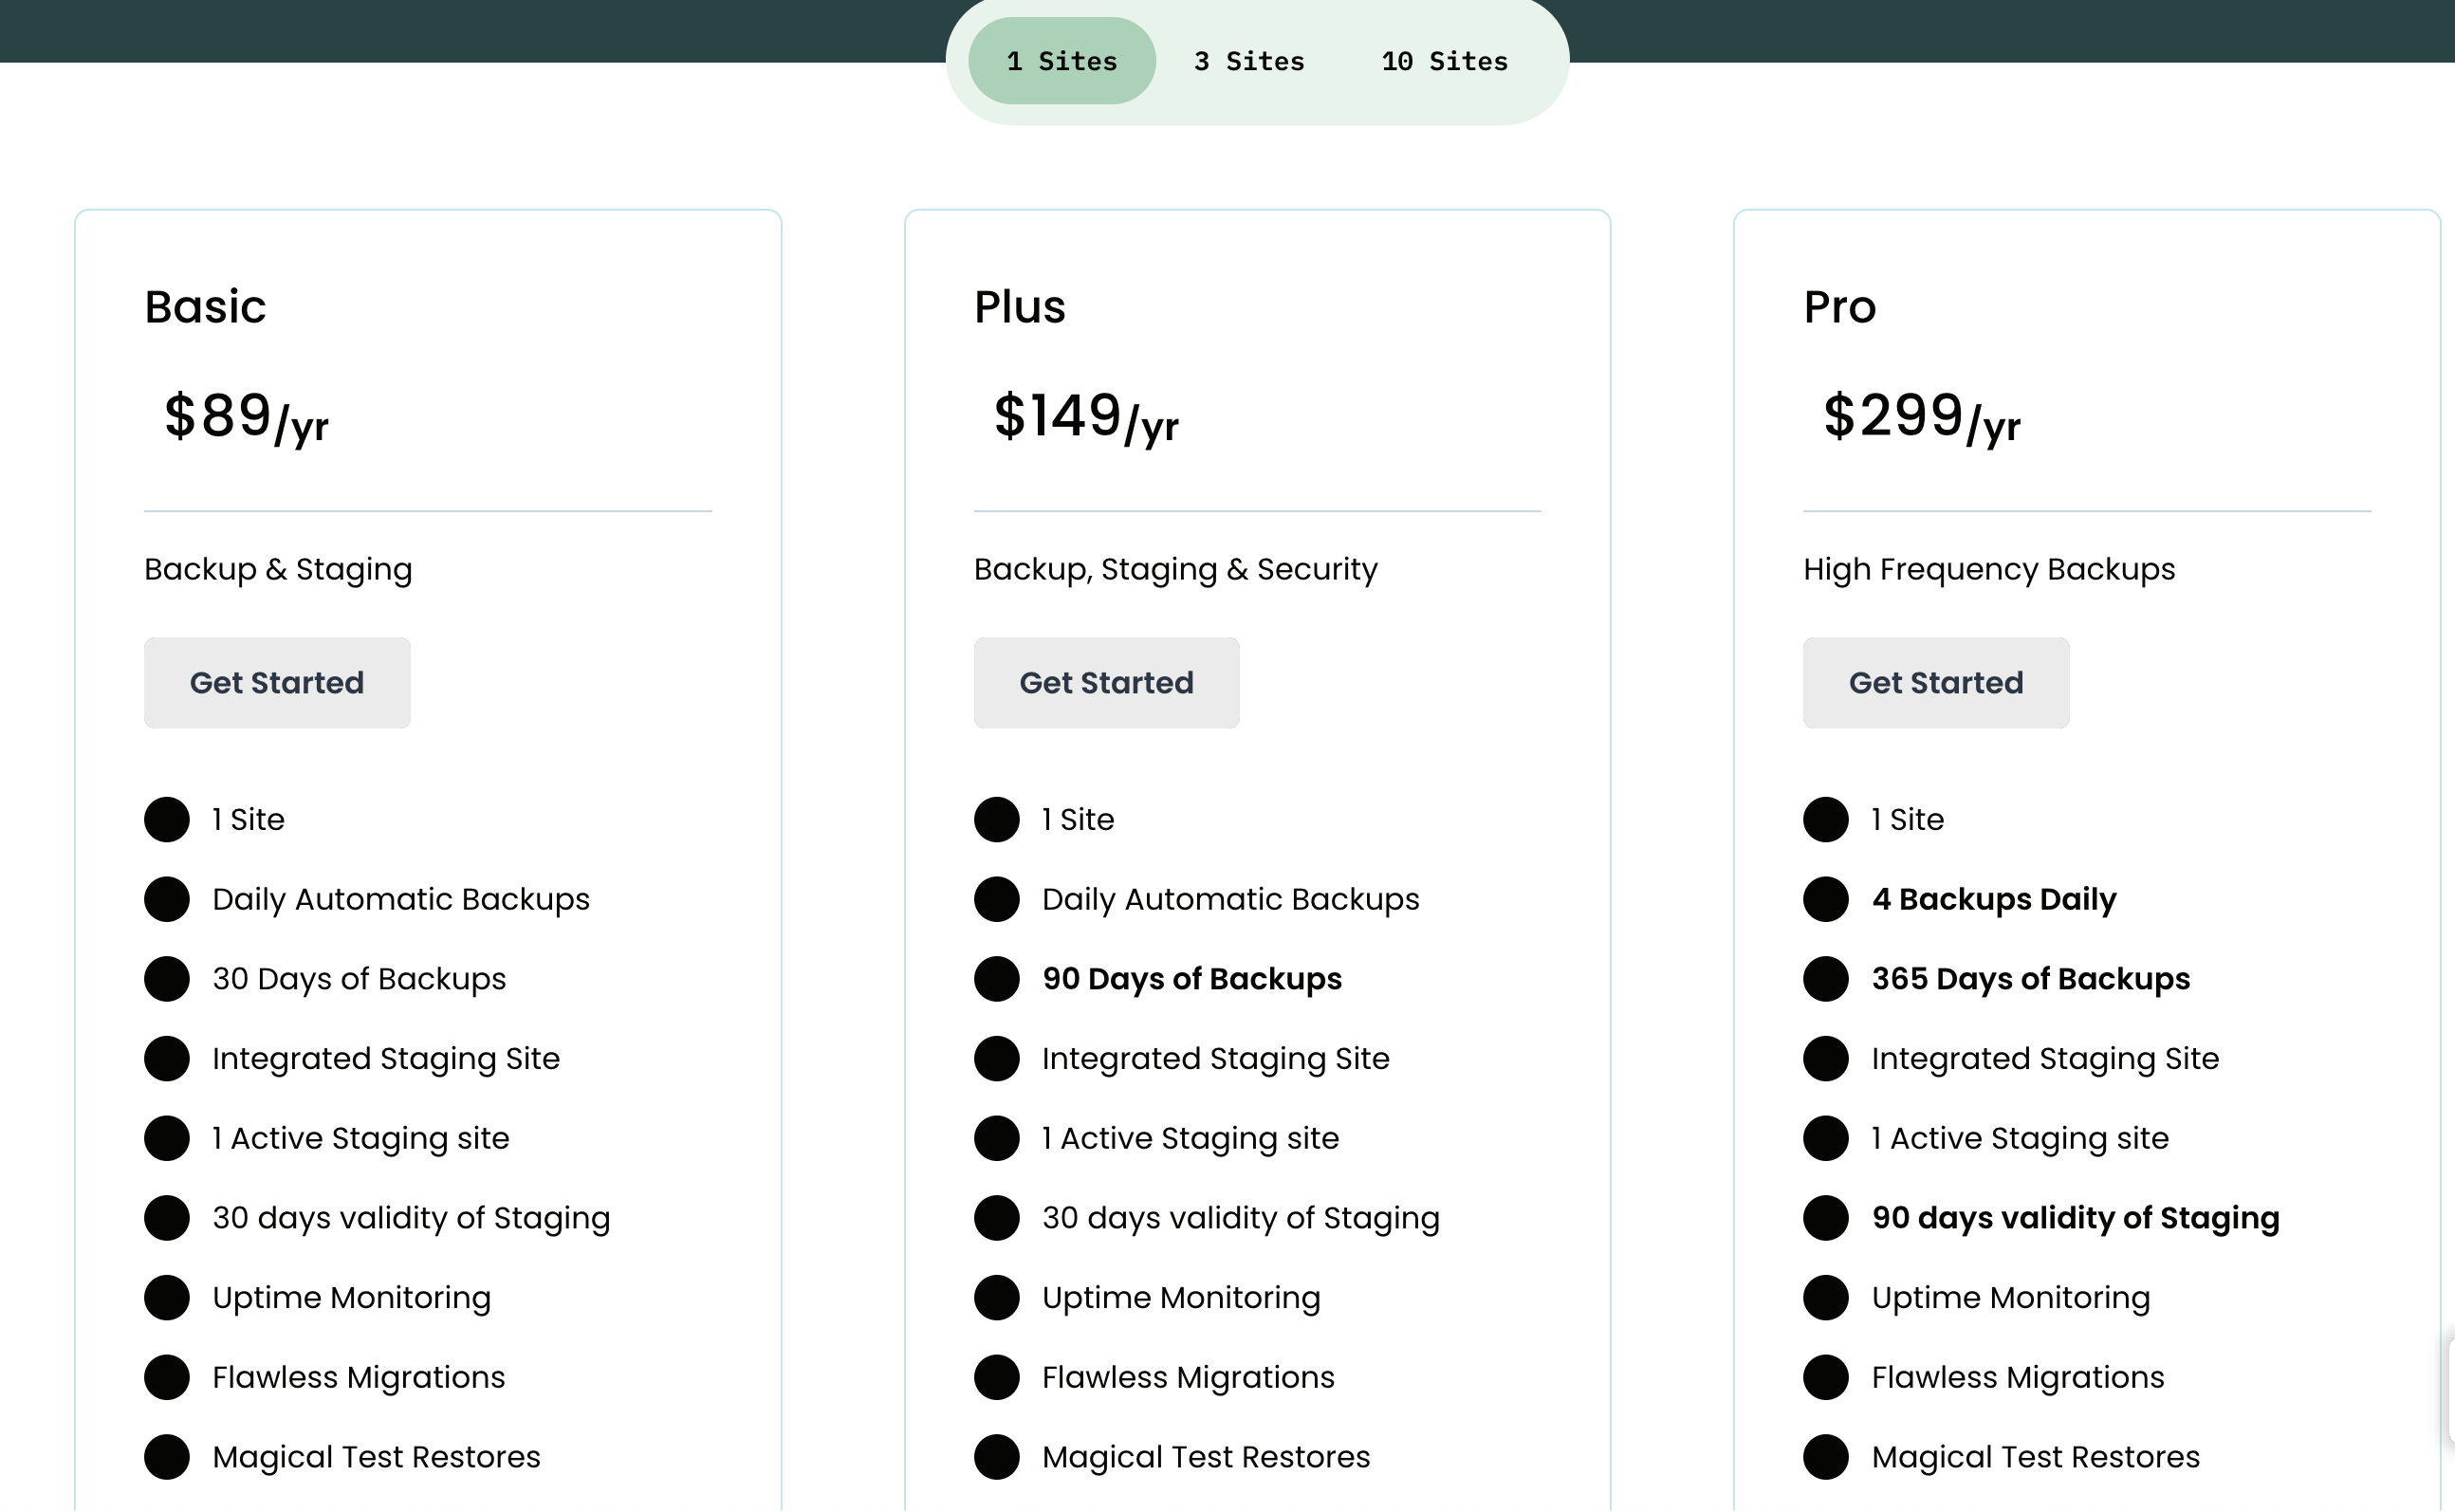
BlogVault comes in 3 different license options for different numbers of sites (1 site, 3 sites or 10 sites), each of them subdivided into three plans (Basic, Plus and Pro).
The difference between the options is the number of sites that you can add to your BlogVault account, together with the number of days the backups are stored for and how many daily backups are taken.
For each license option, you can choose between Basic, Plus and Pro. All basic features are available for all plans.
- Basic kepps backups for 30 days and Plus plans keep backups for up to 90 days. The Pro plan keeps your backups for 1 year (365 days).
- Basic and Plus plans’ automatic backups run on a daily basis. Pro plan, on the other hand, can backup your site 4 times every day.
- If you want WooCommerce backups, you need a Pro plan. The Basic and Plus plans don't have WooCommerce backup support.
Keep in mind that the above list is not exhaustive.
For a full comparison, visit BlogVault’s pricing page. If you are an agency that has more sites to backup, they have custom plans they can create for you.
BlogVault Coupons
At Collectiveray, we usually partner with vendors to offer a good discount to our readers, click below to use our built-in BlogVault coupon.
Click here for the lowest price on BlogVault in May 2026
Testimonials
It's not just who find BlogVault a good service, plenty of other users love the features offered by BlogVault.
There are tons of reviews online and on YouTube describing how great BlogVault is.
You’ve seen in our BlogVault review how flawlessly BlogVault works even on a free web hosting package - which you can easily replicate for yourself if you want to experience this yourself.
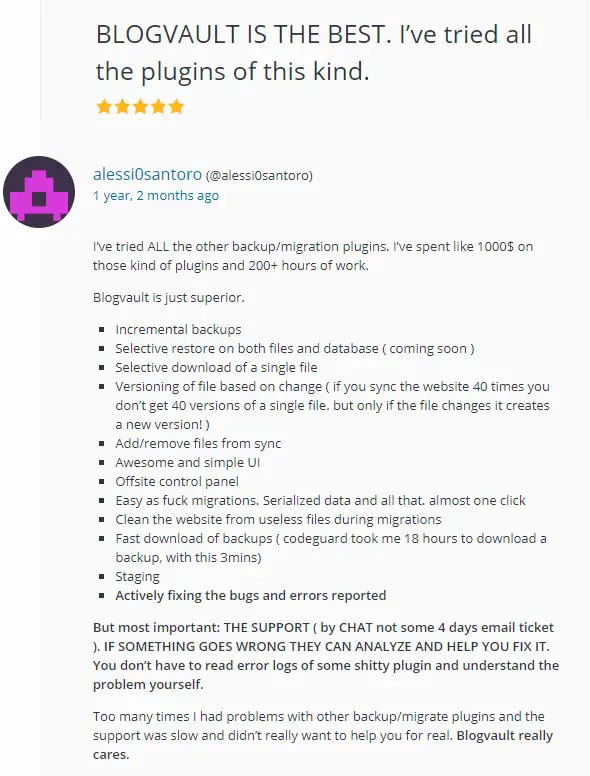
Let's see a few of the comments people and reviews people have about BlogVault, taken from the WordPress repository itself:
I’ve tried ALL the other backup/migration plugins. I’ve spent like 1000$ on those kinds of plugins and 200+ hours of work.
BlogVault is just superior. - alessi0santoro
This platform has proved to be invaluable to me with the constant updates to WordPress and theme frameworks. I've tried a few other options for staging and found BlogVault to be the easiest to manage and migrate. Support is always fast and helpful. I highly recommend BlogVault. - michasig
It's a lifesaver, I couldn't run my business without it. Site migration is a breeze now and knowing everything is safely backed up and secure means I can sleep at night. Who doesn't want one less thing to worry about?! - nicolamitchell
You can check them out yourself here.
Alternatives to BlogVault
While BlogVault is currently among the best backup solution for WordPress, there are still a few good choices out there.
Since WordPress is all about freedom, you’re free to choose from other excellent backup plugins as you wish.
Here are some great alternatives to BlogVault:
- BackupBuddy - Offers a multitude of backup features such as real-time backups, fine-grained scheduling control, and more. Like BlogVault, is also offers site migration and staging sites. Furthermore, it has a tool that allows you to replace your URLs when you migrate a site to a new host as well as a tool to replace text in your database.
- UpdraftPlus - Currently the most popular backup plugin for WordPress, because it is free, UpdraftPlus is backed by a knowledgeable team of experts. It has support for on-demand and scheduled backups and allows you to upload your backups directly to a number of cloud storage services. They also have a staging site called Updraft Clone. It’s free, but there’s a premium version that enables incremental backups, multisite compatibility, backup of non-WP files, and more.
- VaultPress - Part of the JetPack plugin and developed by Automattic, the company behind WordPress, VaultPress is another excellent alternative to BlogVault. It offers both daily and real-time backup solution and other features that can be found on BlogVault. You’ll need a JetPack subscription to take advantage of VaultPress, however, and you’ll have to pay per site since there are no bundles or packages.
While there are plenty of other backup solutions out there, these three are among the best that can rival BlogVault in terms of features and pricing.
BlogVault Frequently Asked Questions
How you back up a WordPress site?
The best way to back up a WordPress site is by using a dedicated backup plugin or service such as BlogVault. Besides backing up your website, such a service will keep old copies of your site so that you can restore to any backup point up to 1 year ago. If you want to perform a backup manually, you'll need to create an archive will all of the existing files in the WordPress folder and a full export of the database associated with the current website. For large sites, manual backups can get complicated very quickly and are not very reliable.
How do you restore a WordPress site?
Restoring a WordPress site with BlogVault is easy. You simply select a backup file, provide FTP credentials and the restore is done automatically. If you want to restore a WordPress site manually, you'll need to remove all existing files and replace all files with the files from your backup. This also applies to the SQL database. You need to remove all the tables and import the SQL dump you have from your backup.
What is a staging site?
A staging site is a true copy of your website that allows you to test any changes before applying them to your live website. This helps identify any issues that could result if you had to perform the changes on the live website. With BlogVault, you can create a staging site, test and make sure everything works well, then apply to changes to your live site automatically once you confirm that everything works ok on the staging site.
Is BlogVault legit?
Yes, BlogVault is a legit service and plugin which can both backup your website and keep it safe against security attacks or other problems. It is prices quite fairly for the features it offers and is powered by a reliable company with trusted partnerships.
BlogVault Review: Final Verdict
BlogVault is probably the best, if not the best backup solution for WordPress.
Its backup, restore and migration feature are one of the best and easiest to use in the market today, and its valuable developer tools, monitoring and site control help you keep your WordPress site up and running at all times.
For those who manage multiple client websites, BlogVault is an excellent and good value choice to make sure all of the sites you immune from severe problems, downtime, failures, or any other problems that could prove to be catastrophic and very expensive to repair without proper backups disasters.