
Online learning has really taken off. Thousands of courses are now being hosted online either by established educational institutions or newer, fresher online sources. Whatever the source, to host your own courses, you need some kind of LMS, Learning Management System. As Teachable is one of the most established LMS out there, we thought we would not only review it, but create the ultimate guide of how to create your own online course.
We have used Teachable for a few months now and we have found it extremely useful and an essential tool for our business. The system is logical, well designed, feature rich and makes short work of putting together a course. As long as you have your course materials all set up, you could theoretically be accepting students within a couple of hours of signing up.
That should tell you all you need to know.
In case it doesn’t, here is a more in-depth review of Teachable.
Summary of Teachable
|
Price |
Free $0 Basic $39/month Pro $119/month Pro+ $199/month Business $499/month |
|
Free Version |
Yes |
|
What We Liked |
You can be selling within hours. |
|
Easy for anyone with basic web skills to set up. |
|
|
Fully hosted so no web hosting required. |
|
|
Integration tools offer genuine value. |
|
|
The platform is stable and responsive for admins and users. |
|
|
What We Didn't Like |
Long payout times on free plan. |
|
|
High transaction fees on lowest paid plan. |
|
|
100% white labelling is not possible |
|
|
Cannot customise most of your course. |
|
Basic site builder. |
|
|
|
No advanced quiz features. |
|
Ease of use |
3.5/5 |
|
Reliability |
5/5 |
|
Support |
4/5 |
|
Value |
4.5/5 |
|
Overall |
4.5/5 |
|
Website |

What is Teachable?
Teachable is an online training LMS platform that enables you to create and sell your knowledge in the form on training courses. It’s based in the cloud and is a complete platform that includes everything you need to host, manage and sell online courses.
Teachable is not a WordPress plugin. It isn’t a website addon. It’s a fully operational learning platform.
A bit like Shopify, it’s a self-sustaining platform that contains all the ingredients necessary to sell courses with the minimum of fuss. All you need is your course material, an overall plan of how everything fits together and the rest can be done with Teachable.
By the way, if you want to see other reviews and article like this one, just click on Web Design > Guides in the menu above.
Why use it?
As we alluded to already, the USP of Teachable is that you can have a training course published in under an hour ready to sell. As long as you have course materials ready to go, the rest is exceptionally straightforward. If you’re more interested in designing those courses for sale and less interested in the minutiae of managing an online school, Teachable makes it easy.
There are lots of extra functions to support your course but the core task of getting everything ordered and published is a breeze.
Truth be told, one of the fastest ways to start a business, particularly one which lives completely online and can working passively, is by deploying a course.
Features of Teachable
|
Features on paid plans |
|
|
Building courses |
|
|
Video Hosting |
Yes |
|
Content Hosting |
Yes |
|
Add file to course |
Yes |
|
Add text to course |
Yes |
|
Add quiz to course |
Yes |
|
Add video to course |
Yes |
|
Add comments to course |
Yes |
|
Upload files to course |
Yes |
|
Design |
|
|
Templates |
No (Theme editor) |
|
Drop and drag builder |
Yes |
|
Change Colours |
Yes |
|
Change Fonts |
Yes |
|
Add own logo |
Yes |
|
Remove branding/white labelling |
Yes (on paid plans) |
|
Control header and footer navigation |
Yes |
|
Manage home page content |
Yes |
|
Edit Basket |
Yes |
|
Edit Checkout |
Yes |
|
Edit Thank You Page |
Yes |
|
Edit email notifications |
Yes |
|
Use Own domain |
Yes |
|
Edit HTML and CSS |
Yes |
|
Modify languages |
|
|
Marketing and Sales |
|
|
Offer free trials |
No |
|
Free course |
Yes |
|
Monthly or Annual Billing |
Yes |
|
One Time Purchase |
Yes |
|
Payment Plan |
Yes |
|
Bundles courses |
Yes |
|
Upsell courses |
Yes |
|
Coupon and promotion codes |
Yes |
|
Affiliate marketing |
Yes |
|
Built in email marketing |
Yes |
|
Integration with 3rd party email marketing |
Yes, Mailchimp, ConvertKit |
|
Zapier Integration |
Yes |
|
SEO |
Limited (no page title or meta description control on blog posts) |
|
3rd party hosting |
No hosted on Teachable |
|
Landing/Sales Pages built in |
Yes |
|
Add Pages |
Yes |
|
Add Blog |
Yes |
|
XML Sitemap |
No |
|
Robots.txt |
No |
|
No Index pages |
No |
|
Checkout and Payment |
|
|
Sell in all currencies |
Yes |
|
Paid immediately |
Yes but only on paid plans |
|
Credit and debit cards |
Yes |
|
Paypal |
Yes |
|
Stripe |
Yes |
|
Percentage of sales taken |
0% on paid plans, |
|
Hosting & Security |
|
|
Cloud hosting |
Yes |
|
Backup |
Yes |
|
Uptime % |
99.9% |
|
Updates |
Yes |
|
SSL |
Yes |
|
Student Management |
|
|
Customer CRM |
Yes |
|
Quizzes |
Yes |
|
Forms |
No |
|
Text |
Yes |
|
Surveys |
No |
|
Downloads |
Yes |
|
Discussions/Comments |
Yes |
|
Storyline & Captivate |
No |
|
Track progress |
Yes |
|
Completion Certificate |
Yes |
|
Schedule Courses |
Yes |
|
Set launch dates |
Yes |
|
Student feedback |
Yes |
|
Process refunds |
Yes |
User Experience
Teachable is a very accessible platform that is logical enough to use. It is a little dated though. The interface hasn’t changed in 4 years. That’s not necessarily a bad thing, just that we are used to apps being updated much more frequently.
Overall, creating a course in Teachable is a lengthy but fairly straightforward process. Where it’s strength lies is in breaking the process down into bitesize chunks and allowing you to add and remove course elements at will. Where it’s weaknesses lie is in workflow.
On some course platforms, there is a linear flow to creating a course. You create the framework, add lectures, complete the lectures with course material, add videos and supplementary documents, add quizzes, certifications and you’re good to go. It all flows from one to the other until you have a complete course ready to publish.
In Teachable, while there is a flow to the navigation, there is a lot of back and forth between course elements to put something together. For example, you create a school, create a course within that school and have to upload a single lecture, add its components and wait until its published before you can add another.
Setting payment methods and adding certifications also includes a lot of back and forth between sections. So while the overall scheme works, there isn’t the workflow to course creation that you get in other platforms. You are going to get confused navigating between the school settings and course admin area. It is inevitable.
Those criticisms aside, Teachable is an all-inclusive platform for launching eLearning courses. It includes everything you need to build a course. It offers clear explanations as to what each section does and what each setting changes. Even new users will quickly be able to get to grips with course building. Once you get the hang of navigation and learn where everything is of course.
The green bar at the top of the dashboard that tells you what still needs to be done in order to publish a course will become very familiar!
Getting Started
Like most platforms, Teachable rewards patience and practice. The mechanics of putting a course together is very straightforward but the devil is in the detail. Hosting your course depends on your having the course materials prepared. This requires you to have written course notes and descriptions, having recorded videos, created certificates and quizzes and have everything ready to be hosted.
This will take a while but is exactly the same for any course hosting platform.
While you are free to set your school up however you like, this is how we did it. Some or all of the following worked for us so feel free to take or leave elements of our method for your own use.
Phone or webcam to record
Use your smartphone or dedicated webcam for filming yourself. If you have a high-quality webcam and standalone microphone, all the better. With streaming being huge now, good quality webcams and microphones are cheaper than ever, but ou can still use a smartphone. When we used an iPhone, the quality came out credibly well - obviously the quality of iPhone cameras these days is super good.

Tripod
Whatever recording medium you use, you will need some kind of tripod unless your camera comes with a stand. We used the Joby GorillaPod for the iPhone. Other tripods for iPhones or other phones are available. They are competitively priced too.
You will need a stable platform to hold your phone or camera while leaving your hands free to perform whatever task you are describing in your course. Even if you have the steadiest hands, using a tripod completely removes camera shake which has a beneficial effect on the end result.
Commlite mini led light
Lighting is something too many tutorials ignore. Get it right and your audience won’t even notice it. Get it wrong and everyone notices it. You can attach this light above the iPhone whilst the phone is attached to the tripod. It is a simple but effective light useful where natural light is not sufficient or in the wrong direction.
Lighting the frame is one of those elements that requires experimentation. Try the light in one position, record something and test. If it doesn’t work, move the light and try again. As we said, get your lighting right and you will never even know it is there.
Write out scripts on Google Docs
You can use any office application to write your course materials and scripts but Google Docs is free and you can collaborate if you need to. You could prepare all of your course materials, descriptions, supplementary information, quizzes and all sorts within Google Docs and simply copy and paste into Teachable.
We wrote our scripts in Google Docs first. This allowed us to prepare in advance what to say and helped us control the timing between narration and action. This timing is critical. Get it wrong and you may waffle to fill empty space or rush to catch up. Neither of which makes for a good instructional video!
You can do yours how you like but we found it easiest to create a table with two columns and many rows. We added the script on one side and the action on the other. That way, getting your timing right is made easier by always knowing what you’re saying at the same time as what you’re doing. It’s a small thing but worked for us.
You can print the script and place it somewhere visible behind the camera or you could use a teleprompter like the professionals.
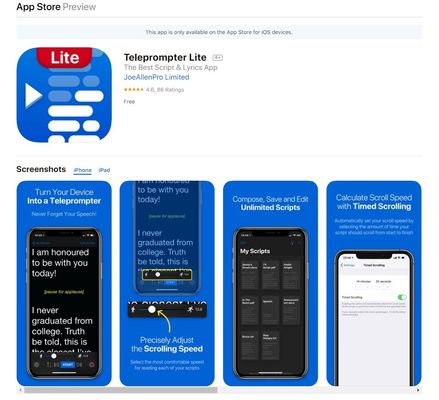
iPhone Teleprompter app
We found an app called Teleprompter Lite that enables you to import your script, record and read your script looking into the phone’s camera. This is how the pros do it on TV and if it is good enough for them, it’s good enough for us!
There are other teleprompter apps but this one worked well enough for our needs.
Edit Videos and Create MP4 files
Once you have recorded your videos, you will need to edit them and perhaps slice and dice them to fit your course. We used Camtasia to edit videos and create MP4 files ready to be uploaded to Teachable. There are other video applications out there if you prefer. As long as you save the finished video in MP4 format, you’re good to go.
How to create a new training course with Teachable
The course creation process in Teachable is mostly logical. There are a couple of foibles that we have mentioned before but if you can use WordPress or Shopify, you’ll be fine here.
There is a specific hierarchy in Teachable. The highest level is the school. This will include all the courses you want to include. You can have multiple schools covering multiple disciplines. Next comes courses. These are where you put your syllabus. You can have as many courses as you like. Within the Course is the Lecture which are the individual lessons.
That hierarchy is:
- School
- Course
- Lecture
- Notes and supplementary information
- Lecture
- Course
You will need to have the higher tier within this hierarchy in place before you can create the dependent element. It’s like building a web page< or online store. It’s logical but you need to know it before you can create the course.
The basic course creation process is a little like this:
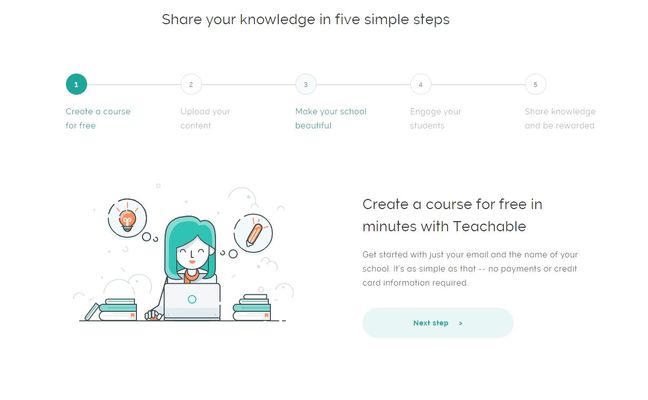
1. Signup and Login into My TeachableU
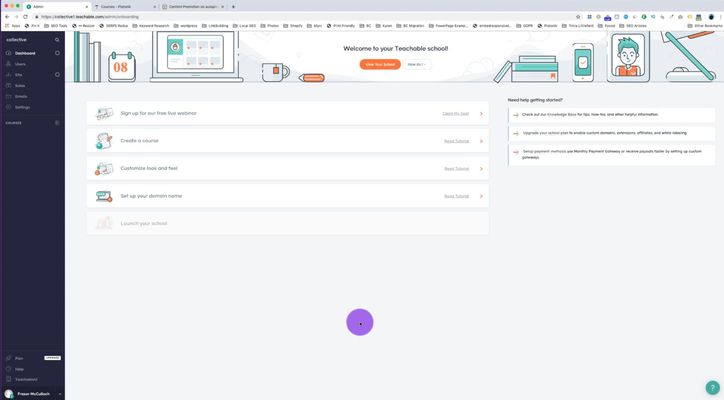
This is the main dashboard where you can see all the schools you own and schools you're enrolled in. You can create new schools, set up your platform settings, manage billing and log out from this dashboard.
TeachableU offers training for the trainer so may be very useful to try before you begin setting up your course. We used a selection of the resources before publishing our own and some of the tips and tutorials are genuinely valuable. Unless you already know how to create and promote online courses, it is well worth spending an hour or two learning about how it all works.
Once you’re done, you can go back to the dashboard and begin.
2. Create New School
Select Create New School from the left menu and give it a name. Select Create to build your school. It is within the school that you build your courses. Within the New School Window, you select the type of course you want to create for easy categorization, set the business settings, set social aspects and select your region.
You can select Enter My School at any time to access your new creation, edit, change it or remove it.
3. Create a new course
You create courses within a school. Select the school you created above and you should see the Create A Course function in the main window. You also have the option to customize the look and feel and set up a domain name.
- Select Create a New Course.
- Give it a name.
- Provide a subtitle.
- Select an author.
- Select Create Course.
From here you can build up a course which will be made up of lectures, videos, notes and supplementary documentation. Depending on how you want to set up your course, you would add multiple lectures and include as much supporting information, quizzes, documentation and resources as you need.
These resources are created through tabs on the Course screen. Content tabs are at the top of the dashboard and the process tabs are at the bottom. It’s a simple but effective way to build a course. Select from the bottom tab, build the content from the top tabs, select the next step along on the bottom and so on.
You can upload videos and documents as required. Select the lesson, add titles, subtitles, quizzes, notes and everything that will make up your course from here. This part has the look and feel of WordPress and works a lot like the blocks feature where you build a page using individual blocks in a given order.
There is a lot to do here but it is logically laid out and won’t take long to master. There are limitations to the builder though. You cannot bulk upload and you have to complete the course and lecture process in order, one after the other until finished. It’s an onerous process but one most LMS have to contend with to one degree or another. It could be more intuitive here but you can get the job done.
4. Pricing your course
Once you have built your first course, you need to set the pricing. It can be free, cost a one-off fee, monthly or annual subscription or you can offer payment plans.
- Select Add a Price from the bottom tab.
- Select free, a one-off fee, monthly, annual subscription or payment plan.
- Set the price and currency.
- Select Add Pricing to add it to your course.
There is no hard and fast rule with pricing. This is where a little competitor analysis would come in useful. Find out what similar courses cost and then price yourself competitively. Either undercut slightly or charge the same while offering more or something truly unique. Whatever works for you.
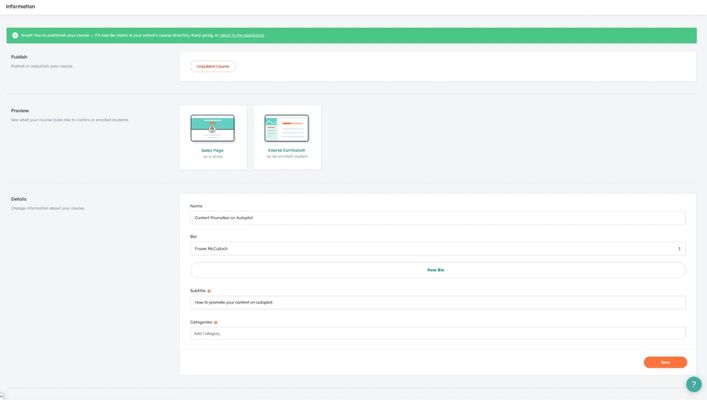
5. Preview your course
Once you have built your course, added lectures and priced the course, you have the option to preview it as a student. This is a very valuable feature as you can try before your customer buys and can fix any errors or omissions before paying customers will notice. It is well worth doing even if it takes valuable time.
Select Preview Course from the Preview section of the Information screen once it has been published. You can preview the sales page and the course curriculum from here too.
6. Customise the look and feel
Before your course is ready to go live, you need to see to any customisations. You should see a green bar at the top of the screen that advises you to check this section out before you publish to live.
- Select Themes from the side menu to access customisations.
- Add a logo, favicon, upload home page image.
- Select font.
- Choose colour palette options or choose your own colours.
- Save your changes.
Fonts are limited to a dozen and you cannot add your own. You can select from unlimited colours though. Select Save when you make a change.
It would have been nice to use a wider range of web fonts or even import Google Fonts but those that are there are good enough.
7. Domain name
You can set the domain name as schoolname.teachable.com or add your own custom domain eg: mycoolschool.com. The Domain menu item on the left of the main dashboard allows you to change the domain as you need.
You will need to set a domain in order to publish the course. Choose the default option if you’re not using a custom URL.
8. Navigation and author bio
The Navigation option on the left menu defines the items on the top and footer of website. This is where you can customise the navigation to suit your course and design the simplest, most logical navigation you can come up with.
The Author Bio section allows you to add an image and a short biography to introduce yourself to your students. Complete an Author Bio for every course author you’re going to use. You can use multiple course authors per course or per lecture.
Finally, you can add thumbnail images for your courses within Information and the Branding section and it is a good idea to do so.
9. High Converting Single Check Out Page
Now your course is almost complete, we should create a sale page for it. You will need to navigate back to your course using the left menu and select the Sales Page. Add your content, images, videos and conversion content to increase the likelihood of uptake.
You can also add a thank you page after sign up from the Pages section. If you’re adding acknowledgement pages, you may as well as links to other courses or upsell extra courses or resources as you see fit.
10. Final course setup of Teachable
Nearly there!
Now you can add coupons or discounts to paid courses, enable commenting, add certificates and set up your payment options.
To add coupons, navigate to your course and select Coupons from the left menu. From here you can create a coupon to add to social media, marketing and outreach to help drive sales. You can create multiple coupons if you use the paid-for versions of Teachable.
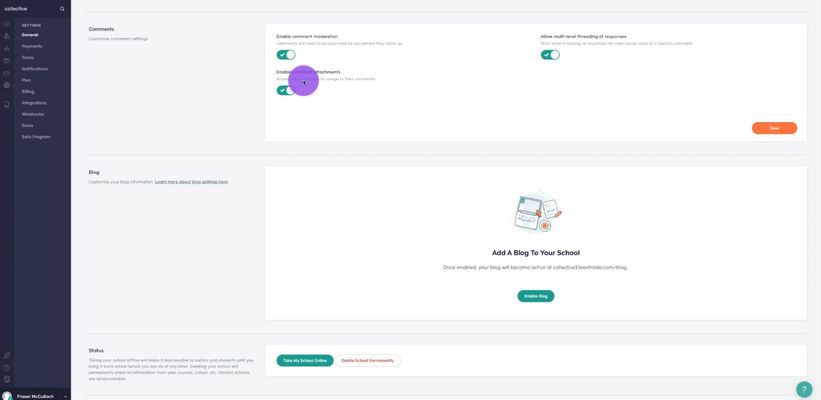
To enable comments, select your course and select General Settings. Toggle comments and moderation on within the Comments section to add engagement to your courses. Comments can be a double-edged sword so consider carefully whether to allow them. There is a discussion forum feature within Teachable which may be a more suitable place for discussion. Only enable discussion if you will have the time to moderate those discussions in a timely manner!
To add course completion certificates, select Certificates at the bottom of the left menu within your course. You again need to be a paying subscriber of Teachable to offer certificates but you can add them in this section if you are.
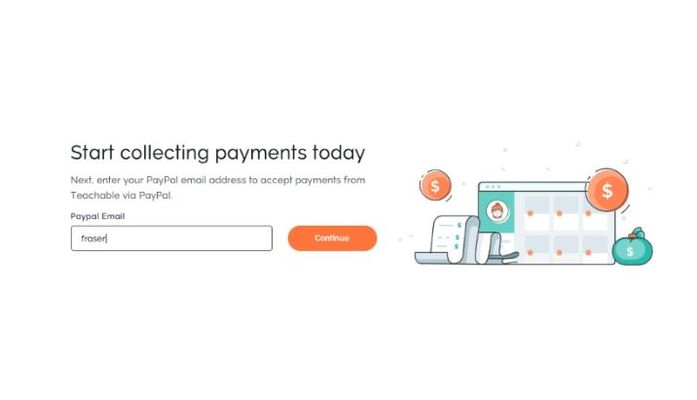
11. Payment options
Once the course has been set up, now is a good time to set up your payment options. This is the final step before you launch your school and go live on Teachable. Here you will need to add a payment method to the course and to Teachable so you get paid. You will also need to configure tax and GDPR compliance too while you’re here.
Adding payment methods is very straightforward.
- Select Payments from the left menu within the course.
- Enter your PayPal address and select Continue.
- Select your tax status, Company or Individual and complete the form.
- Select to enable Teachable BackOffice or not.
- Select to allow students to pay via PayPal on the next screen.
- Add your course type and select Go to Payment Settings.
- Complete your payment details on the next screen. Set it to accept credit cards, PayPal or not and select Save.
You will need to enable Teachable BackOffice to stay compliant with EU VAT and US Tax laws. This is locked behind the paid versions of the platform. You can make your own arrangements with your accountant of course.
Now you can launch your school!
Navigate to your course and you should see the green banner at the top telling you your school isn’t live yet. Select Complete the Remaining Steps text link to proceed. You should be taken back to your course dashboard where you see all the creation elements completed with the green tick.
Select the final section, Launch Your School to go live. Select a Teachable payment plan for your school or the small Free Plan text link at the bottom. That’s your course launched. You should see a confirmation popup telling you your school is live.
Now repeat for as many courses or schools as you’re planning to launch.
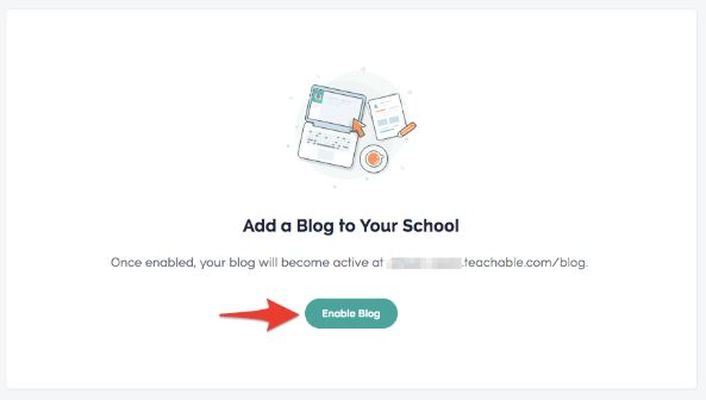
Adding a blog to Teachable
Teachable offers a blog feature to help market your school and increase engagement. It’s a useful feature that is well worth using for some easy SEO and another way to engage with your audience. It’s no WordPress but it is useful enough and should generate interest as long as you post well and often.
- To set up the blog, do this:
- Select Settings and General.
- Select Blog and select Enable Blog.
Your blog comes complete with an RSS feed for those who still use them and will now be accessible from the dashboard.
- Select Site and Blog from the main Teachable dashboard.
- Select New Post to create a post.
- Write your post as you normally would.
- Complete the blog settings to suit your needs.
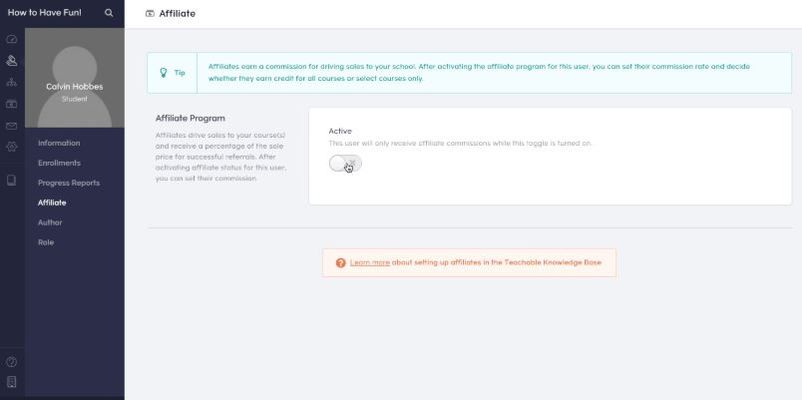
School Affiliates
A neat feature of Teachable is the inclusion of affiliates. This enables you to have others promote your courses in return for a percentage of the course fee. This is only available to premium Teachable users for paid courses but is a useful way to have others do your marketing for you.
You can have as many affiliates as you like for a school. You just have to add them as a User.
- Select User and Students from your Teachable dashboard.
- Add the user if not already registered.
- Select the user and select Affiliate.
- Turn the Affiliate Program on.
You can also have course affiliates as well as school affiliates. The affiliates page on the Teachable website walks you through the entire process.
Integrations
As well as its own features, Teachable integrates with some well-known applications such as Google Analytics, Sumo, Zapier, Mailchimp, ConvertKit and Segment. It works with each of these providing and receiving data from each to deliver a holistic course arrangement.
You control integrations from the Settings menu on your Teachable dashboard. Select the Integrations menu item to integrate a select application with your school. There are also webhooks for unsupported applications if you need them too.
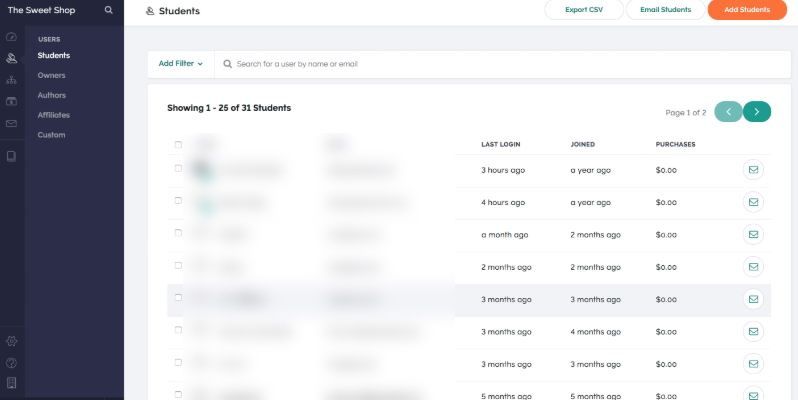
Managing Students
As you would expect from an eLearning platform, there is a powerful student management console that allows you to manage everything about them. Accessed from the Users section of your Teachable dashboard, you can manage everything from name and address to payments and scores.
You can also access student information from within the course itself. Select the course you’re managing and select Students from the left menu to see their details. It will show the students enrolled on the course, when they last logged in and their email address. Select a student to see more details.
![]()
Tracking and Reporting
Key to running a successful course is knowing who is doing what and when. If you are a Teachable Professional Plan subscriber, you have access to the reporting tool that can provide detailed information around your courses, students and revenue.
Unfortunately, most of the reporting functions are locked behind the Professional and Business versions of Teachable. This is a downside of the platform but one that is easily overcome by paying the extra once your school is large enough to justify it.
To access reporting:
- Navigate to the course you want to report on.
- Select Reports from the left menu.
- Work your way through the reporting tool to identify the status of what can be reported.
There is a lot to reporting. It collates student data, completion rate, percentage completions, school composition, lecture completion, video views, quiz scores, leaderboard, engagement and a whole lot more. The reports page on the Teachable website goes into a lot more depth on reporting.
PROs and CONs
As ever, we break down this review into a few bullet points to highlight the pros and cons of the application in question.
PROS
- You can be selling within hours.
- Easy for anyone with basic web skills to set up.
- Fully hosted to no web hosting required.
- Integration tools offer genuine value.
- The platform is stable and responsive for admins and users.
CONS
- Long payout times on free plan.
- High transaction fees on lowest paid plan.
- 100% white labelling is not possible.
- Cannot customize most of your course.
- Basic site builder.
- No advanced quiz features.
Pricing
The fact that Teachable has a free plan works in its favour. The fact it is very limited and makes you wait up to 60 days as an arbitrary limitation does not go in its favour. That said, the prices of the premium plans are reasonable and you certainly do get a lot for your money.
Check out pricing and discounts in May 2024
The price plans include:
Free - $0
The free plan includes:
- Unlimited courses and students.
- Basic quizzes.
- Discussion forum feature.
- Integrated payment processing.
- $1 +10% transaction fee.
Basic - $39/month
The Basic plan includes:
- Unlimited courses and students.
- 5% transaction fees.
- Instant payouts.
- Course creator training.
- Drip course content.
- Affiliate marketing features.
- Third party integrations.
Pro - $119/month
The Professional tier includes Basic plus:
- No transaction fees.
- Instant payouts.
- Up to five school admins.
- Priority product support.
- Graded quizzes.
- Advanced reporting.
- Course completion certificates.
- Course compliance features.
Pro+ - $199/month
The Professional tier includes Pro plus:
-
0% transaction fees*
- 200 courses
- 200 coaching products
- 200 digital downloads
- 200 product bundles
-
Custom user roles
Business - $499/month
The Business tier includes everything above, plus:
- Unlimited admin users & author seats
- Unlimited courses, coaching products, and digital downloads
- Advanced theme customizations
- Custom user roles.

Course Creator Support
One strong point for Teachable is TeachableU. This is training for trainers and shows you how to create courses, create quality videos, turn ideas into courses and grow your school. There are a ton of online resources within the Teachable website, a good Facebook community and live workshops held regularly on a range of topics.
There is a huge range of resources within TeachableU that offer genuine value to school owners. You get access to some of them before you sign up, many of the courses are available to free users and all of them are available from Basic plans upwards.
It looks like Teachable have invested a lot of time and thought into providing the tools for your success. While it undoubtedly works in their favour, it definitely works in yours!
Teachable Discount / Coupon
Teachable rarely offers discounts or coupons but if they do, we’ll post them here.
Testimonials
Fraser, Researcher @CollectiveRay
“We would recommend Teachable to set up and sell courses but make sure you have a following or email list first. Go with the $99 a month plan because you could wait up to 60 days to get paid if using the free plan where payments are processed through Teachable’s payment gateway.”
Dainis Graveris @Foundertips
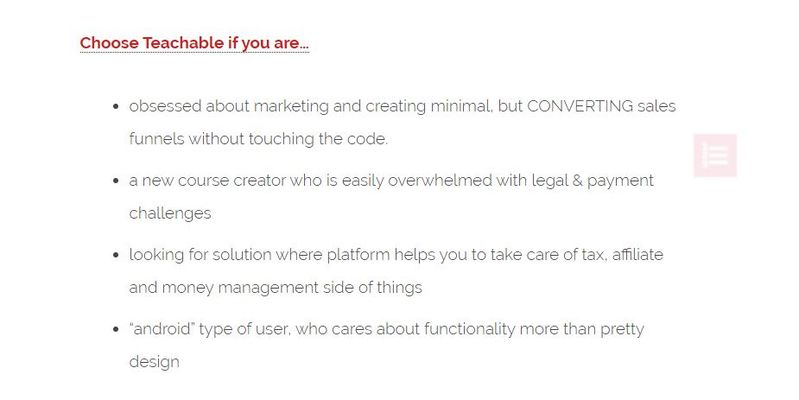
‘Choose Teachable if you are obsessed about marketing and creating minimal, but CONVERTING sales funnels without touching the code. Or if you’re a new course creator who is easily overwhelmed with legal & payment challenges.’
Janelle Allen @Zen Courses
‘Teachable is great for course creators who are primarily focused on branding, marketing and selling. If you’re an online course creator who wants to engage deeply with your students and have more learning features, Teachable might not be right for you.’
Jeff @Learning Revolution
‘For edupreneurs with relatively simple course creation needs – and particularly those relying heavily on video – Teachable is a great option. I find the platform easy to use and the end user experience very good. At the professional level (currently $99 per month), Teachable offers the range of features that most solo edupreneurs or small businesses will need for successfully creating and selling online courses and the pricing is on par with similar platforms in the space’

Alternatives
Teachable is far from alone in the online learning space. There are a whole host of competitors including Thinkific and Podia. Both of these are the closest competitors with similar functionality, features and ease of use. If you think Teachable isn’t for you, one of those others would be worth checking out.
If you're looking for a WordPress based option, you can opt for something like LifterLMS which we have also looked into.
Frequently Asked Questions
What is Teachable used for?
Teachable is used for creating a learning or course based site. The cloud-based learning management solution is a great fit for small and medium-sized businesses. The software allows users to create and share online courses by adding audio, video, images, text and PDF files to create a full blown learning system. Students can access these courses across devices such as computers, tablets, and smartphones.
Is there a free version of Teachable?
Yes, Teachable includes a free plan, besides the 3 paid plans. As with most free options, there will be some limitations on the features offered, with the plans starting at just $29/month for the Basic plan which is very reasonable.
Is Udemy better than Teachable?
Udemy has a bit more flexibility when it comes to the delivery options of courses, but Teachable offers more design options, including the abilty to have your own custom domain name.
Conclusion
Teachable gets so much right. The system is (mostly) logical and easy to navigate. There are a ton of options for course creation, support for video and extra documentation, quizzes, a discussion forum, certification, blogs and unbranded websites and a whole lot more.
There are downsides though. The arbitrary wait for payment seems a bit mean spirited and the workflow can become frustrating at times. Having to go back and forth while creating a course becomes tiresome. Getting from one place to another is easy enough but you will get lost at first.
TeachableU is an excellent resource. We found ourselves referring to it a lot. Not because Teachable is difficult to use but because there is so much information there, we thought there would be information that could help our online course perform better. There was.
For the price, Teachable is well worth checking out. It could be much better but what there is works very well indeed!

Please leave a useful comment with your thoughts, then share this on your Facebook group(s) who would find this useful and let's reap the benefits together. Thank you for sharing and being nice!
Disclosure: This page may contain links to external sites for products which we love and wholeheartedly recommend. If you buy products we suggest, we may earn a referral fee. Such fees do not influence our recommendations and we do not accept payments for positive reviews.