All WordPress customers should change the PHP versions for each unique WordPress site within the hosrting dashboard. PHP versions 7.4 and 8.0 are currently supported for most advanced WordPress hosting companies such as Kinsta. In this article we will discuss how to update PHP in WordPress.
Given that it is significantly faster, resource-friendly, and more secure than its predecessors, PHP 7.4 or the most recent version 8.0 are both highly recommended.
In some configurations, it has been demonstrated to be 3x as fast, as seen in PHP benchmark reports.
As you might be aware, PHP now follows a dependable release schedule. Critical security updates are provided for an additional year for each new version, which is actively maintained for two years.
They have adopted the same schedule, which means that they will be removing unsupported versions of PHP when they reach end-of-life. This is done to ensure that your WordPress sites are as quick and secure as possible (EOL).
{autotoc}
Why Update the PHP Version of Your WordPress Site?
The two main factors are speed and security.
You should upgrade PHP in the same way that you would upgrade WordPress itself to ensure that you are protected against security flaws. Additionally, upgrading PHP results in a notable speed improvement.
PHP 7.0 represented a significant improvement over version 5.6 in terms of performance. We have noticed progressively better performance compared to the previous version with each new release.
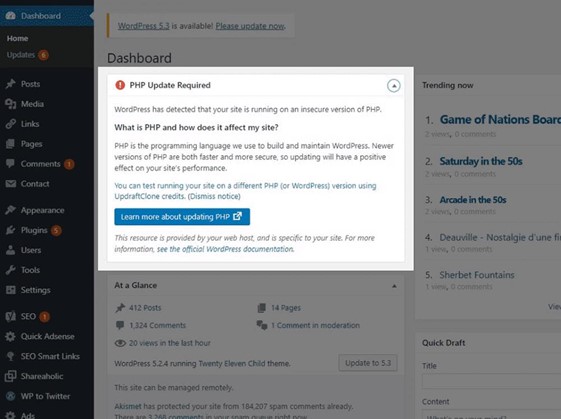
Are you unsure of the PHP version you're using? You can do so from the Tools menu on the MyKinsta dashboard. Alternatively, if you're using WordPress 5.0 or later, you can check the Site Health tool to see the PHP version.
What If My Site Breaks?
When code on your website makes use of outdated functions that are no longer supported by more recent versions of PHP, problems can arise. A plugin or a running theme is probably to blame.
Our guide below offers step-by-step instructions on how to fix this.
How to Update PHP in WordPress
Today, we'll go over how to test your WordPress website for compatibility in the best way possible before updating PHP versions. There shouldn't be much downtime for most of you, and there won't be much work to do.
Others might need more testing, troubleshooting, or even the services of a WordPress developer to make things compatible.
If all you want to do is update the PHP version in your live WordPress environment right away, you can skip step 5.
To make sure everything functions properly, we do, however, strongly advise that you adhere to every step listed below particularly if you're using an outdated version like PHP 5.6.
- Create a Staging Site
- Change PHP Engine
- Test Site, Plugins, Theme
- Push Staging to Live
- Update PHP on Live Site
1. Create a Staging Site
Making a staging site should be your first priority. This environment is different from your live website and allows you to test newer versions of PHP without affecting it.
Go to the MyKinsta dashboard and select Sites from the left menu. A list of your sites will appear. Then, click the one to which you want to add a staging area (the site you want to update PHP versions on).
Select Staging from the drop-down menu by clicking the Environment selector next to the site name, then click the Create a staging environment button.
Check out the important information about staging environments as well. For instance, you might need to disable a third-party CDN if you use one in order for your website to render properly.
This is as a result of the different URL used by your staging site. Please keep in mind that caching is disabled on staging if you're trying to test performance.
2. Update PHP in WordPress
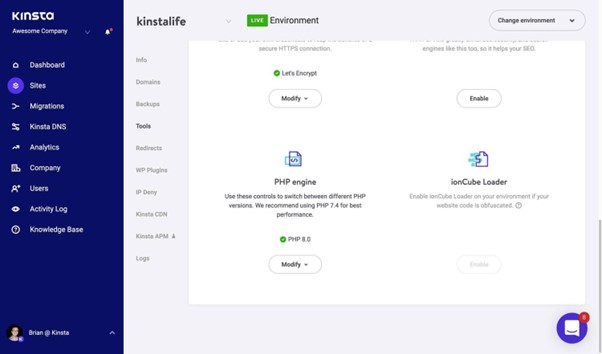
Go to Sites and choose the website you want to change the PHP version on to update the PHP version on your WordPress site. Next, select the Tools tab.
Click the Modify button next to PHP Engine and choose your preferred PHP version from the menu.
Make sure your WordPress staging environment—not your live environment—is selected if you want to test a new PHP version first. We advise testing PHP 8.0 initially.
You can always roll back your website to a previous version, such as PHP 7.4, if it experiences issues.
You'll see a prompt as soon as you choose the PHP version you want. For confirmation, click the Modify PHP version button.
This procedure could take three minutes. Your PHP engine will restart at the conclusion of the process, which could cause your WordPress backend to go down for a few seconds. There won't be any downtime for website visitors.
You can leave the page while the PHP version is being changed, but some actions, like managing the cache, won't be available until the new engine has been turned on.
As soon as the modification has been made, you will see a notification on the dashboard.
(Suggested: Updating your PHP version can assist you in resolving the WordPress "The site is experiencing technical difficulties." error.)
3. Test Your Site, Plugins, Theme
Now that a staging site is operational and running the most recent version of PHP (or the version you want to switch to), simply browse and click around on your WordPress website to check if anything is broken. This is what you should do first.
You might see a 500 error (501, 502, 503, 504, etc.) or white screen of death on the front end of your site if something is incompatible, like a plugin or your theme.
Disabling all of your third-party plugins and re-enabling them one at a time is the simplest and quickest way to figure out what might be the issue in this situation. Keep in mind that you are a staging area. As a result, you need not be concerned about breaking anything.
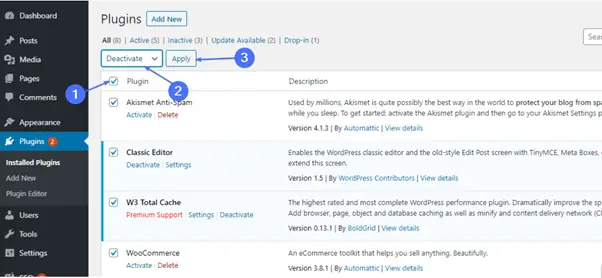
Select all of your plugins from the Plugins screen in your WordPress dashboard. Click Apply after choosing Deactivate from the menu.
After that, you can re-enable each one by going to your WordPress website individually. This will help narrow down what might be causing an issue.
If a mistake has prevented you from accessing your WordPress dashboard, check the instructions on using FTP to disable plugins.
You can apply the exact same tests to your WordPress theme. You can momentarily return to the Twenty Nineteen theme, which is WordPress's default theme.
View Log Files
Maybe you know which plugin or theme is the problem, but you're not sure why. Your WordPress error logs may be helpful in this situation. Simply log in to one of your WordPress sites and select Error Logs from the menu on the right.
You can see the files in your access.log, kinsta-cache-perf.log, and error.log directories. It will by default display the most recent 1,000 lines. To view the most recent 20,000 lines, move the slider across the screen.
Important: Debug information is not displayed by the MyKinsta logs tool. You can enable WP DEBUG as we'll show you below if you need to see debug information.
View Raw Log Files via SFTP
You can see the completely unmodified logs in /logs/ via SFTP.
Tail Your Log Files via SSH
As you experiment on your site using SSH, you can tail the logs. This basically means you can watch the log update live while testing. SSH access is offered with each hosting package from Kinsta.
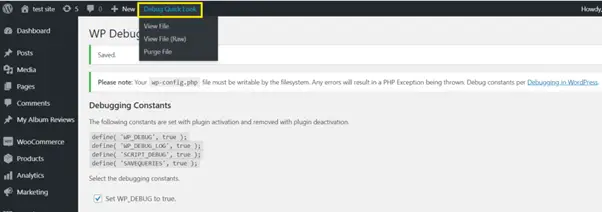
Enable Debug Mode in MyKinsta
WordPress debug mode can be enabled for Kinsta users right from the MyKinsta dashboard. Simply click the Enable button after navigating to Sites > Tools > WordPress Debugging.
By doing this, you will be able to view PHP notices and errors without needing to enable debug mode via SSH or SFTP.
If it detects any problems, our self-healing PHP feature will restart PHP immediately. You can manually restart PHP at any time by visiting the Tools page of your website and selecting Restart PHP.
Enable Debug Logging in WordPress
You can always turn on debug logging in WordPress if you don't have access to SSH or MyKinsta. To begin with, you must use SFTP to connect to your site.
Then download your wp-config.php so you can edit it.
Search for the line that reads, "That's all, stop editing!" Happy writing! * Add the following (as shown below) just before it:
define( 'WP_DEBUG', true );
define( 'WP_DEBUG_LOG', true );
define( 'WP_DEBUG_DISPLAY', false );
If the above code already exists in your wp-config.php file but is set to “false,” simply change it to “true.”
When you do this, your /wp-content/debug.log file will be displayed in full, enabling debug mode. If there are any, you will also see errors and warnings in your WordPress admin.
Important: Remember to turn it off when you're finished working with it because these files can quickly grow to be quite large.
Confused as to What to Look For?
Unfortunately, given the sheer number of plugins and themes available, we are unable to provide a comprehensive list of all potential errors.
These frequently happen because the code (functions, syntax, etc.) is incompatible with the PHP version you're using. Here is an illustration of what you might see, though.
As you can see from the example above, it's fairly simple to determine that the bbPress Shortcodes plugin is the issue.
In the worst-case scenario, you might discover that one or two of your plugins are incompatible. In that case, we suggest the following:
- Update your plugins and themes to the latest version if you haven’t already.
- Contact the plugin or theme developer and request that they add or fix support for PHP 7.4 (or the current version you're using). We're giving you a heads-up before the phase-out dates for this reason, among others.
- Find a substitute plugin that is compatible with the PHP version and can provide the same functionality.
- Employ a WordPress developer to resolve the problem.
- Check to see if the plugin or theme works by switching to a less advanced version of the PHP engine. If so, you could use an older version of PHP while waiting for the developer to update their work. Since PHP 8.0 is faster and will receive longer-term support, we do not advise doing this. But you might have to do this if there is something you absolutely must run that is only compatible with PHP 7.4.
4. Push Staging to Live
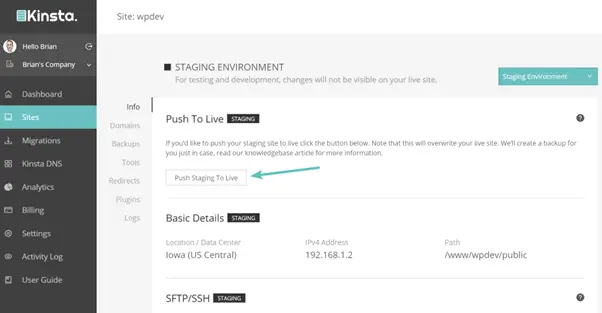
If you needed to make any changes to your plugins or themes after PHP testing is complete, you can either push staging to live or make the same changes to the live site as you did to the staging site.
Some of you might discover that upgrading to a newer version of PHP requires fairly extensive changes in staging. Using the push to live feature in that situation will help you save a lot of time.
Make sure your staging environment is chosen before you begin. Next, select "Push Staging to Live."
If you have any questions or encounter difficulties when updating the PHP version on your WordPress site, please comment below in the comment section.
5. Update PHP on Your Live Site

You can update PHP on your live site at this point by following the same procedure as in Step 2 above (Tools > PHP Engine > Modify > choose your preferred PHP version).
And that is the simplest way of how to update PHP version in WordPress.
IMH
Do you want a fast website?
Who am I kidding? Don't we all?
So why do so many of us struggle?
The biggest challenge is usually finding a fast, reliable hosting company.
We've all been through the nightmares - support take takes forever or doesn't resolve our problem always blaming something on your side...
But the biggest bummer is that the website always feels slow.
At CollectiveRay we host with InMotion hosting and our website is stupid fast. We run on a custom stack of LightSpeed server setup on MariaDB with a PHP7.4 engine and fronted through Cloudflare.
Combined with our front-end optimizations we reliably server 6000 users every single day, with peaks of 50+ simultaneous users.
Want to get a fast setup like ours? Transfer your site for free to InMotion hosting and get our 50% OFF on current pricing.
Try InMotion Hosting with 50% OFF for CollectiveRay visitors in July 2026 ONLY!

How to Update PHP in WordPress Site FAQs
How do I update WordPress' PHP version?
Making a staging site should be your first priority. Once you have a staging site, try to Update WordPress' PHP version. The PHP version of your WordPress site can be updated by going to "Sites" and choosing the website you want to modify. Different hosts have different ways to do this, but you'll find something simialr to PHP version. Update your PHP version on the staging site only and check your website, plugins, and theme to see that they are still working. You can now either push the staging to "Live" or do the same procedure you did fro the live version.
Why doesn't my PHP version update?
PHP versions are not updated automatically because some websites, plugins or themes might not be compatible with all versions of PHP. When code on your website makes use of outdated functions that are no longer supported by more recent versions of PHP, problems can arise or your webstie can go down completely. So the way to update PHP is to check manually whether your website works well on an update version of PHP (on a test site). Then you can perform the update on your live site.
How does the PHP version impact the speed of your WordPress site?
The PHP version of your WordPress siteimpacts the speed because there is a direct correlation betwene the PHP version of your site and the website's performance. Each new version of PHP optimizes your website's memory and server resources for faster page loads. New versions of PHP all have layers built in to protect your website from viruses and other potential threats and remove any old inefficent code. That's why it is always recommended to upgrade to the latest versions of PHP.