Everything you need to know about enabling WordPress debug
If this has this ever happened to you, you know why you need to understand WordPress debug. You go to try out the latest and greatest plugin and as soon as you activate. Boom!
Your website - Dead!
You want to uninstall the plugin, but you can’t because the backend is dead too.
Or you’re a WordPress developer coding a new plugin, but you can’t figure out why it’s not working the way you want it to. That's why debugging is an essential feature for coders and web designers.
{autotoc}
Wouldn’t it be great if you could easily find out the errors when you’re working on code to develop a new theme or a plugin? WordPress debugging is a cool feature that allows you to easily find the errors and deprecated functions during code execution on your WP installation.
It comes especially handy during the debug process especially if you tried implementing some experimental features on your themes or plugins.
By default, the WordPress configuration hides PHP notices while loading a page. If you want to perform debugging of PHP and the WordPress API, you'll need to do some tweaks to enable WordPress debugging.
This is due to the fact that most websites don’t want to show PHP errors on a live site. Showing such WordPress debug errors can be dangerous as the notices can reveal crucial details about your website, code, paths and other information to your site visitors, which can give hints to hackers. This information could then be used to exploit and use malicious codes to breach your website.
Recommended Reading: 17 actions to prevent boost WordPress security
During the development phase, the WP codex highly recommends programmers to enable WordPress debugging.
In fact, enabling WordPress debug will help you in 2 ways.
- PHP errors: It shows errors caused by any PHP functions
- Deprecated functions: These are functions that might have used in previous versions of code, but have been recently marked as not to be used anymore. This will help you to find a replacement function to use instead.
In this post, let’s take a look at various WordPress debugging constants and how to turn on error logging on your installation or website…
WordPress Debug Settings
1. Enable WordPess Debug with WP_DEBUG

The most important PHP constant that can be used to enable debugging mode on your site is WP_DEBUG.
By default, this PHP constant is set to false. It will be shown as follows in your wp-config.php file.
define( 'WP_DEBUG', false );
In order to turn on logging, all you need to do is to set WP_DEBUG to true.
See the code below.
define( 'WP_DEBUG', true );
Below are a couple of things, you’ll need to keep in your mind before enabling WordPress debug.
- Be careful before making any changes to your wp-config.php file because it is the most important file in your installation that can be used to configure database access, enhance performance and improve security. Making a small mistake in the configuration can result in your site becoming inaccessible
- Make sure you don’t enable WordPress debugging on a live site. As we said before, crucial information can be revealed, besides the fact that leaving WordPress debugging enabled will create performance problems because it results in significant overhead
Recommend Reading: How to backup WordPress natively or with a plugin
Now that we've enabled the setting for WordPress debugging we'll need to look at the output of the debugging commands. To do this, it is best that we enable the WordPress debugging log file.
This can be done by enabling the next setting in wp-config.php.
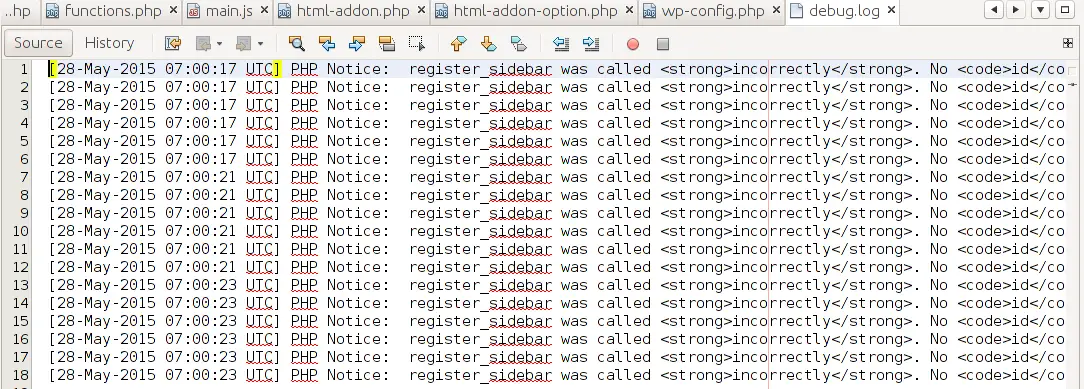
2. Log Errors to debug.log with WP_DEBUG_LOG
To be able to review any WordPress debugging errors, notices or any other output, we'll need to look at the WordPress debug file. Possibly you will need to send this file to any vendors or WordPress developers that you work with.
To generate the WordPress debugging log file, you’ll need to turn on ‘WordPress debug logging’ using the WP_DEBUG_LOG setting. This constant essentially forces WordPress to write debugging outputs to a log file.
What this PHP constant does is it saves all error notices in a debug.log file located in the ‘wp-content’ directory setting, so you can review such notices/errors whenever you need.
Note that the WP_DEBUG_LOG setting works in conjunction with WP_DEBUG constant i.e. the WP_DEBUG must be enabled for the WP_DEBUG_LOG setting to take effect.
Here is how to enable debug logging to the debug.log file. Simply add the following code to your wp-config.php file.
define( 'WP_DEBUG_LOG', true);
Once it is set to true, all of your themes and plugins errors will be tracked and saved in the debug.log file.
There is also the possibility to set a different file by using a small variation in this setting. For example, if you'd like to set a different location or name for the log file, you can use the following:
define( 'WP_DEBUG_LOG', '/logs/wordpress-errors.log' );
The above settings do not affect what is displayed on the frontend. This can be set independently using the next setting we're going to discuss below.
3. Enable/Disable Display Errors with WP_DEBUG_DISPLAY
Have a look at the below screenshot. This is what your website could look like if WP_DEBUG_DISPLAY is on. Essentially, this is a setting that forces WordPress to show the errors on the frontend, rather than just writing them to the log file as we have seen in the previous steps.
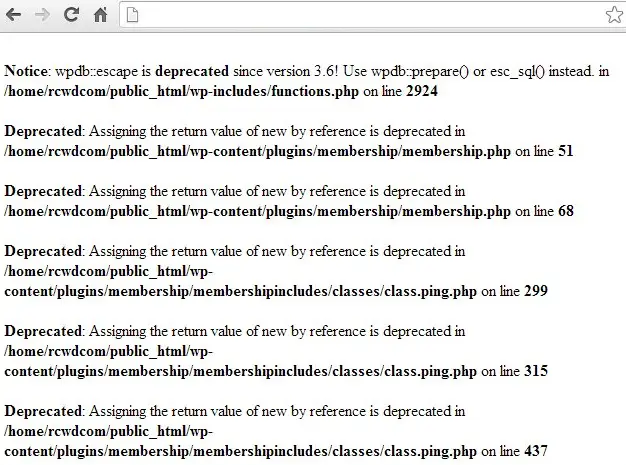
In most cases, if you have enabled WP_DEBUG_LOG to track any errors caused by your themes and plugins to a log file.
However, if you are working in a development environment, you could also choose to show the PHP notices or errors on the front-end of the site too.
The constant WP_DEBUG_DISPLAY in the wp-config.php file allows you to enable/disable whether debug messages are shown on the frontend of your site.
By default, if you have enabled WordPress debugging, displaying WordPress error messages is set to ‘true’. You can turn it to ‘false’ if you want to hide them.
All you need to do is to add the below line of code to your wp-config.php file.
define( 'WP_DEBUG_DISPLAY', false);
Be cautious if you enable this on a live site, because this can disclose sensitive information. If you enable it temporarily, don't forget to disable once you have identified and fixed your problem.
4. Enable script debugging with SCRIPT_DEBUG
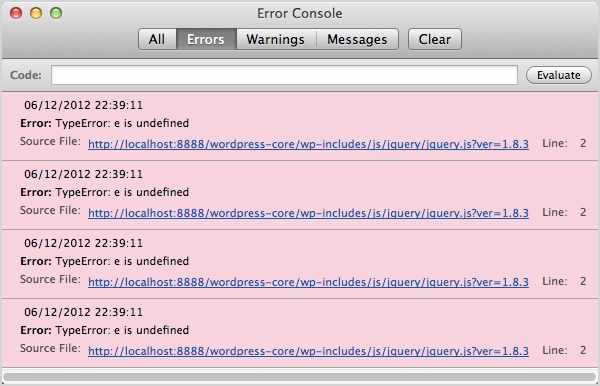
So far we’ve discussed the importance of WP_DEBUG mode and how to enable it on your website installation. There is another important PHP constant that you can enable for WordPress script debugging: SCRIPT_DEBUG.
While enabling WP_DEBUG reveals any errors caused by PHP functions on your WordPress theme and plugins, enabling SCRIPT_DEBUG shows you if there are any Javascript development or CSS errors.
In fact, while debugging if the SCRIPT_DEBUG constant is turned on, it forces WordPress to use the development version of files instead of the minified version.
As you may know, WordPress loads minified versions of CSS and JS files in the live environment. These minified versions of files remove all unnecessary characters in those files in an effort to reduce the file size for faster page loading.
Recommend reading: 21 actions to make WordPress faster
While loading minified files can be extremely helpful in terms of user experience and WordPress SEO, it can be a pain for development purposes especially when you’re trying to find and fixing bugs.
By forcing the installation to load the development version, you can easily figure out what scripts are causing conflicts in your core CSS and JS files. Using this setting in conjunction with the browser tools console allows you to identify where Javascript errors are being thrown so you can fix them.
To turn on SCRIPT_DEBUG, add the following code to your wp-config.php file.
define( 'SCRIPT_DEBUG', true );
5. Enable / Disable Logging of Database Queries
Once again, while debugging issues, you might want to take note of which database queries are running. In particular, if you are troubleshooting and performance issues, you might want to check exactly which queries are running.
The wp-config.php file has another setting that allows you to log all queries that are run. Add the following line to w-config to enable the saving of queries.
define(‘SAVEQUERIES’, true);
Once you enable this option all queries will be saved in the $wpdb->queries global. If you're not sure what the value of the variable is, you can add the following PHP code snippet script to a file in WordPress. This will output the value of $wpdb->queries global variable.
<?php
    global $wpdb;
    print_r( $wpdb->queries );
?>
WordPress Debug Plugins
Besides log error messages, you might also need to check queries for performance, or otherwise try to understand what's going on underneath the hood. There are a number of other plugins and tools that we recommend you use when you need to perform such debugging or troubleshooting.
1. Query Monitor
Query Monitor is a neat plugin that allows you to see exactly what different plugins on your WordPress installation are doing. Even though the name says that it is a "query monitor" this plugin does more than just monitor database queries.
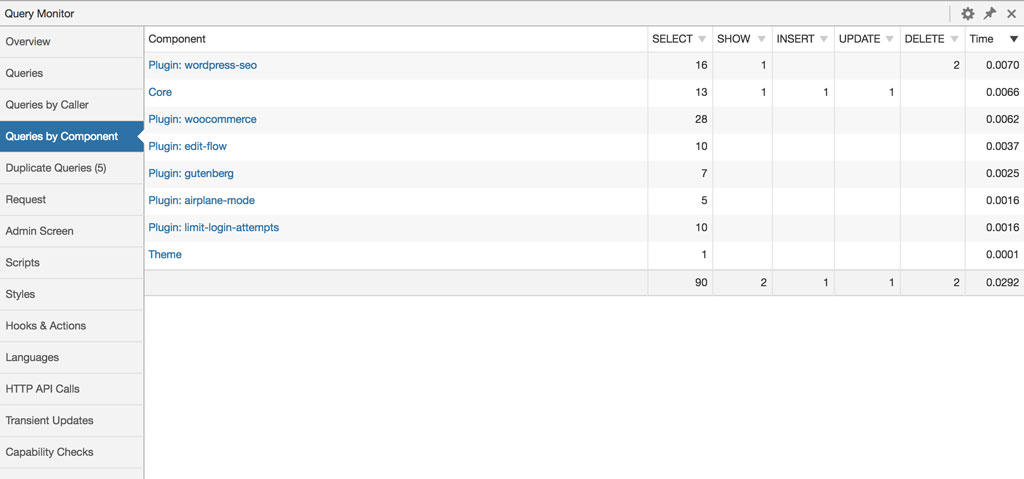
In fact, this plugin can:
- debug queries
- monitor PHP errors
- check hooks and actions
- HTTP API calls
- monitor enqueued scripts and stylesheets
- debugging of AJAX calls
- etc.
You can also narrow such monitoring by plugin, or theme, which helps you to narrow down the sources of problems.
2. Debug Bar
This plugin is typically used by developers as they are coding their themes or plugins. The plugin adds a debug menu to the WordPress admin bar that shows query, cache, and other WordPress debugging information.
The great thing is that it respects the WordPress debug settings we described above.
3. Log Deprecated Notices
This is another developer-oriented plugin. Essentially, logs whether you're using any deprecated functions, files or arguments, such that you can upgrade and fix your code to use the latest recommendations.
Writing to the WordPress Debug Log
As a developer, you should probably add error information to the WordPress debug log as necessary. To do this, you need to use a specific WordPress function that outputs messages to the log:
error_log( "This is a log entry" );
If debugging is enabled, the above message would appear in the log file. You can use the above to log exceptions or other unexpected problems.
IMH
Do you want a fast website?
Who am I kidding? Don't we all?
So why do so many of us struggle?
The biggest challenge is usually finding a fast, reliable hosting company.
We've all been through the nightmares - support take takes forever or doesn't resolve our problem always blaming something on your side...
But the biggest bummer is that the website always feels slow.
At CollectiveRay we host with InMotion hosting and our website is stupid fast. We run on a custom stack of LightSpeed server setup on MariaDB with a PHP7.4 engine and fronted through Cloudflare.
Combined with our front-end optimizations we reliably server 6000 users every single day, with peaks of 50+ simultaneous users.
Want to get a fast setup like ours? Transfer your site for free to InMotion hosting and get our 50% OFF on current pricing.
Try InMotion Hosting with 50% OFF for CollectiveRay visitors in July 2026 ONLY!

WordPress Debug Frequently Asked Questions
What does WordPress debug do?
The various WordPress debug settings enable the viewing of any notices, such as errors, deprecated functions or any other error logs generated by themes, plugins and other WordPress functions. By enabling the settings above, you can identify and fix any errors in your WordPress plugins or themes.
Where is the WordPress debugging log?
The WordPress debugging log is usually found in the root directory with the name debug.log. Using the settings defined above, you can change the location of the WordPress debugging log to a location that is more convenient for you.
How do I disable debugging in WordPress?
To disable debugging in WordPress, simply add the following entry to your wp-config.php file: define( 'WP_DEBUG', false ); You might also want to check the rest of the settings that we describe in this article.
What does WP Debug do?
The WP Debug setting in the wp-config.php file is used to enable or disable WordPress debugging.
Does WordPress debugging affect performance?
Yes, WordPress debugging has a performance impact because it adds some overhead, including the need to output to a file. It is recommended that when you have completed debugging, you disable all such settings. This also makes your installation more secure, since sensitive information might be included in debug logs.
Summary
If you want a quick summary of all that we've discussed, have a look at the below wp-config.php example file with all the settings in place:
// Enable WP_DEBUG mode - to disable just put false instead of true
define( 'WP_DEBUG', true );

// Enable Debug logging to the /wp-content/debug.log file
define( 'WP_DEBUG_LOG', true );
// Comment the above file and uncomment the below to log to a specific file
//define( 'WP_DEBUG_LOG', '/logs/wordpress-errors.log' );

// Disable display of errors and warnings / switch to true to enable
define( 'WP_DEBUG_DISPLAY', false );

// Use dev versions of core JS and CSS files (only needed if you are modifying these core files)
define( 'SCRIPT_DEBUG', true );

// Log queries enabled, switch to false to disable
define(‘SAVEQUERIES’, true);
Have you ever turned on WordPress debugging? Share your thoughts with us in the comments section…

Need help getting stuff done? Try these top-rated affordable gigs on Fiverr!