
We all want to get the most out of every website we run - and WordPress is no exception. When we first started this site, there were many things we couldn't figure out and we had to go it alone.
The authors of this website want to make sure you jumpstart your learning process and get the most out of WordPress right now! With WordPress being the CMS of choice for 30% of ALL websites on the internet, 40% of the top 10K sites, and with it being the CMS of choice for 50% of websites which use a CMS, we're sure we speak for many people when we say these WordPress tips will help you push WordPress blog to its full potential!
The great thing about WordPress is that its popularity has led to a large number of tips and tutorials available which can show you how to do lots of stuff, small WordPress tricks that push your website to its maximum potential.
WordPress has matured significantly over the years, from a humble blog to a CMS that is so flexible that it allows you to create any kind of website today. From a personal blog to an e-commerce site to a niche social network, you can count on WordPress and all kinds of WordPress themes to allow you to create a great website. Themes of note including the best-selling items, Divi and Avada which we've looked at and reviewed fully in separate posts here and here. We've got a full listing of themes and roundups we've looked and reviewed in detail in a specific section for this purpose in the menu above: WordPress > Themes.
And with the growth comes the need for WordPress tricks or "hacks" - small changes in the WordPress code to optimize the performance and display of WordPress.
However, most users are not developers and do not have much experience with code. Thus, many people are not able to use WordPress tricks to tweak and optimize their sites to add more functionality.
In this article we’ll show you how to do some cool WordPress tips without hiring a developer - these are a few simple WordPress tricks (or small tweaks/changes in WordPress code) that allow you to get more, much more from your WordPress website installation.
Why do we call these tricks or hacks? Wikipedia defines a programming hack as "an inelegant but effective solution to a computing problem". So since we are changing the WP files - we are calling these changes hacks - essentially it's just WordPress tips and tricks which you should use to make your overall WP experience healthier without having to go through a huge amount of tutorials.
Note: This article assumes you know that some basic HTML/CSS coding. If you're not ready to do any of these changes yourself, why don't you have a try and hire a WordPress developer from the top 3% of talent from Toptal? This way you'll all of the benefits without any of the hassle of coding involved.
You'll find that many of these tips involve changes to one of the template files, such as functions.php, single.php, headers or another file. Make sure you back up the files before making any tweaks on any of these files because errors might break your site and you will need to revert to a working version of the file.
Add new features to your WP site using the following tricks tips and tweaks. If you'd like to get more of these, we have a whole list here under WordPress > Tips and Tricks.
1. Compress Images for Faster Load Times
Images are one of the heaviest components of a webpage and if you’re not optimizing them, you’re hurting both your site’s performance AND your SEO.
Besides the fact that slow websites create a negative user experience.
To optimize your images, one of the most effective ways is to compress them. You can also make them smaller by using specific formats while also removing EXIF data.
There are many tools to compress your images without losing quality (or at worst, very little loss that's not even noticeable).
You can use online services, or else use specific programs that you'll need to install on your own machine.
For example, you can use one of the following programs:
- Adobe Photoshop (Paid)
- GIMP (Free)
Both of these programs have an option to save your image for the web or settings that will make images optimized for the web so that they have a smaller size and therefore, load faster.
You can also do similar image compression using online tools such as:
- TinyPNG
- JPEGMini
- Optimole
- EWWW Image Optimizer
These are either a WordPress plugin or an online service that you can use to compress your images before or as you upload them to WordPress.
While some might argue about the various features of each of these services or programs, it's always better to have any image compression tool or plugin rather than nothing.
We go into the merits of how to choose the best image compression plugin for WordPress or how to use Photoshop/GIMP to optimize your images for the web as these have been written countless times.
What’s important to know here is that you must optimize your images to improve your site’s performance and SEO.
Incidentally, if you're looking for more detail, you might want to look at this post from WPBuffs: Optimize Images 300% in WordPress with These 17 Free Tools and Plugins.
2. Use Custom Permalinks
Back in the day, WordPress’s permalinks, by default, use the “plain” permalink settings which looked like www.example.com/?p=123.
This was bad for both SEO and UX.
Thankfully, if you’re installing WordPress today, it now defaults its permalink settings to “day and name” option which looks like www.example.com/2020/01/01/sample-post.
This is way better. But here’s the problem: the date is included in your permalink.
This could cause issues such as visitors thinking that your post is outdated after some time has passed. It could also be an issue if you’ve recently updated your content, but your permalink still displays the old date.
The solution is to use the post name permalink option.
To set this, go to Settings > Permalinks and select Post Name.
This option is the best for SEO purposes.
3. Reset WordPress as If It’s a New Install (Using WP Reset Plugin)
If you’re building a site, if you’re a developer or even if you’re a writer who writes articles about WordPress, you may find that you need to get a fresh install of WordPress every now and then to test different things from scratch.
This can be time-consuming, especially if you need to do multiple fresh installs on a regular basis.
But you don't have to perform a full install every time you need a fresh install of WordPress!
There’s a plugin called WP Reset that will let you reset WordPress as if it’s a fresh installation.
To use this plugin, install it, then, go to Tools > WP Reset.
Once you’re on the page, go to the Reset tab and scroll down to the very bottom. You will see a box where you need to type the word “reset” to use the Reset Site button to reset your site.
This will now reset your installation as if it’s a brand new installation of WP.

This is different from WordPress’s built-in reinstall function where it reinstalls WordPress but keeps your site’s data intact.
On the contrary, WP Reset resets your WordPress installation as if it’s a truly fresh install. Your username and password remain the same but everything else is removed.
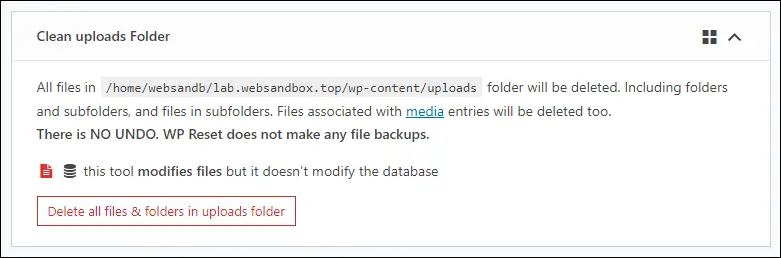
Keep in mind that your wp-uploads folder retains the files in it (but they won’t show up to your site’s media library anymore). To fix that, use WP Reset’s Clean uploads Folder tool in the Tools tab.
4. Password Protect WP-Admin or WordPress Front-End
Password protecting your WP-Admin can add an extra layer of security to your site. This will make it harder for hackers to get into your website, keeping it safe(r).
To password protect WP-Admin (or your WordPress front-end or literally any other parts of your website), you need to have access to cPanel.
Note: The steps described here cover the current version of cPanel as at September 2020, but should work in the foreseeable future.
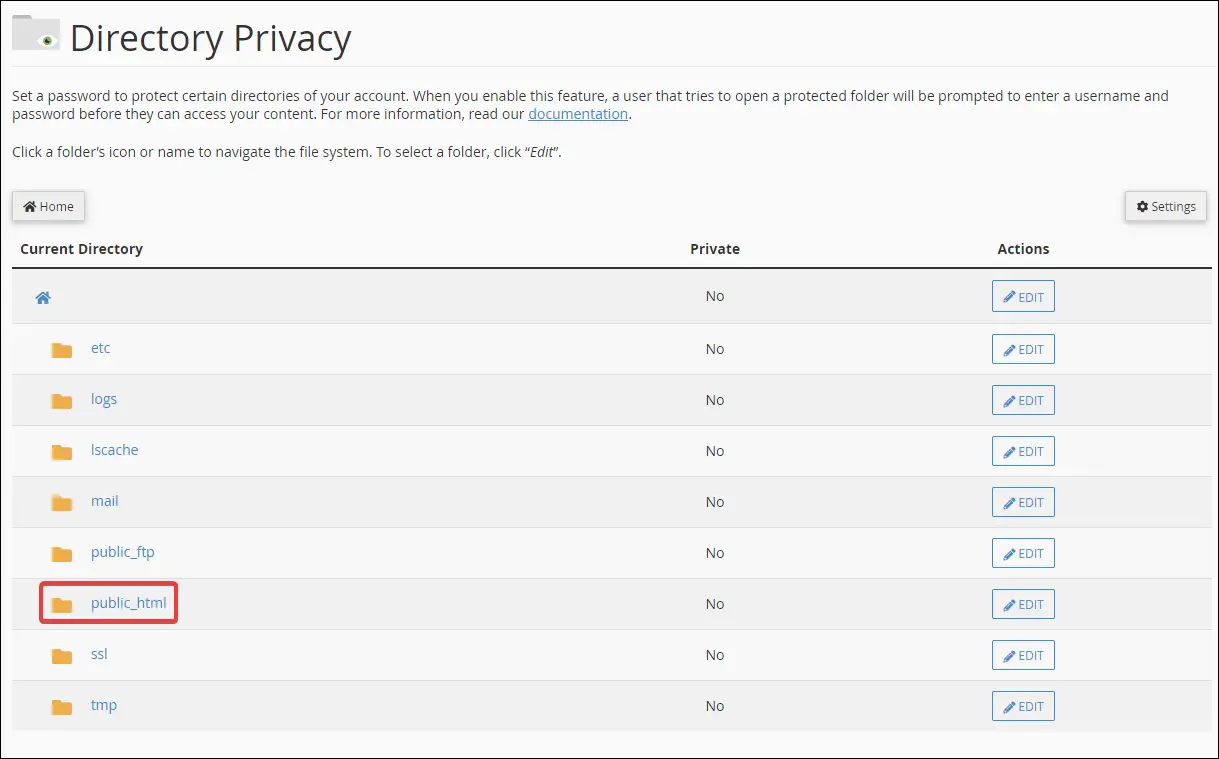
Step 1: Log in to your website’s cPanel account.
Step 2: Under Files, find Directory Privacy. This will take you to the page where you can select the directories you want to be password protected.

Step 3: Find public_html and click it (by default this is where your website’s file resides. Some hosts don't follow this so make sure to refer to your host’s manual for more info if you can’t find a folder named public_html).
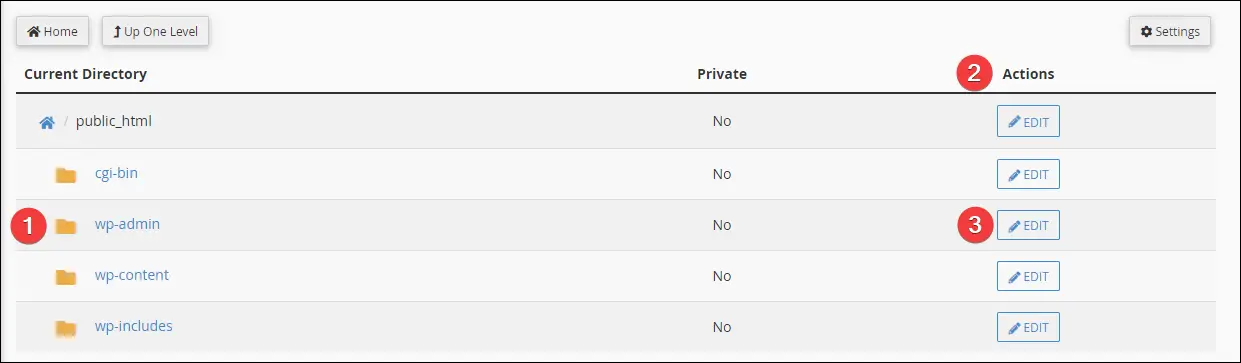
Step 4: Find the folder called wp-admin then under the actions column, click edit.
This will bring you to the page where you can activate password protection for the said folder.
Note: this assumes your WordPress site is installed in the root of your public_html folder. If you installed it on a different folder or if it’s in a subdomain, you have to find the proper location of your wp-admin folder.
Step 5: Activate the option “password protect this directory”. Give it a name (this is just for reference) if you want to, then click the save button.
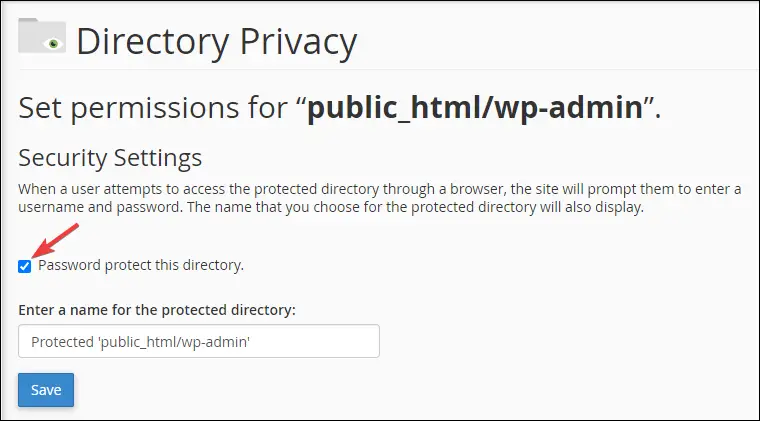
After that, the page will prompt you that the password protection has been successfully activated. Click the “Go back” link and you will be taken to the next step where you will define the username and password that you want to use.
Step 6: Create a combination of username and password to protect your wp-admin. Once you’re satisfied click the save button and you’re done!
Now, when you visit the wp-admin (or wp-login.php) page of your website, you’ll be prompted with a sign-in dialogue similar to the one below.

Note that you might notice it will only prompt you once and not on subsequent details. This is because the login data will be stored as a cookie on your browser.
If you use a different browser, turn on incognito, clear your browser cookies, or use a different computer, you’ll be prompted to log in again.
5. Hide wp-includes, wp-content, and wp-uploads From Showing on the Browser (Disable Directory Browsing)
You may have noticed that you can see what files your website has just by going to a certain URL of your website. Try going to yourwebsite.com/wp-includes/js/jquery/.
If the page looks like the one below, then you'll want to disable directory browsing.

If you don’t disable it, malicious individuals can find out what kind of themes and plugins you have and based on that information, they can use known exploits for these items to hack into your website.
Thankfully, disabling directory browsing is very simple.
In your website’s root directory, edit your .htaccess file and add this code at the bottom:
Options -Indexes
Save your .htaccess file and you’re good to go! After doing this try visiting the example URL earlier and you should now be greeted with a 403 forbidden error.
6. Change WordPress Media Upload Directory
If you want to change your media upload directory, you can easily do that by adding a line of code to your wp-config.php file.
For example, let’s say you want to change your upload directory to a folder called “media” located in the WordPress’s root installation directory, we’ll add this code right after require_once( ABSPATH . 'wp-settings.php' ); in the wp-config.php file:
define('UPLOADS', 'media');
From now on, all media files you upload will now go to the “media” folder.
NOTE: It’s advisable to do this on a freshly installed WordPress site. However, you can still do this on an already existing one, provided you know what you’re doing. This is because your old media files won’t magically move to the new folder.
As a result, when you do this on an existing WordPress installation, while your old images will still work properly in your posts/pages, they won’t appear properly in the media library. To fix this, you will have to move your old media files to the new directory and then update your database to reflect these changes, but that’s a topic for another article.
7. Add Icons to Navigation Menu
You can easily add icons to your navigation menu using the Menu Icons plugin developed by ThemeIsle. Simply install and activate the plugin and you will now be able to add custom icons to your menu items.
![]()
You can select from various icon type sources (#1). If you want to use your own custom icon images, you’ll want to enable the Image option. This will let you upload your own custom icons. Once you’ve activated your custom icon types, you can now add custom icons to your menu items (#2).
If you want to add icons to your navigation menu without using plugins, you can do so via your theme’s custom CSS.
First, you’ll need an icon, preferably 25px by 25px in dimension, then upload it to your website. We recommend creating a new folder called “icons” in your root WordPress installation and uploading all your custom icons there. You will then refer to your icons via ./icons/youriconname.png on your custom CSS code snippet.
Here’s an example custom CSS that you can add to your theme. This is tested working perfectly on the TwentyTwenty theme. You may have to adjust these to fit perfectly to whatever theme you’re using.
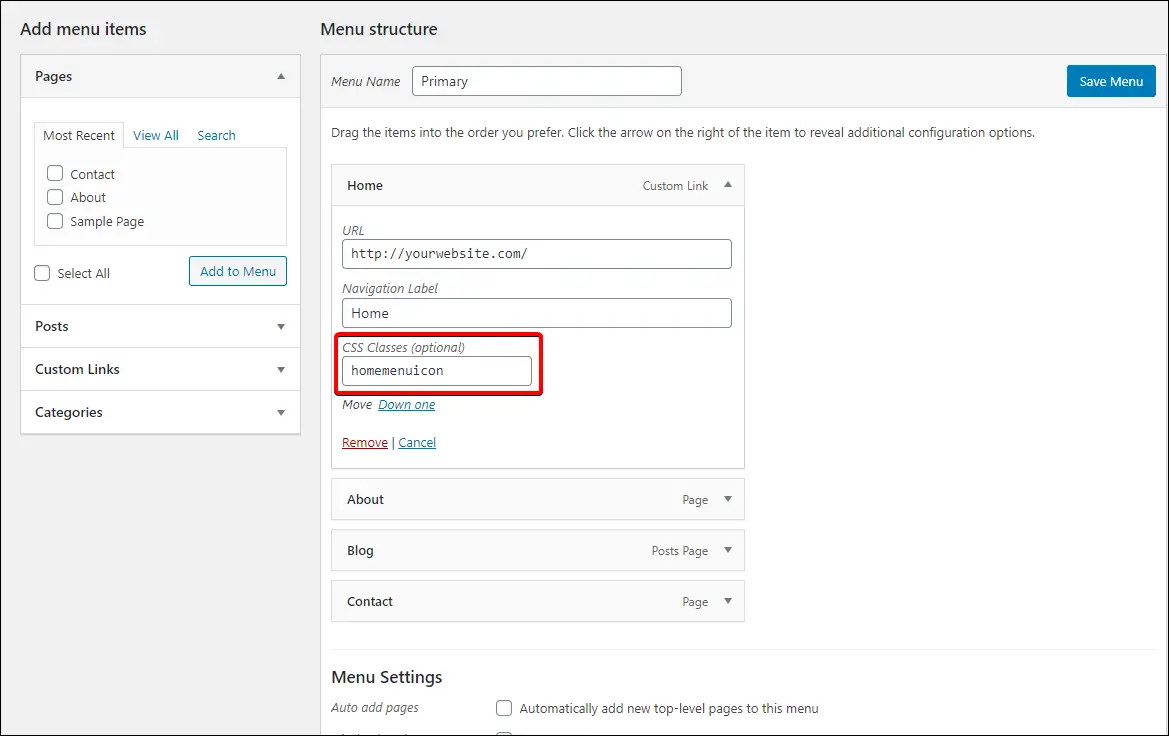
.homemenuicon a{
    padding-left: 30px;
    background-image: url(./icons/youriconname.png);
    background-position: left;
    background-repeat: no-repeat;
}
You can add custom CSS to any theme via Themes > Customize > Additional CSS. Once you’ve added the CSS for your menu icons, you need to apply it.
Go to Theme > Menu and enable CSS Classes in screen options.
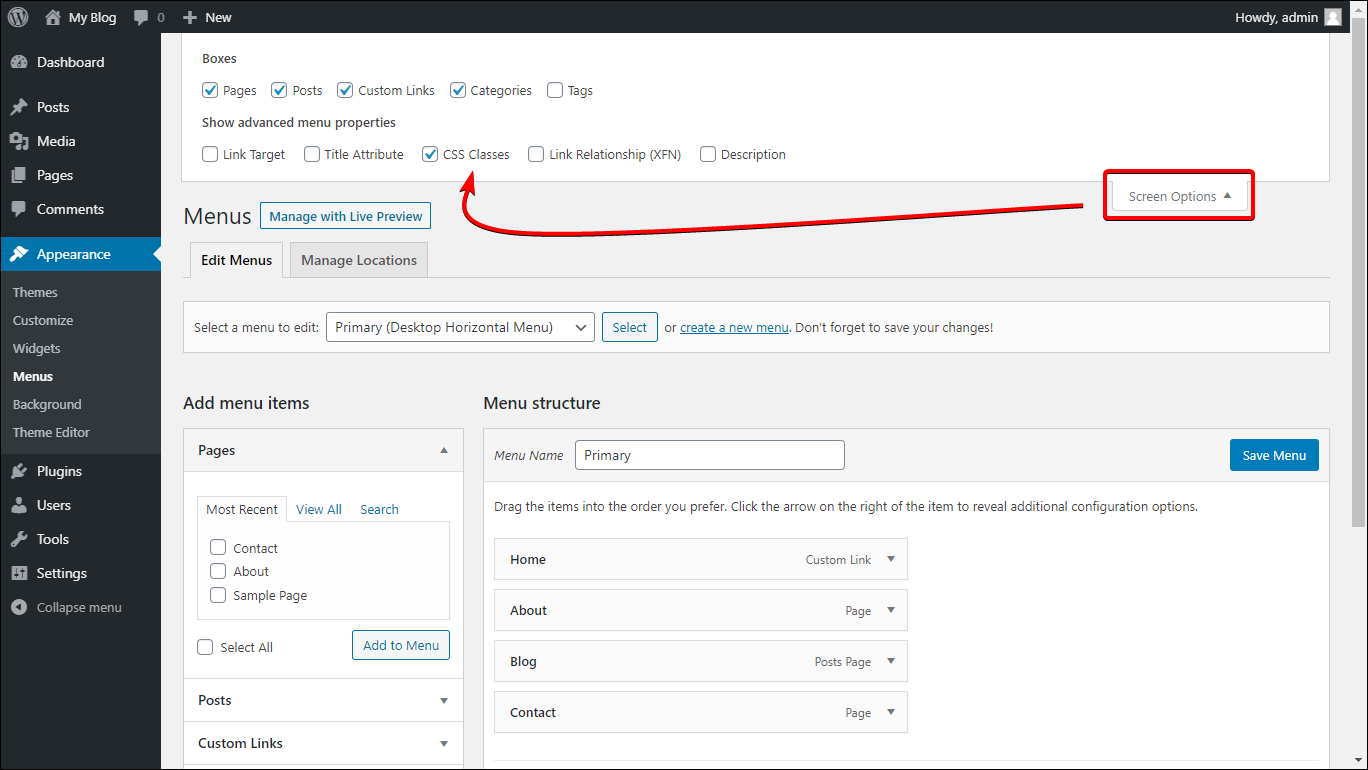
Next, add your custom class (in our example, .homemenuicon) to the CSS Classes field in the menu.
Save the menu and see your home menu item now sporting a custom icon beside it.
Below is what our example will look like in TwentyTwenty theme using a custom home icon of 25px by 25px in size.
![]()
8. Open All External Links in New Window and/or Add noreferrer noopener
To open all external links in a new window, or add a noreferrer and noopener attribute to all external links, all you need to do is to install a plugin called WP External Links.
After installing the plugin, you will have a new item in your admin navigation menu called “External Links”. Go here and configure the plugin.
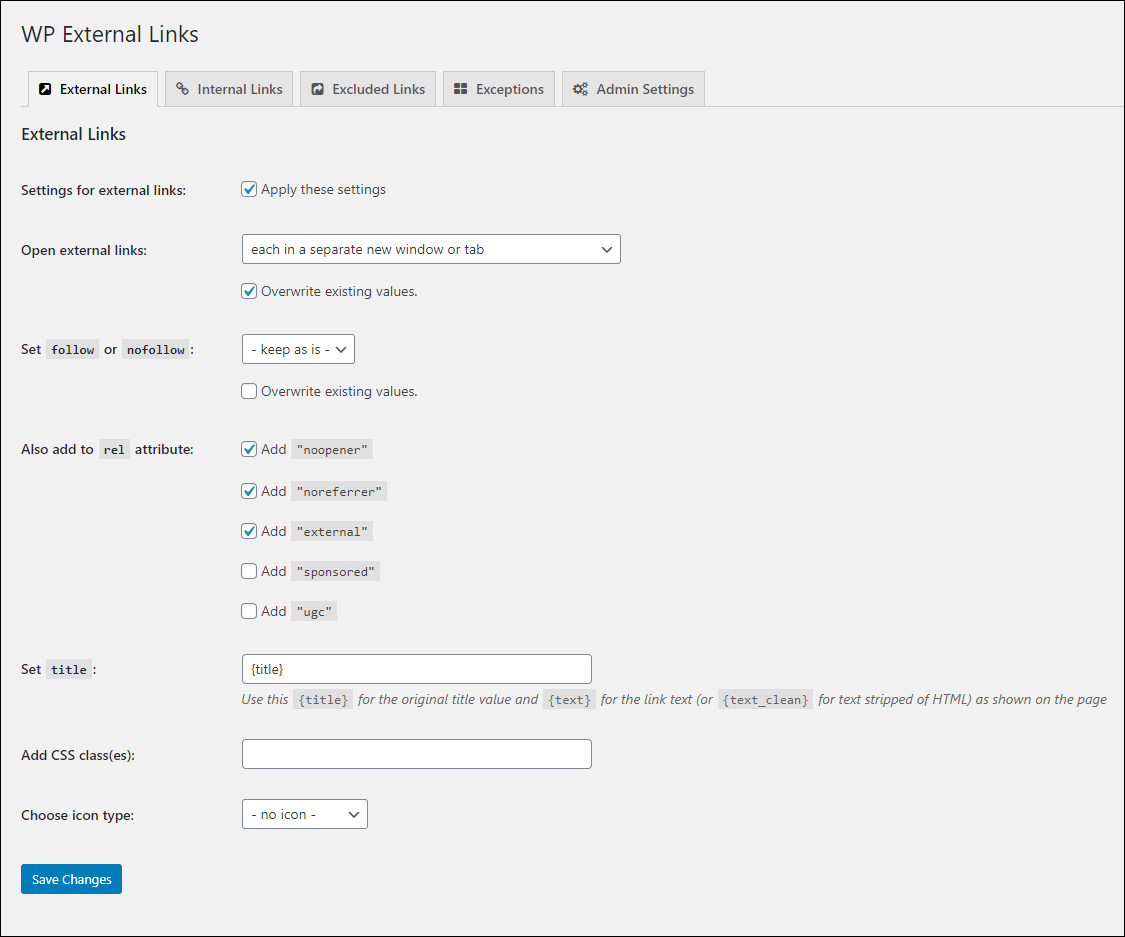
For the Open external links option, select each in a separate new window or tab. You can leave other settings on default and you’re good to go.
If you want to do this manually follow the instructions below.
Add the following code snippet at the end of the theme’s functions.php file:
add_action( 'wp_enqueue_scripts', 'external_links' );
function external_links() {
    wp_enqueue_script(
        'external_links.js',
        get_template_directory_uri() . '/js/external_links.js',
        array('jquery')
    );
}
Next, create a folder called “js” inside your theme’s folder and inside it, create a script file called external_links.js and then copy and paste the following code snippet in the said file:
jQuery(document).ready(function($) {
    // Check if links are external, if yes, add class=external and add proper attributes
    $('a').filter(function() {
        return this.hostname && this.hostname !== location.hostname;
    }).addClass("external").attr("rel","external noopener noreferrer").attr("target","_blank");
});
Now all external links will open in the new tab and will have external, noopener, and noreferrer attributes.
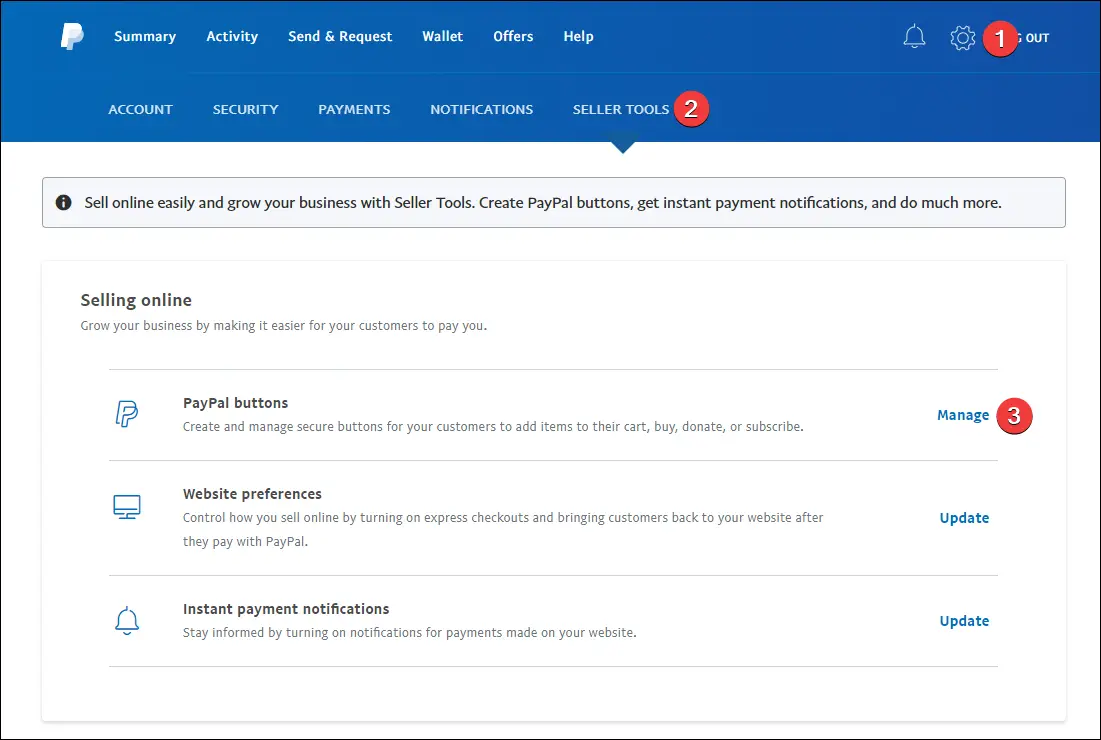
9. Add “PayPal Donate/Buy Me a Beer” Button
If you want to accept donations on your website, you can easily do so by creating a PayPal account and grabbing their donate button.
Here’s how to add a PayPal Donate button:
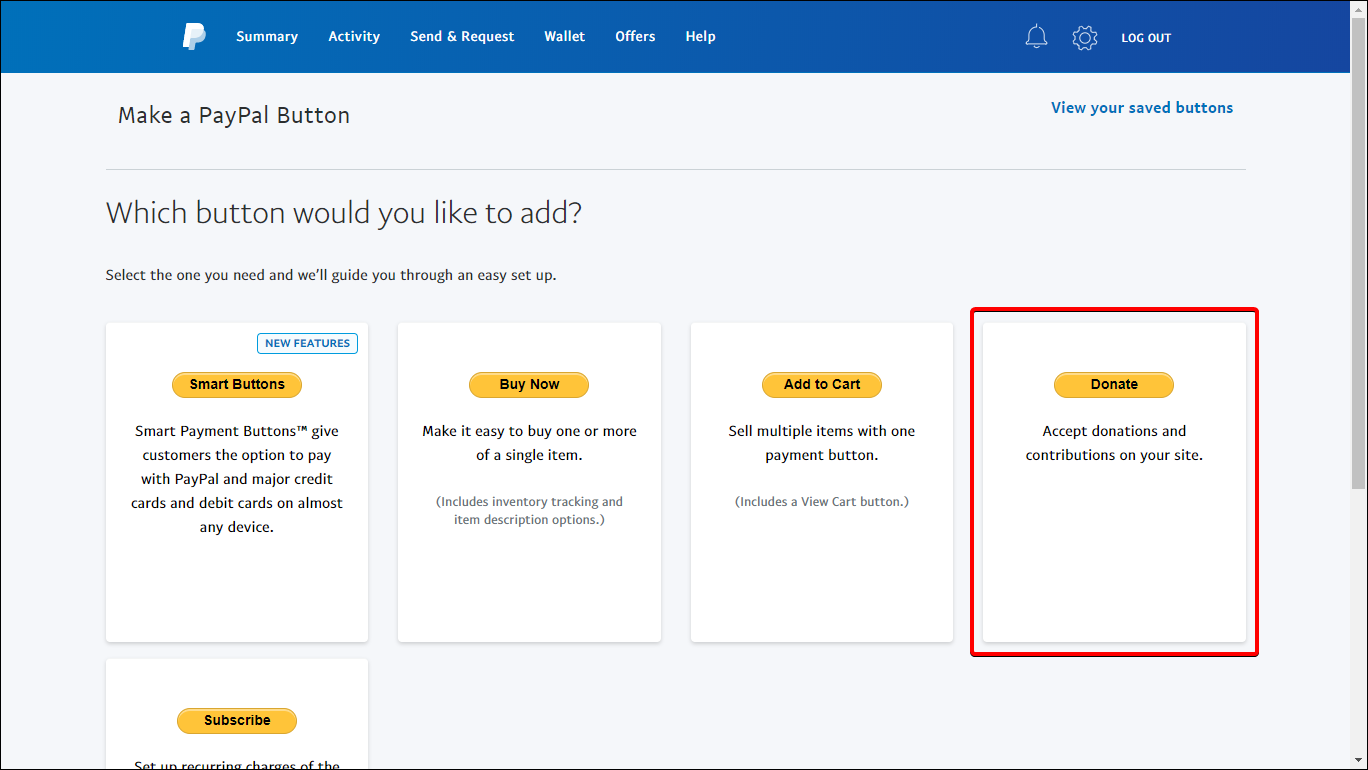
Log in to your PayPal account, then click the gear icon in the upper right corner of the screen. Then, go to Seller Tools and then next to PayPal buttons, click Manage.
On the next page, PayPal will ask you about which button you want to create, select the Donate button.
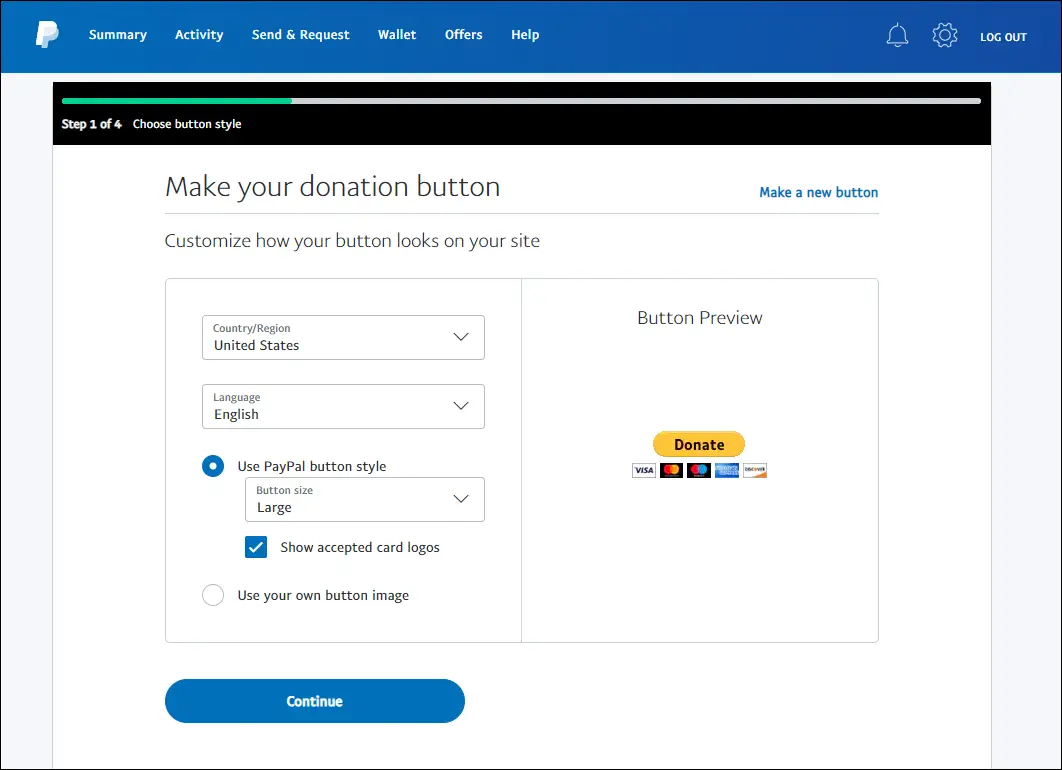
Next is a four-part process.
In the first step, select your country/region, language, and your desired PayPal button style. You can also use your own button image if you want by selecting the Use your own button image setting.
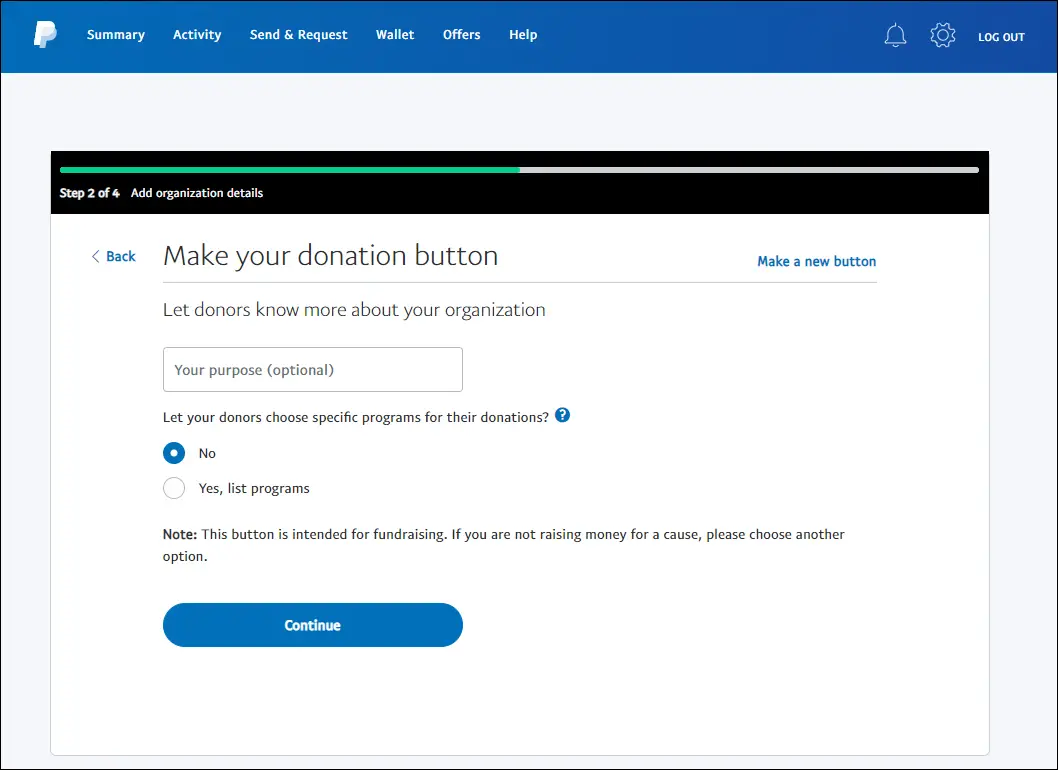
After that, the next step lets you set a purpose (what the donation is for), etc. You can just press continue on this part.
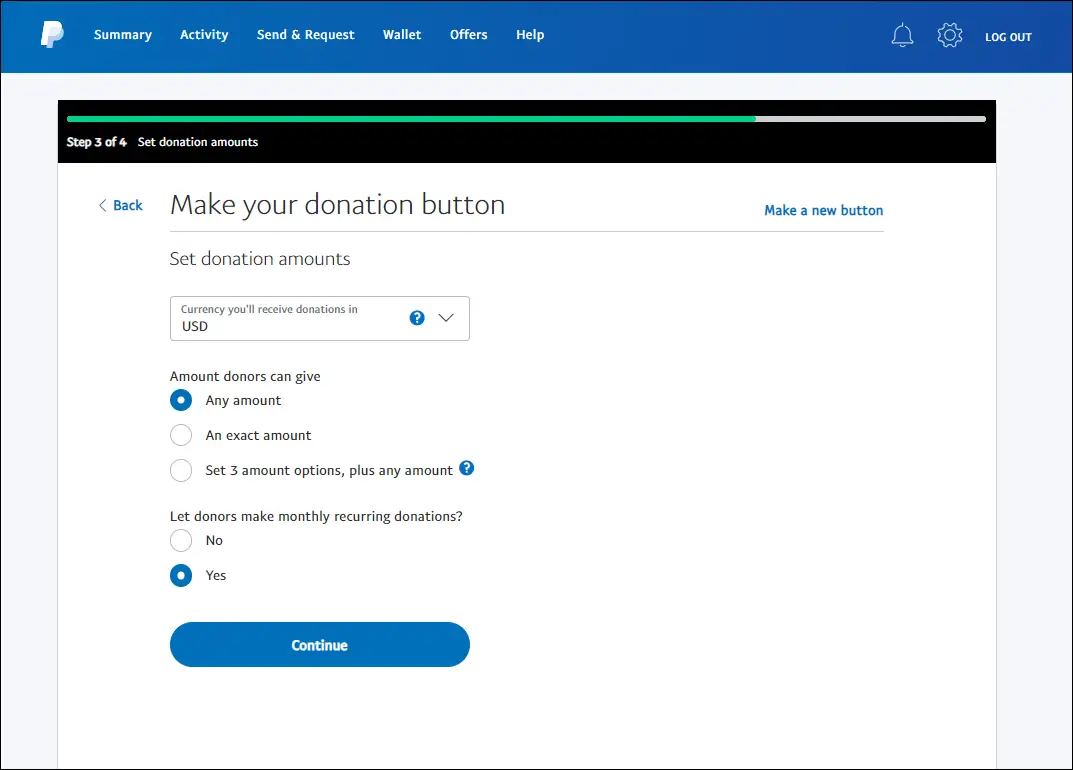
In the third step, you can set donation amounts (if you want to put fixed donation amounts) and your desired currency.
For the fourth and final step, you can configure optional settings.
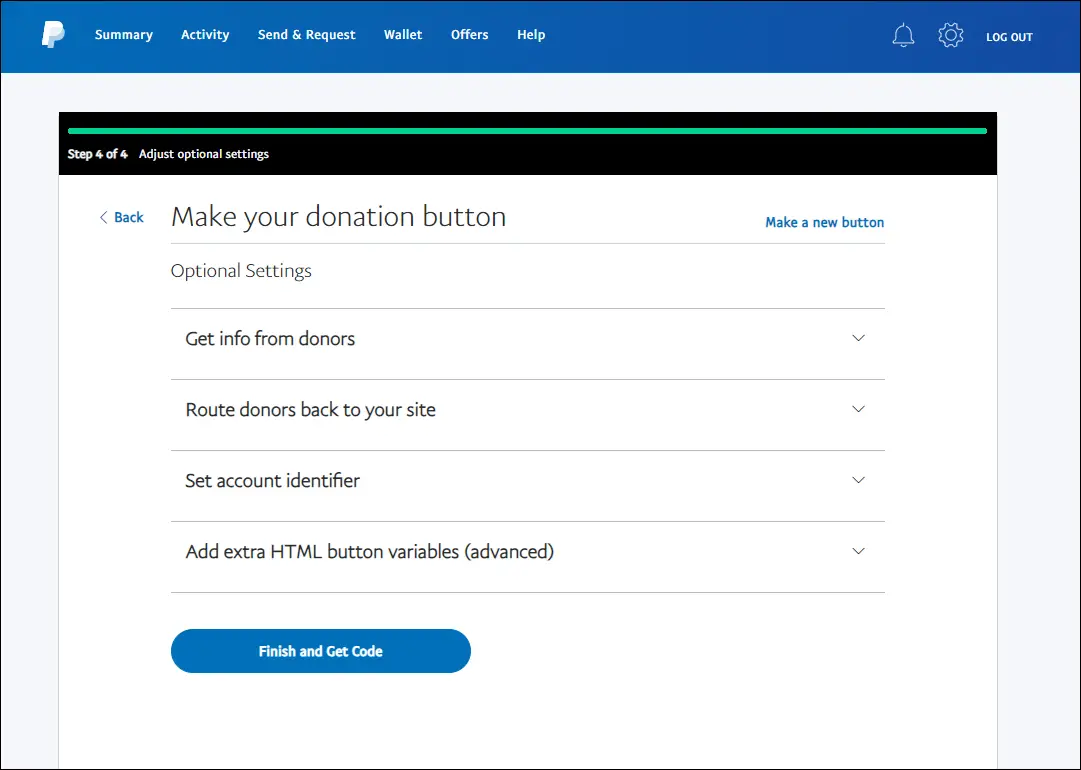
Like step 2, you can just skip this part and click Finish and Get Code. After that, you can see the HTML code for your PayPal donate button.
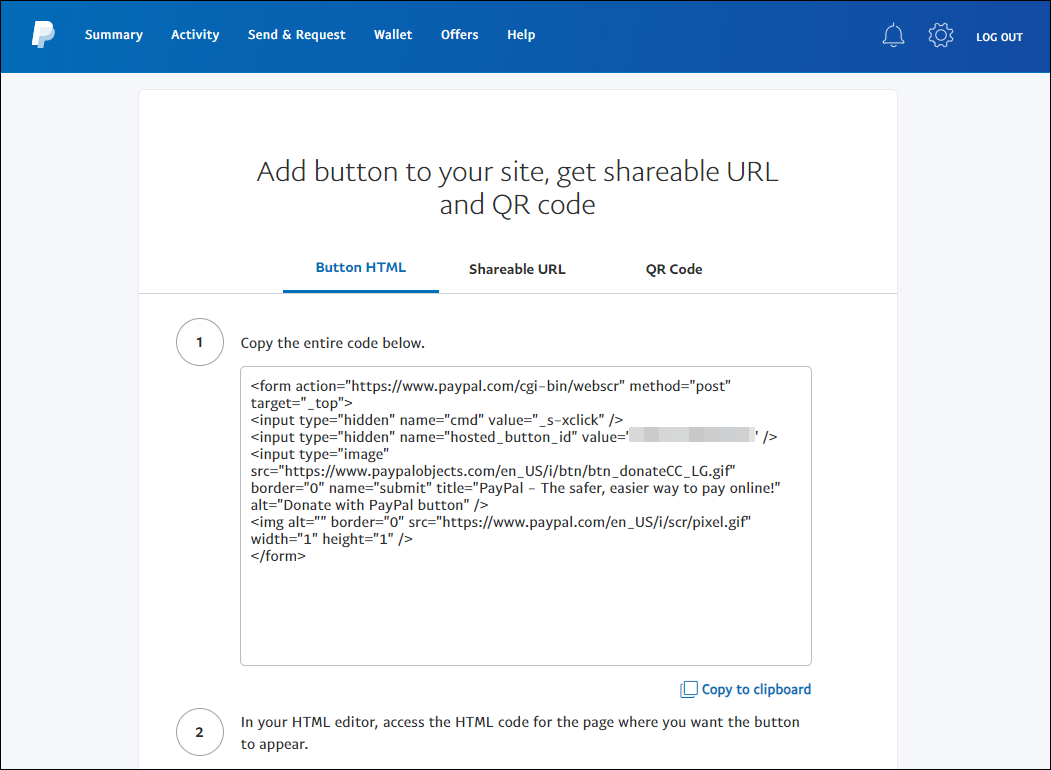
Copy the entire code and paste it wherever you want it to appear on your WordPress site.
10. Move from HTTP to HTTPS
Before you start doing this, make sure you already have HTTPS or SSL (certificates) installed and ready for use on your website. If you have that all set up and the only thing you need to do to set it up for your website, then here’s what you need to do:
Go to Settings > General and then update your URL to use the https protocol. After editing it, click Save.
Next, update your .htaccess file and add the following lines:
<IfModule mod_rewrite.c>
RewriteEngine On
RewriteCond %{HTTPS} off
RewriteRule ^(.*)$ https://%{HTTP_HOST}%{REQUEST_URI} [L,R=301]
</IfModule>
Then, edit your wp-config.php file and add the following line:
define('FORCE_SSL_ADMIN', true);
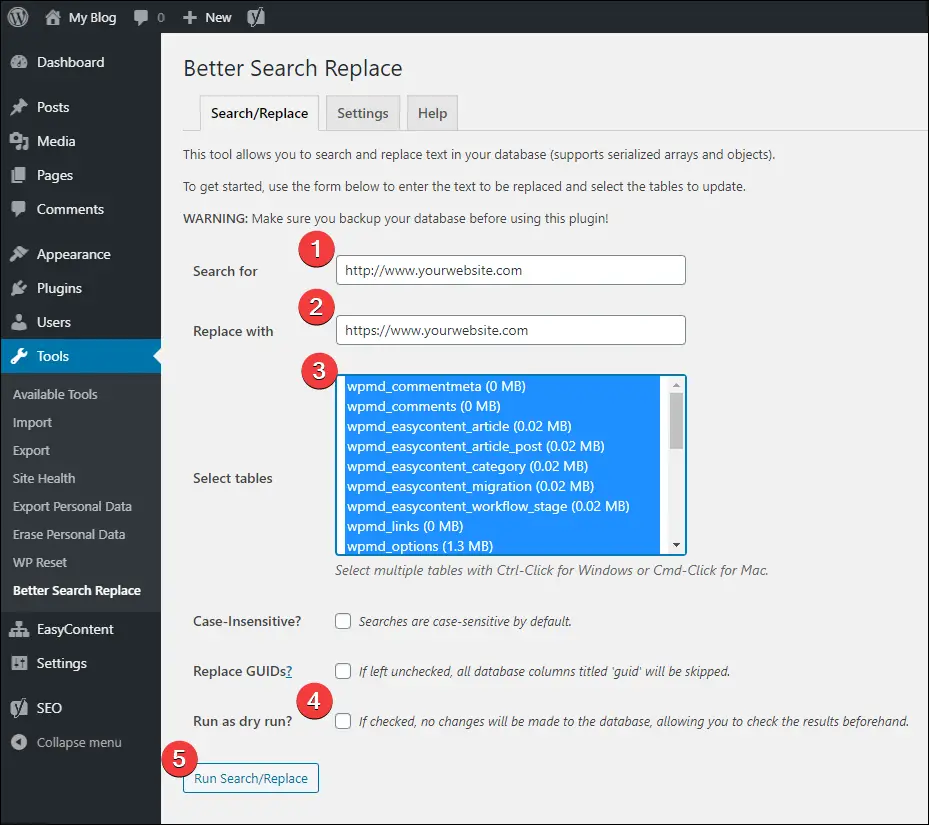
Finally, you need to update your database to reflect the change in the URL. Not doing so will result in a mixed content warning for your website. While you can do this manually, there is a plugin that makes it easier: Better Search and Replace.
Install this plugin then go to Tools > Better Search and Replace.
In the Search for field, put your old URL without https, for example, http://www.yourwebsite.com (#1) and then in the “Replace with” field, put your new URL with https, like https://www.yourwebsite.com (#2). Then, select all tables (#3) to ensure you miss nothing.
Uncheck the Run as dry run? (#4) option and finally, click the Run Search/Replace (#5) option.
11. Check For Broken Links
Broken links can hurt your website’s SEO (Google sees them as neglectful), besides the fact that they are a negative user experience. To ensure that you’re always free of broken links, you can use the plugin called Broken Link Checker.
Simply install and activate the plugin. It will immediately begin crawling your site looking for links to monitor.
If any link, be it external or internal, becomes broken, it will notify you and then allows you to easily edit or remove the said broken link right within the plugin’s dashboard.
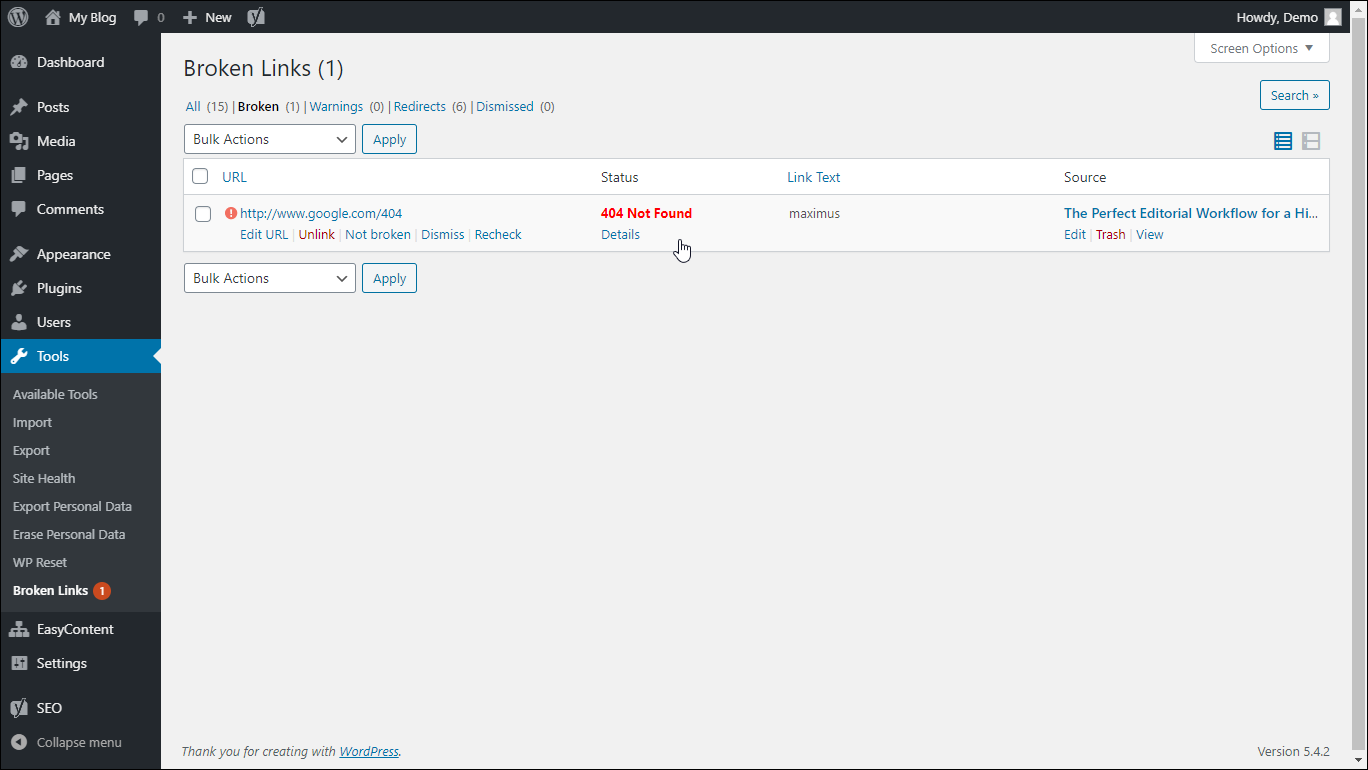
The plugin is highly configurable. You can select how often the crawler checks for broken links, use additional APIs for better detection, or check not only for normal links but also for plaintext links or even links within CSS stylesheets.
12. How to Limit Login Attempts
Brute force attacks are one of the most common forms of attacks used by hackers to get into a WordPress site.
You can easily prevent this by limiting login attempts. The plugin Limit Login Attempts Reloaded is written specifically to protect against such attacks.
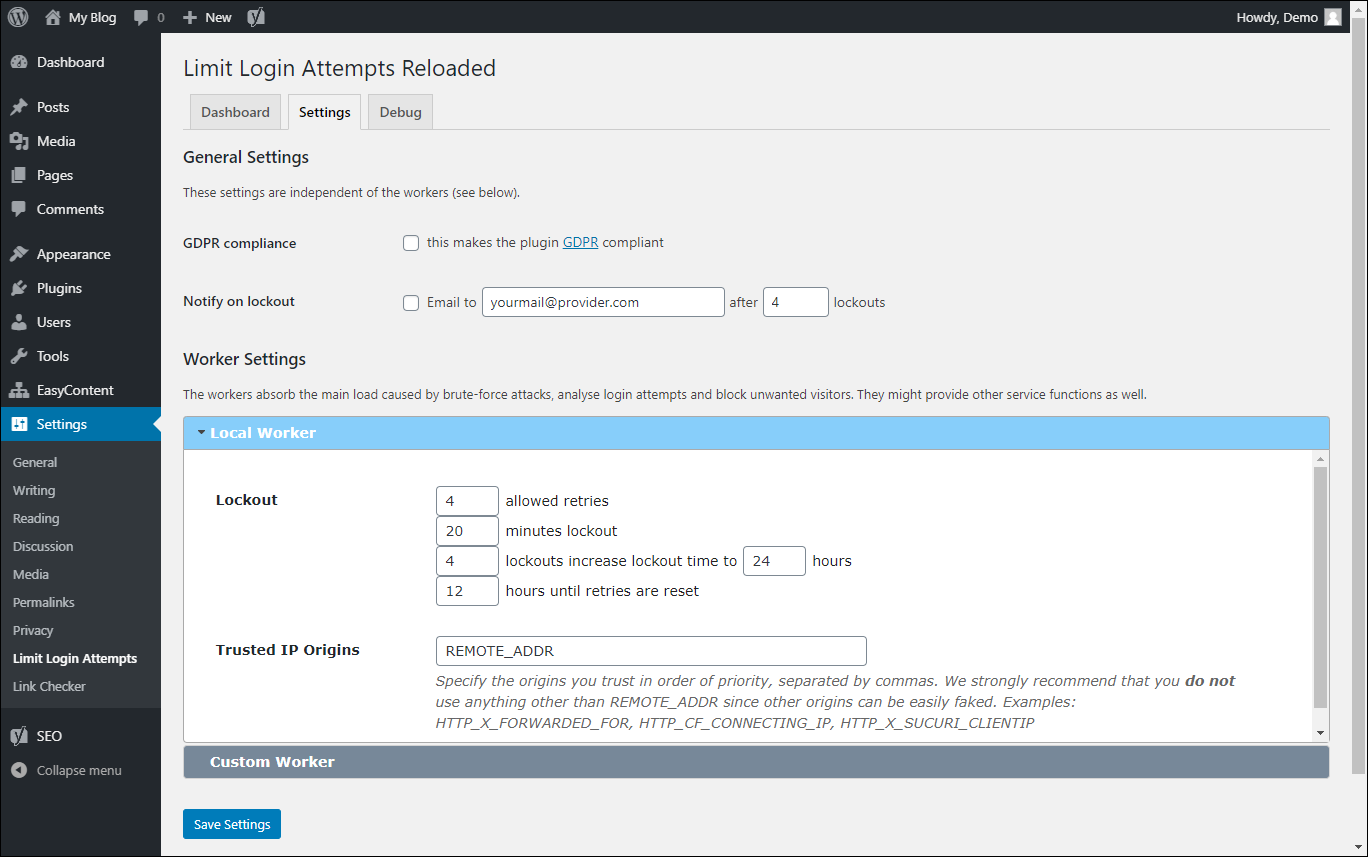
After installing the plugin, you can access it through Settings > Limit Login Attempts.
To configure the plugin, go to the Settings tab and configure lockout settings. The default values are often enough, but you can adjust these to fit your needs.
Here is some quick information about the settings so you can adjust them accordingly:
- Allowed retries - how many login attempts before a user (or IP) is locked out
- Minutes lockout - how long a user is locked out before being able to retry logging in again
- X lockouts increase lockout time to X hours - allows you to set an extended lockout period after a user has been locked out for a set number of times
- Hours until retries are reset - you can leave this at default
13. How to Add Two-Factor Authentication
Combined with Limit Login Attempts, Two Factor Authentication makes it impossible for anyone to login to your WordPress site. To add Two-Factor, one of the easiest methods is by using a plugin called Two Factor.
After installing the plugin, a new set of options will appear in Users > Your Profile.

You can then select which type Two-Factor options you want to use (you can enable multiple options for higher security.)
- Email - every time you log in, you’ll receive a code to your email address (the one registered under your WordPress profile).
- Time Based One-Time Password (Google Authenticator) - for this you need a smartphone with the Google Authenticator app installed.
- FIDO Universal 2nd Factor (U2F) - you’ll need a FIDO certified USB device to enable this setting, you can find more information about this here.
- Backup Verification Codes (Single Use) - if you lose access to, for example, your smartphone where you have your Google Authenticator installed, you may have trouble logging in. You can generate one-time backup verification codes that you can use to log in to your WordPress site. Make sure you check the enabled option for this after generating the codes so you can use them.
14. Disable Theme and Plugin Editor
When you have multiple administrators managing your website, you may want to prevent them from messing it up by disabling the theme and plugin editor.
To disable it, edit wp-config.php and add the following line of code just before the line saying “That’s all, stop editing! Happy publishing”:
define( 'DISALLOW_FILE_EDIT', true );
Once you add that line, the “edit” item will be removed from the themes and plugins admin sidebar menu.
15. Lazy Load Images
Lazy loading images is a concept, where images are loaded only when the user scrolls to them.
This makes the initial load time of a web page much faster when compared to the regular loading of images. This improves not only your user’s experience but also your SEO (Google rewards fast websites).
If you want a fast website, we would highly suggest you take a look at this WP Rocket article.
NOTE: As of WordPress 5.5, lazy loading became part of the core version. If you're using the latest version of WordPress, you can skip this trick.
However, the plugin we feature here works side by side with the built-in lazy loading making much more efficient. The plugin also handles backward compatibility and external images (which the WordPress core doesn't lazy load at all).
There are many plugins that allow you to implement lazy loading for your WordPress website, but one of the best is called a3 Lazy Load. Unlike its competitors which try to do a lot of other things, this plugin only offers you one feature: lazy loading for different assets of your website.
Simply install this plugin and make sure lazy loading is enabled via Settings > a3 Lazy Load and you’re good to go!
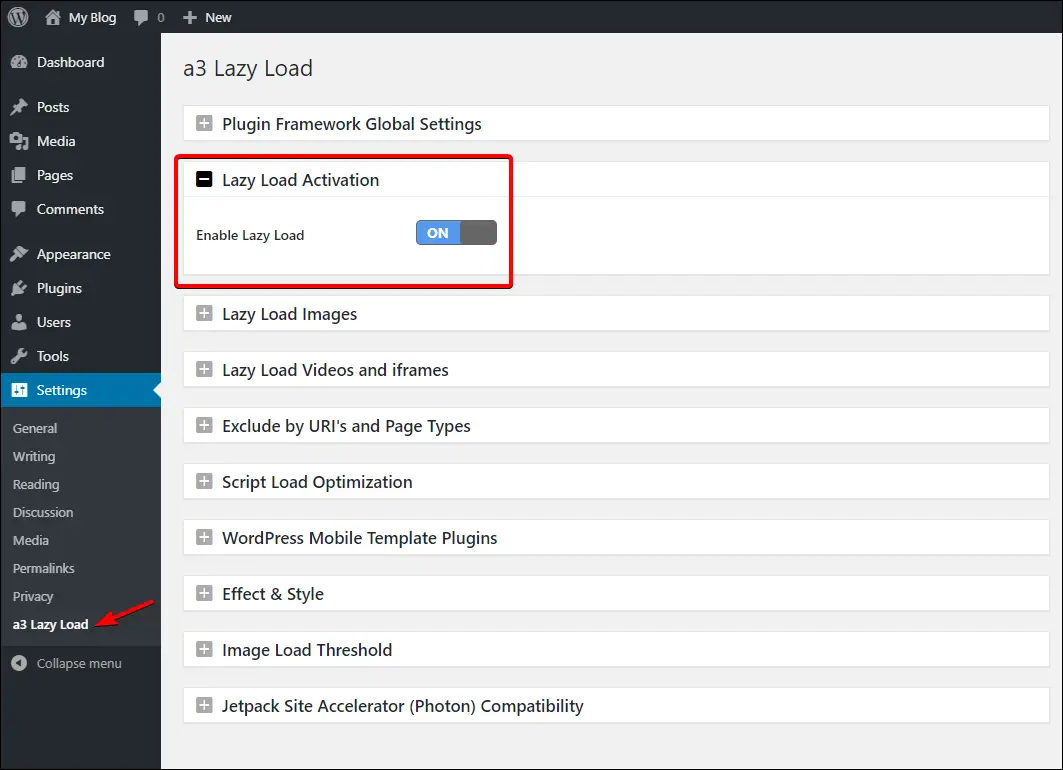
You now have lazy loading enabled on your website.
16. Remove Query Strings from Static Resources
Sometimes when you test your website with Pingdom Tools or GTMetrix, you’ll see a suggestion to remove query strings.
Query strings are the portion of a URL after ? and &. You can often see this on many parts of the web, particularly in your address bar when you search for something in Google.
www.yourwebsite.com/example.css?v=3.5
In the example URL above, the part ?v=3.5 is a query string. Usually, URLs like this are not cached even with cache-control and this can affect your website’s load time. That’s why website speed test tools recommend removing query strings.
To remove query strings from static resources, copy and paste this code snippet to your theme’s functions.php file:
function remove_query_strings() {
   if(!is_admin()) {
       add_filter('script_loader_src', 'remove_query_strings_split', 15);
       add_filter('style_loader_src', 'remove_query_strings_split', 15);
   }
}

function remove_query_strings_split($src){
   $output = preg_split("/(&ver|\?ver)/", $src);
   return $output[0];
}

add_action('init', 'remove_query_strings');
Save the file, and query strings from static resources should now be gone.
17. Deny Access to All .htaccess Files
By default, your server should automatically deny access to all files beginning with .ht but if for some reason, it’s not the case for you, we suggest moving to a better host with better security.
In the meantime, you can add the following code to your .htaccess file to prevent access to it:
<Files .htaccess>
	Order allow, deny
	Deny from all
</Files>
18. Add Custom Fonts in WordPress
Adding custom fonts in WordPress makes your site unique, especially if you’re using a popular theme.
While many premium themes include custom fonts already, you may still want to add a font of your own, a truly unique one, if you will.
To do that, you first need to find fonts for your website.
Some of the best places to look for fonts are Google Fonts, Adobe Fonts, and FontSquirrel. There are also tons of plugins that you can use to add custom fonts to your WordPress site.
Some of the best plugins are Use Any Font, WP Google Font, and Google Fonts Typography.
In this tip, however, we’re going to show you how to add a Google Fonts font to your website without using plugins.
First, find the font you want to use on Google Fonts. As an example, we’ll be using the Ranchers font.

- Select the style you want, click the Select this style button (#1) to add it to your selection. Note: the picture says “Remove this style” since we’ve already selected it.
- Go to the Embed (#2) tab in the sidebar and make note of the <link> (#3) and CSS rules to specify families (#4). We’ll use these later on.
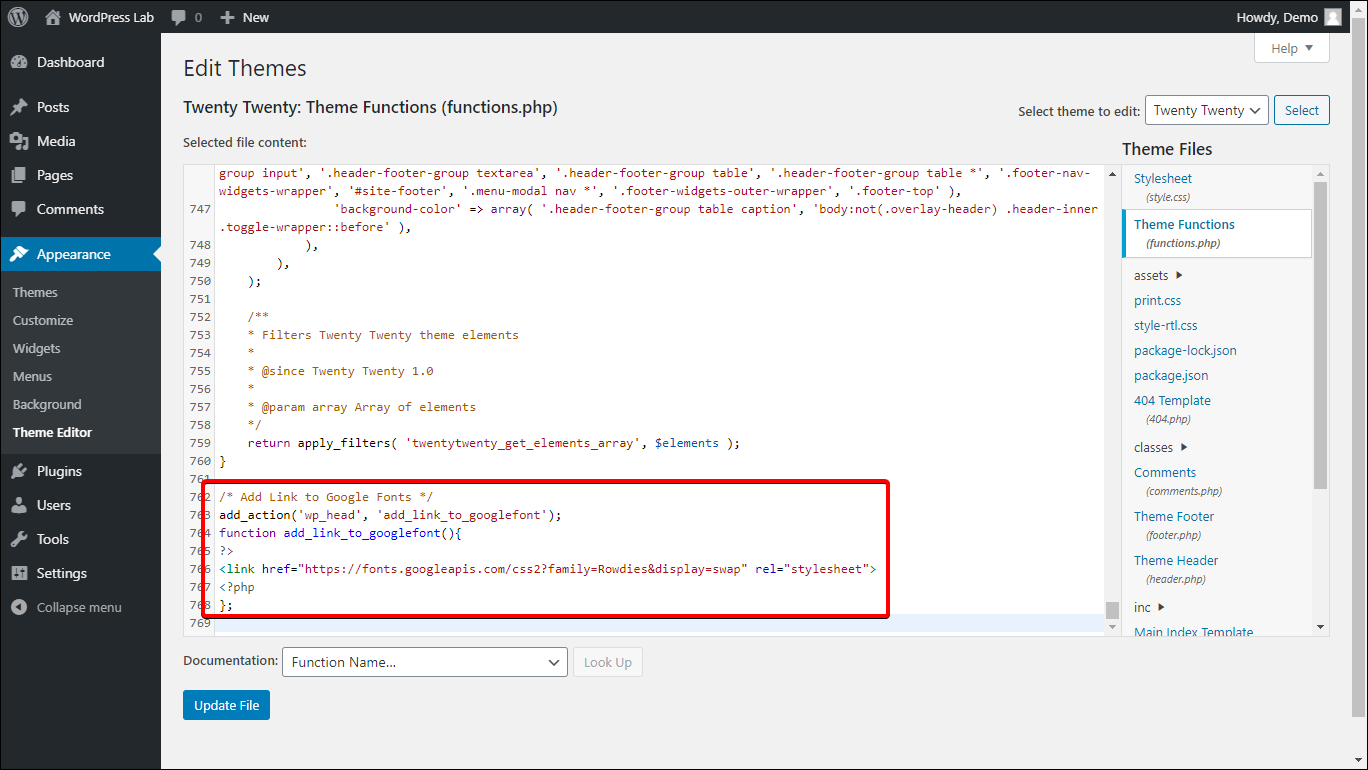
Login to your WordPress site and edit functions.php and add the following code snippet which allows us to inject a code snippet in our WordPress site’s header (thanks to Kinsta for the snippet template):
/* Add Link to Google Fonts */
add_action('wp_head', 'add_link_to_googlefont');
function add_link_to_googlefont(){
?>
INSERT CODE TO LINK THE FONT HERE
<?php
};
Replace the INSERT CODE TO LINK THE FONT HERE with the “<link>” (#3 in the image above) code snippet. Save the file. Your functions.php should now look similar to this:
Now we can start using the font.
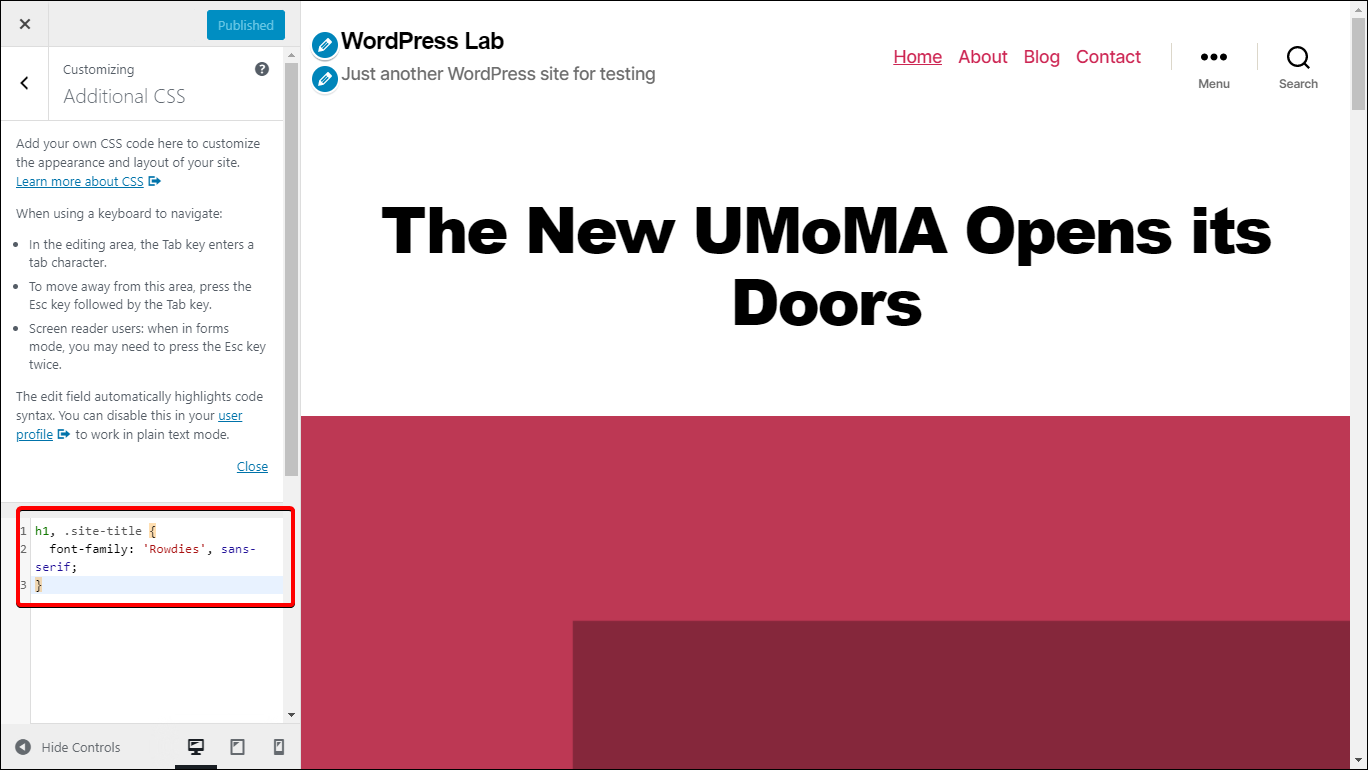
To apply the font, go to Appearance > Customize > Additional CSS then add CSS rules to apply the font to parts of the site. For example, if we want to apply the font to all h1 elements in the site as well as to the site title, we’ll add a CSS snippet like this:
h1, .site-title {
	INSERT CSS RULE HERE
}
Replace INSERT CSS RULE HERE with the “CSS rules to specify families” code snippet (#4 in the image above) earlier. Your CSS should look like this:
Note that the customizer’s preview won’t properly load our custom font, so you won’t see the changes here in real-time. You have to publish your changes and view your site to see if the font is loading properly.
If it doesn't, make sure you've followed each step correctly.
19. Add Paginated Comments
Sometimes, a blog post or article you publish on your WordPress site will attract dozens or even hundreds of comments. These can add up, leading to that article becoming very long.
But here's something you probably didn't know:
WordPress has a built-in setting for paginating comments to save such a problem from happening!
To access this, login to your WordPress dashboard and then go to Settings > Discussion and then under Other comment settings, tick the Break comments into pages option.
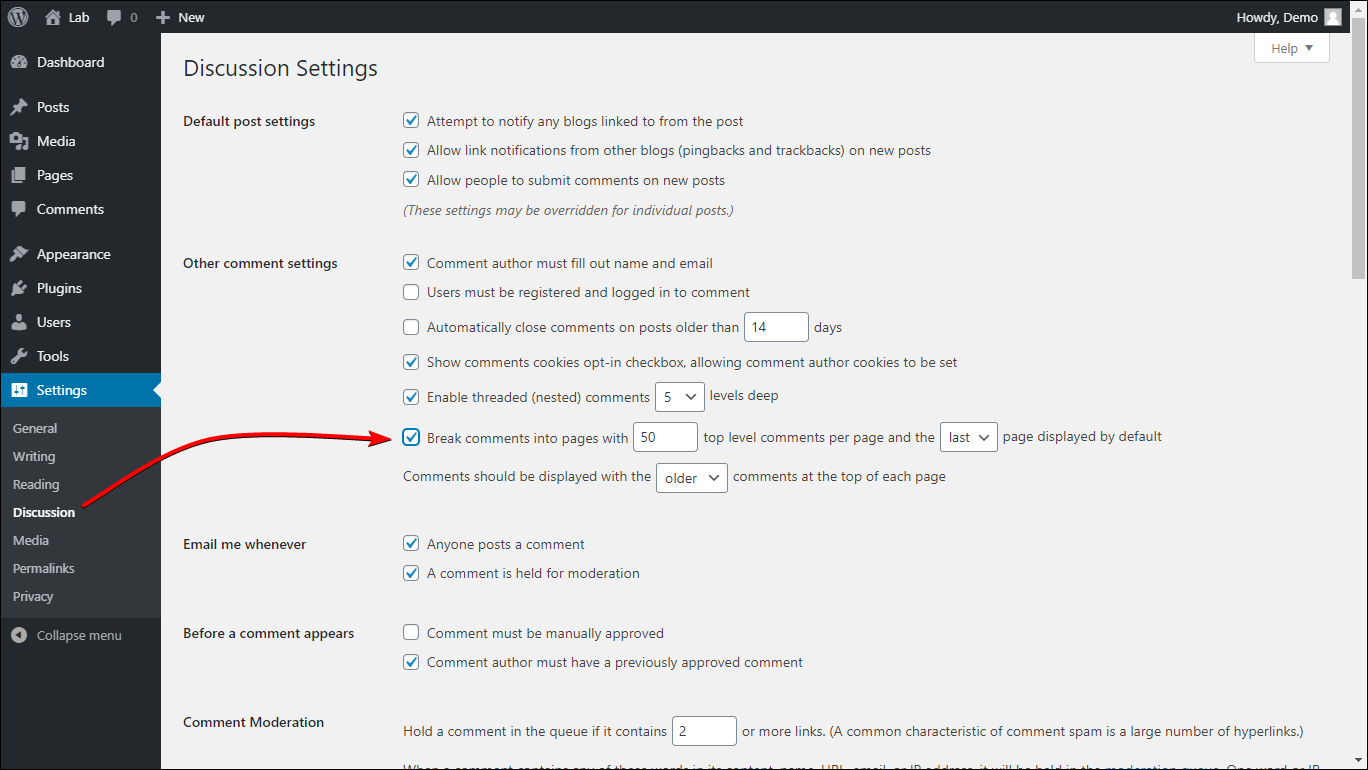
You can then set how many top-level comments are displayed before subsequent ones are put into the next page, their display order, etc.
Note that depending on your theme’s styling, you may see numbered pagination or Next/Previous pagination.
20. Change “Read More” Text
If you want to change the read more text, all you need to do is to add the following code snippet in your theme’s function.php file:
function custom_read_more_link() {
    return '<a class="more-link" href="' . get_permalink() . '">YOUR READ MORE TEXT HERE</a>';
}
add_filter( 'the_content_more_link', 'custom_read_more_link' );
Replace YOUR READ MORE TEXT HERE with your desired read more text. Depending on your theme, you might need to add custom styling to the .more-link class to fix how it looks.
21. Move WordPress to a New Host
If you want to move to a new host, the process is simpler than you might think.
Note: this guide assumes that you’ve already updated your domain’s DNS to point to your new host. If you haven’t done it yet, make sure you update it first. While waiting for your domain’s DNS to update, you can start following the steps below, but it might take between 24-48 hours for your site to be live again.
Here’s a simple step by step guide to moving your WordPress site to a new host:
STEP 1:
Backup your WordPress website’s files. Login to your cPanel account, and zip all of your website’s WordPress files, and download the created zip file to your computer.
You can also use FTP to download your files as they are to your computer (be sure to create a standalone folder on your computer that will hold nothing but your site’s WordPress files).
STEP 2:
Backup your database. Login to phpMyAdmin and backup your database. Select your site’s database in the left sidebar, then go to the Export tab.
In the Export method select Quick. In the Format, select SQL. Then click Go and a copy of your database will be downloaded to your computer.

NOTE: if you have an option for selecting rows, then you’re selecting a single table to export. Make sure you select the entire database. To ensure you have the entire database selected, the top status bar should display nothing else after Database: yourwebsite_db and the page should say something along the lines of exporting tables from “whatever_dbname” database and not exporting rows from “whatever_rowname” table.
STEP 3:
Create a new database on your new host. Make note of the database name, username and password. You’ll need these details soon.
STEP 4:
Extract your zipped WordPress backup (the one you downloaded in step 1) and edit the file wp-config.php.
Find and update the DB_NAME with your new database’s name, DB_USER with your new database’s user and DB_PASSWORD with your new database’s password. These are the details that you created in step 3.
STEP 5:
If you’re going to use a new domain name for your site, make a new backup copy of your old database, then edit the copy and do a find and replace of your old domain name with your new domain name.
NEW DOMAIN STEPS
Special text editors like Notepad++ or Visual Studio Code have a nifty find and replace feature to make this easier.
The format should be:
FIND: https://www.yourdomain.com
REPLACE WITH: https://www.yournewdomain.com
Make sure you include the correct protocol (http or https) as well as whether your site is using www or not (both for the new and old domains) and end it with the tld (i.e. .com, .net) without the backslash (/).
Once you’re sure with the changes, hit the find and replace all button or whatever equivalent option your text editor editor has. You can now upload this updated database to your new host.
If you mess up, you still have a backup database to go back to.
KEEPING THE SAME DOMAIN NAME
Login to your new host’s cPanel and then access phpMyAdmin. Click the name of your new database in the left sidebar and then go to the Import tab. Click the Choose file button and then select your WordPress website’s database backup and click Go. This process may take a while.

STEP 6:
Zip your updated WordPress backup and then login to your new host’s cPanel and upload the archive via cPanel’s File Manager. Once the upload is finished, unpack the files in the root of the public_html (or whatever folder your site lives — check your host for details — but usually it's public_html). Make sure the files are placed in the root, not in a folder! There are cases where extracting files from a zipped archive extracts them to a folder with the same name as the archive — if that’s the case, move the files to the root directory.
Alternatively, you can use FTP to upload the files to your new host without having to zip them up. Make sure you upload the updated one (the one where you updated the DB credentials).
From here, you can now login to your site using your old credentials.
And you’re done! You’ve successfully migrated your website to a new host!
22. Change WordPress Domain Name
Changing your WordPress’s domain name is easy.
Before you do this, make sure that the nameservers of the new domain are pointing to the current hosting server.
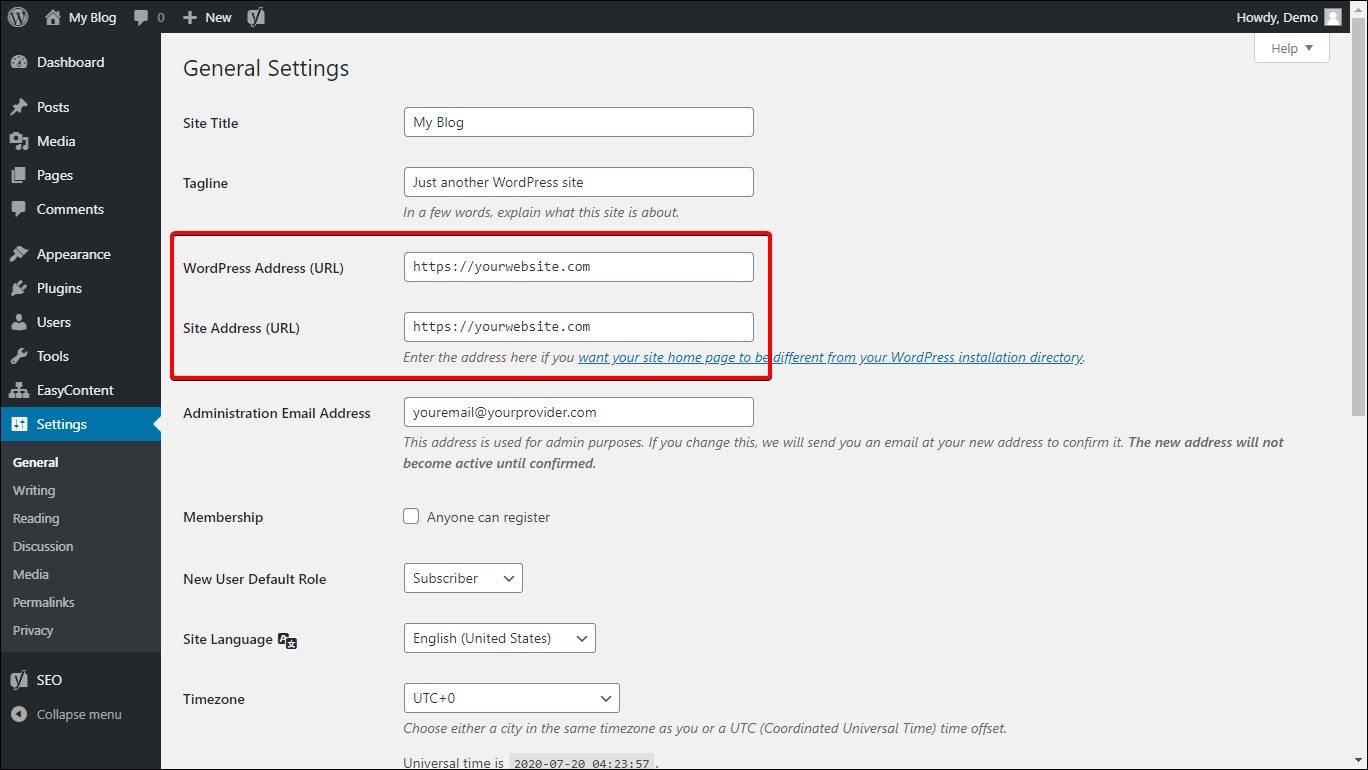
All you need to do is to log in to your WordPress dashboard then go to Settings > General and then update WordPress Address (URL) and Site Address (URL) with your new domain name (by default, both these settings should contain the same domain name [URL], if you don’t know whether you should put two different values here, then put your new domain name in both).

Click Save Changes.
You will now get a 404 error ... that’s normal.
Now access your website and WordPress admin page via the new domain. You’ve successfully updated your domain name!
Don’t forget to set up 301 redirects in your .htaccess file from your old URL to your new URL for SEO purposes.
23. How to Revert to Classic WordPress Editor
WordPress 5.0 saw the release of the new Gutenberg Editor, a block editor which is quite similar to page builders. With Gutenberg you can use “blocks” to add elements to your post or page, which makes creating visually stunning pages easier, even without the help of a page builder like Elementor or Beaver Builder.
However, we can’t deny that the classic WordPress editor has its own charm, and, for some, it might be easier to use.
If you prefer the Classic Editor, you can easily revert to it by installing the plugin called Classic Editor. After installing and activating the plugin, go to Settings > Writing and select Classic Editor as the default editor for all users.
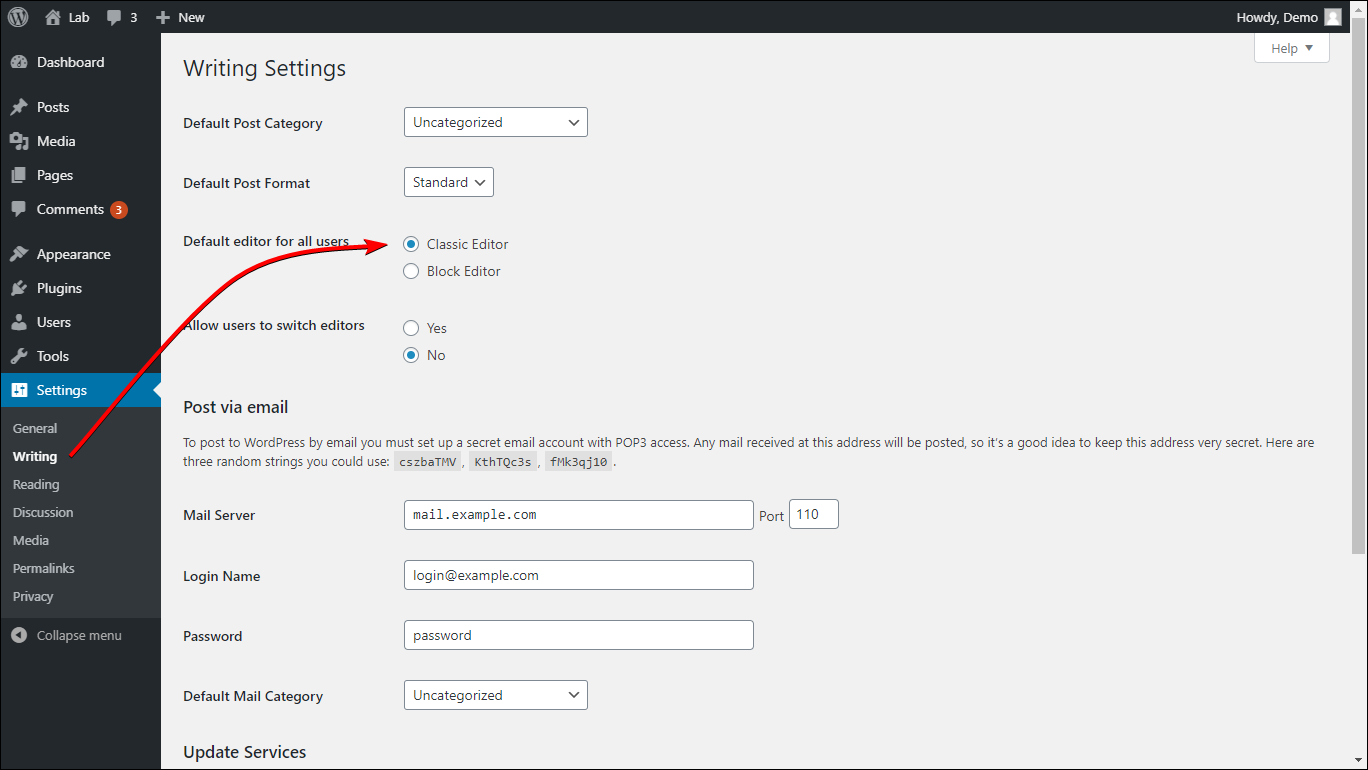
You may have noticed the new option that allows users to switch between editors. Selecting Yes adds a new widget allowing your authors to switch to their preferred editor at will.
24. Use Title Tags and Alt Text to Your Images
Adding image alt text helps search engines and screen readers understand what an image is. Additionally, if, for some reason, your image wasn’t able to load, the alt text will be displayed instead — allowing visitors to know what an image is supposed to be.
The Title tag on the other hand, while not as impactful to SEO as the alt tag, is still quite important in terms of usability. The title tag of the image will be displayed if a user hovers their mouse over an image (as seen below).
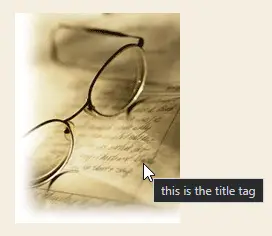
You can leave the title tag blank, but the alt tag is almost always mandatory.
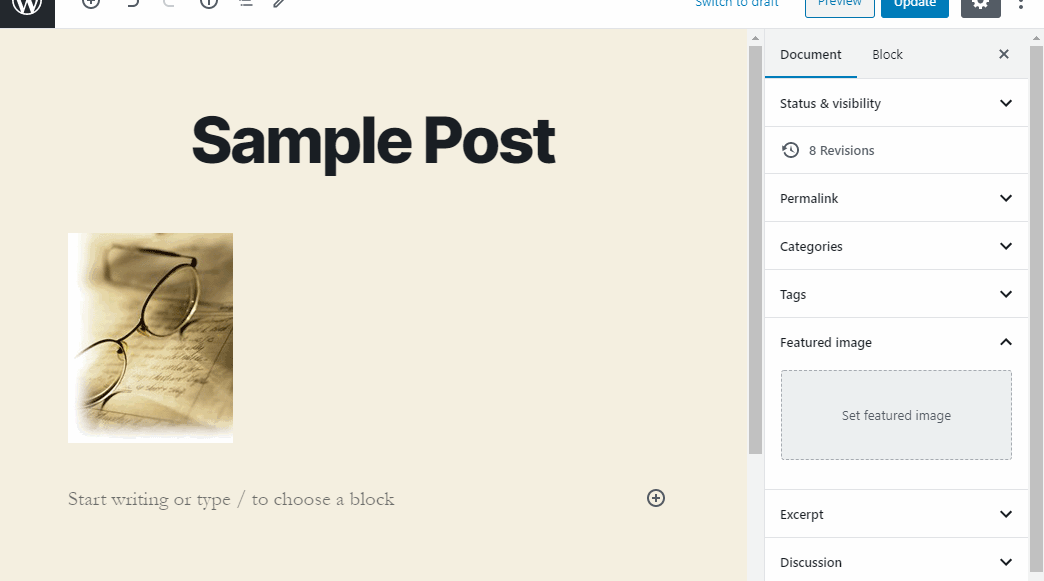
To add an alt tag to an image via the Block Editor, click the image and then on the sidebar, go to the Block tab and under image settings, you can find the setting for alt attribute and under that, in the advanced, you can find the setting for the image title.
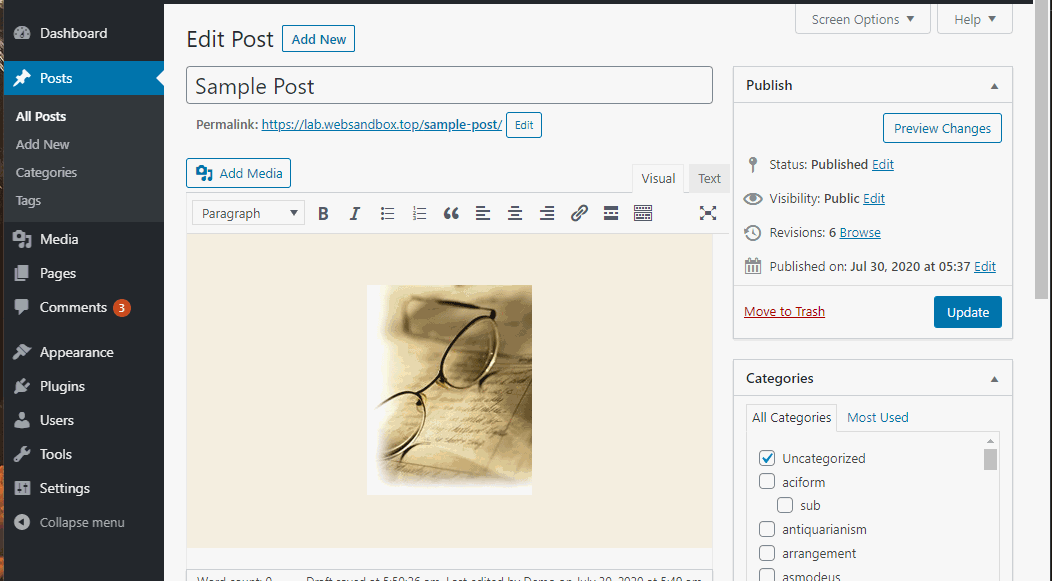
If you’re using the classic editor, click the image and then click the pencil icon to open image settings. From there, you should see the settings for both alt text and title.
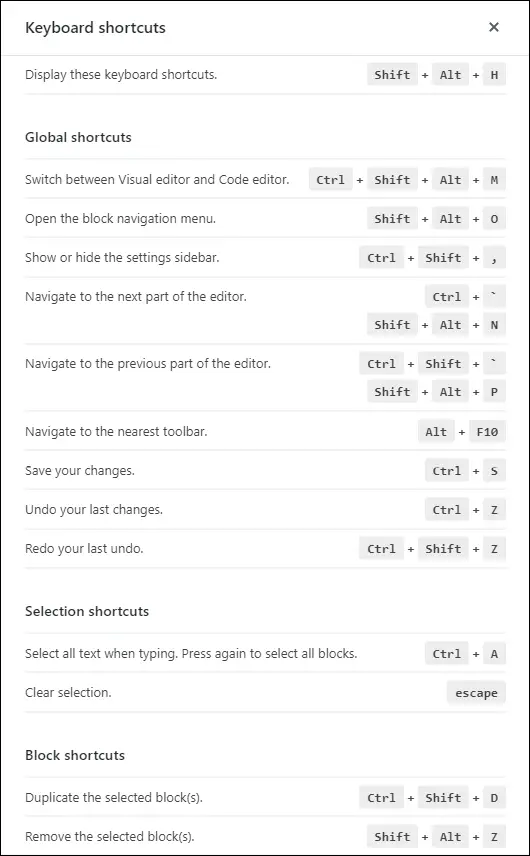
25. Gutenberg Shortcuts
These Gutenberg shortcuts can help you easily navigate and format your content when using the new WordPress’s editor.
To display Gutenberg shortcuts, press shift + alt + h (option + control + h for Mac).
26. Add One or More Footer Widget Areas
Not every website supports footer widgets. So this tweak will help you add multiple footer widgets into your WordPress theme. Read the tutorial here.
27. Customize Login Page
There are several ways to customize your login page. If you want to change it via CSS, here’s a cheat sheet:
|
Selector |
What it changes |
|
body.login |
Entire login page background |
|
body.login div#login h1 a |
WordPress logo |
|
body.login div#login form#loginform |
Login form |
|
body.login div#login form#loginform p label |
Username and password field label |
|
body.login div#login form#loginform input |
Username and password input field |
|
body.login div#login form#loginform input#user_login |
Username input field |
|
body.login div#login form#loginform input#user_pass |
Password input field |
|
body.login div#login form#loginform p.forgetmenot |
Remember me |
|
body.login div#login form#loginform p.submit input#wp-submit |
Submit button |
|
body.login div#login p#nav a |
“Lost your password” text link |
|
body.login div#login p#backtoblog a |
“Back to {site_name}” text link |
To use this CSS, you have to create a CSS file that will hold your custom styles. We recommend creating a folder in the root installation of WordPress that will hold your custom CSS file.
Then, you have to add a function in your theme’s functions.php file for the custom CSS file to load:
function custom_login_style() {
    wp_enqueue_style( 'custom-login', 'PATH_TO_YOUR_CUSTOM_CSS_FILE' );
}
add_action( 'login_enqueue_scripts', 'custom_login_style' );
Don’t forget to replace PATH_TO_YOUR_CUSTOM_CSS_FILE with the actual path of your CSS file.
28. Add Custom Page Template into WordPress
First, create a file called “mycustompagetemplate.php”. You can name the file whatever you want as long as the filename extension is “.php”.
Open this file in your favorite text editor and add this line:
<?php /* Template Name: My Custom Page Template */ ?>
This will tell WordPress that this is a template file, we will call it “My Custom Page Template”. Again, you can put whatever you want after Template Name, make sure it reflects what the template is supposed to be used for (i.e. Full Width Template, Red BG Template, etc).
Upload the file to the root directory of your theme (or whatever theme you plan to use this custom template on). This is typically “wp-content/themes/themename”.
After that, try creating a new post or page and you’ll see your custom template available for selection. Its name will be whatever you put in the Template Name.
Right now, however, if you apply your custom template to a page, the page will display nothing because there’s nothing in our template file.
To get our template file display something, let’s change the content of myscustomtemplate.php file to the following:
<?php /* Template Name: My Custom Page Template */ ?>

<?php get_header(); ?>

<main id="site-content" role="main">

<?php

if ( have_posts() ) {

    while ( have_posts() ) {
        the_post();
        // this is tested using twentytwenty theme, you may need to adjust the below code snippet to match your current theme
        get_template_part( 'template-parts/content' );
    }

}

?>

</main><!-- #site-content -->

<?php get_footer(); ?>
Now, apply the template to a page and see it display the page’s content properly. From here, you can make custom changes to this template by adding your own custom code snippets, custom styling, etc.
29. Add Infinite Scroll WordPress Trick
Adding infinite scroll to your WordPress site can be easily done by a simple trick, but it requires you to install the JetPack plugin. After installing the plugin, go to Jetpack > Settings then go to the Writing tab, and find the Theme Enhancements section.
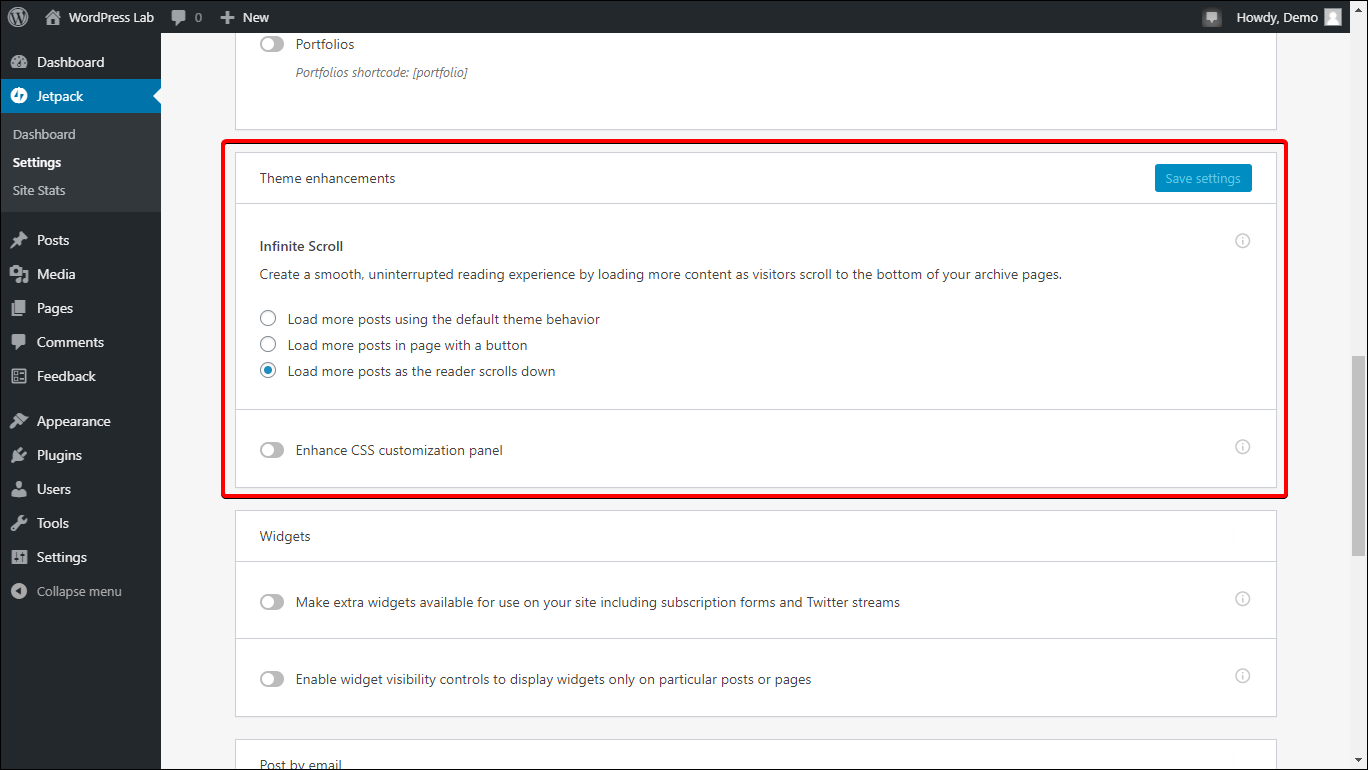
If this section is not enabled or if it's asking for support, edit your theme’s function.php and add the following code snippet:
add_theme_support( 'infinite-scroll', array(
 'container' => 'content',
 'footer' => 'page',
) );
Now, the infinite scroll option in JetPack should now be present.
30. Disable Post Revisions
If for some reason, you don’t want to store post revisions (thereby reducing your database’s size), you can add the following line of code to your wp-config.php file:
define('WP_POST_REVISIONS', false );
Save the file and you’re done!
31. Install a Child Theme
Creating a child theme is an excellent way of adding permanent customizations to your theme.
If you’re making lots of edits to your website via functions.php file, you know that every time you update the theme, the changes you make get lost. One way of preserving them is by using a child theme.
We’ll be using the TwentyTwenty theme as an example.
To create a child theme, access your root WordPress installation via cPanel’s file manager or via FTP and navigate to wp-content > themes.
Inside that, create a new folder, give it the same name as its parent theme but with “-child” suffix (for example “twentytwenty-child”).
Inside that folder, create a file called “style.css”. Inside it, paste the following:
/*
 Theme Name:   Twenty Twenty Child
 Description:  Twenty Twenty Child Theme
 Template:     twentytwenty
 Version:      1.0.0
*/
This tells WordPress that we’re creating a child theme based on Twenty Twenty. You can add other parameters here, but the Theme Name and Template are required. The theme name is your child theme’s name and the template is the parent theme’s directory name.
And that’s it!
You should now be able to see and activate your child theme when you log in to your WordPress dashboard. To add custom functions, create a functions.php file in the child theme’s directory and add your custom code snippets.
You will no longer lose your custom code snippets even when you update the parent theme.
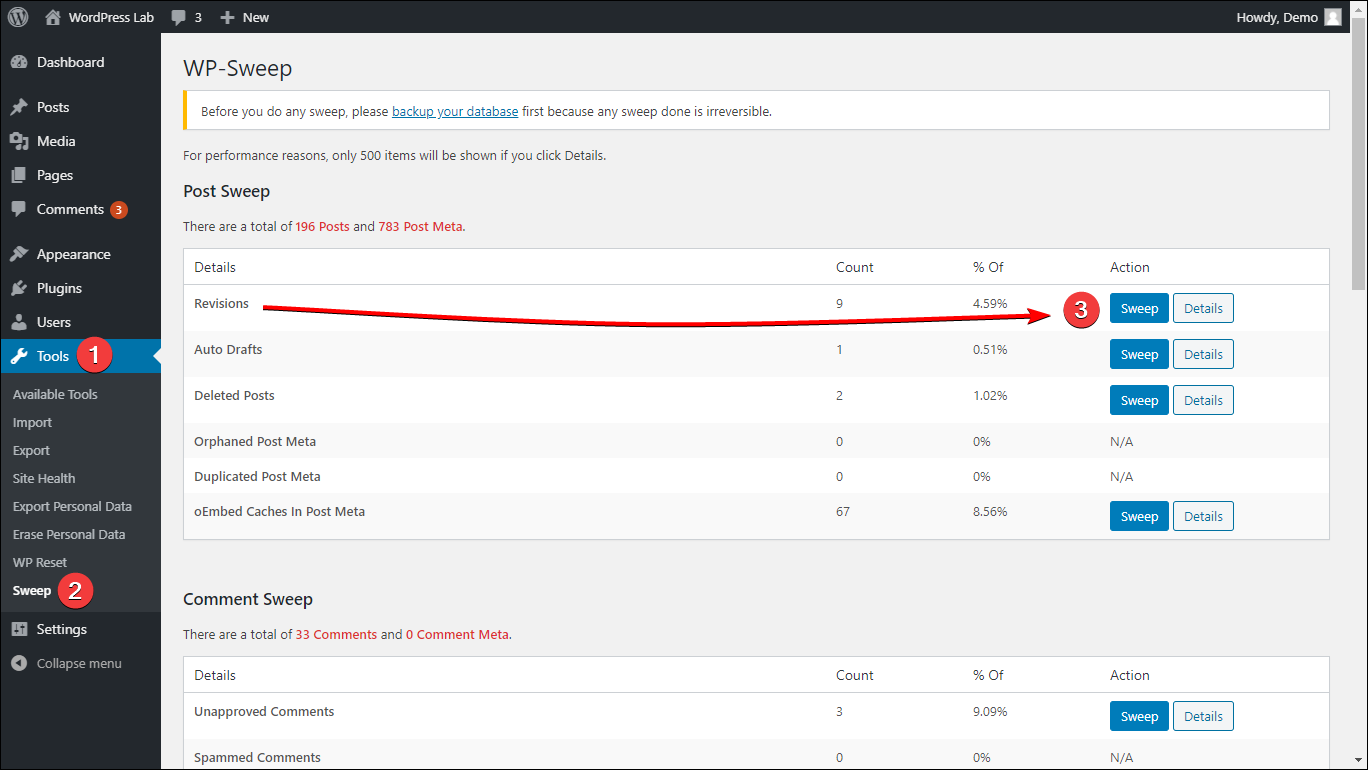
32. Delete Existing Post Revisions
You can easily delete existing post revisions by installing the plugin called “WP-Sweep”. After installing and activating that plugin, you can access it via Tools > Sweep.
From there, you can find Revisions and click its corresponding Sweep button to clean post revisions.
If you'd rather not use a plugin and you’re comfortable using MySQL commands and using phpMyAdmin, the query you’ll want to use is:
DELETE FROM wp_posts WHERE post_type = "revision";
Don’t forget to replace wp_ with your database’s WordPress prefix. Also, make sure you take a backup before you do this!
33. Add Featured Box Inside the Content
One of the best ways to add a featured box inside the content is by using a shortcode.
Copy and paste the following code snippet to your functions.php file:
function content_featured_box($atts, $content = null) {
return '<div style="margin-bottom: 25px; overflow: hidden; padding: 20px; color: #919191; background-color: #F0F8FF; border-left: 8px solid #CEE1EF; font-size: 18px;">' . do_shortcode($content) . '</div>';
}
add_shortcode('featuredbox', 'content_featured_box');
To use this, simply use the short code [featuredbox]Your Featured Content Goes Here[/featuredbox] and put your featured content in between (you can add HTML code).
You can customize its appearance by editing the shortcode or by assigning an ID or class to the <div> element in the functions.php code and then giving it custom styling via your theme’s CSS editor (customize > additional CSS).
34. Show Related Posts
One of the best ways to keep users engaged on your website is by showing related content. But how can you do this on your WordPress website?
There are many plugins out there that do the job like YARPP (which we don't like because it creates performance issues) and JetPack. If you want a solution that makes use of plugins, install one of these plugins and you will get related posts functionality right out of the box.
If you want a DIY solution, continue reading.
First, you need to create a child theme of your current theme. Once you’re done with that, make a copy of your parent theme’s single.php or singular.php file into the child theme’s folder.
In the child theme’s root directory, create a file called related-posts.php and inside it, put the following code snippet. This snippet will display four related posts by category. This is quite a basic query, but gets the job done.
<div class="related-posts">
<h4>You might also like:</h4>
<?php
$related = new WP_Query(array(
    'category__in' => wp_get_post_categories($post->ID) ,
    'posts_per_page' => 4, // number of related posts to display
    'post__not_in' => array(
        $post->ID
    )
));

if ($related->have_posts())
{
    while ($related->have_posts())
    {
        $related->the_post(); ?>
     <div class="related-posts-item">
         <a class="related-posts-link" href="/<?php the_permalink(); ?>"><?php the_title(); ?></a>
		 <div class="related-posts-excerpt"><?php the_excerpt(); ?></div> <!-- Display excerpt -->
     </div><?php
    }
    wp_reset_postdata();
}
?>
</div>
Then, in the single.php or singular.php file of your child theme, insert the following code snippet wherever you want related posts to appear. For example, you can put this right before the closing </main> tag.
<?php get_template_part('related', 'posts'); ?>
Finally, we need to style the new content. In your child theme’s style.css file, add the following code snippet:
.related-posts  {
	margin: 2em auto auto auto;
	width: 70%;
	padding-bottom: 35px;
	text-align: center;
}

.related-posts-link {
	padding: 5px 0;
	font-size: 1.65em;
	font-variant: small-caps;
	font-weight: bold;
}

.related-posts-excerpt {
	margin: auto;
	padding-top: 10px;
	width: 75%;
}
You can configure these styles with whatever you want your related posts to appear.
There you have it! You now have a simple related posts functionality on your theme. You can tweak the query to display other content, such as sort by publishing date to get the most recently published or updated content in the category, or other tweaks that make sense for you.
35. Erase Thousands of Unfiltered Spam Comments in Seconds
You might think it’s hard to get rid of all of your spam comments (maybe thousands of them) in seconds, but it's not. WordPress has a built-in spam cleaner which you can easily access via Comments > Spam.
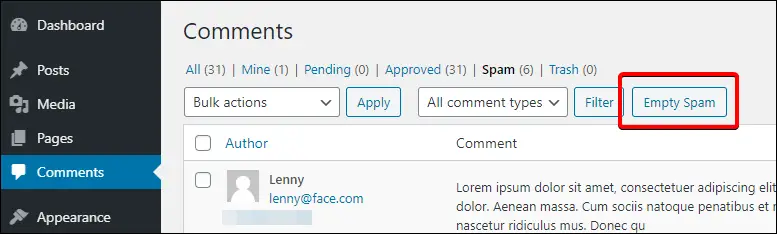
There should be an Empty Spam button in there which when clicked, will delete all spam comments.
36. Disable Admin Bar Access to all Users
Often for membership/community site, the WordPress admin bar would not be customized for the end-users. In such cases, you may want to disable admin bar access.
If you want to disable access to the admin bar for all the users including the administrator, add the following to your theme’s functions.php file:
show_admin_bar(false);
Now, whenever a logged-in user is viewing your site’s frontend, the admin bar won’t show up.
37. Increase PHP memory
To increase your WordPress site’s PHP memory limit, all you need to do is to edit your website’s wp-config.php file and add the following line right after the line that says define( 'WP_DEBUG', false );
Note: your debug might be set to a different value, but as long as the line says “WP_DEBUG”, it’s the right place.
define( 'WP_MEMORY_LIMIT', '256M' );
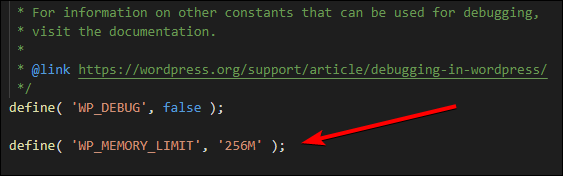
You can change the second parameter to whatever value you wish followed by “M” which stands for megabytes. 256M should be more than enough for most sites but feel free to adjust according to your needs and according to your hosting plan.
Save the file and you're done, you’ve successfully increased your WordPress site’s memory limit.
38. Disable Checking for Plugin Updates
If, for some reason, you want to disable WordPress plugin update check (maybe for performance reasons), all you need to do is to add the following code snippet to your theme’s functions.php file:
remove_action( 'load-update-core.php', 'wp_update_plugins' );

add_filter( 'pre_site_transient_update_plugins', create_function( '$a', "return null;" ) );
Now you won’t get plugin update notifications anymore.
Warning: it’s not advisable to leave this on for a long time since outdated plugins can introduce security risks to your site. Unless you have other ways to keep your site updated and mitigate such risks.
39. Increase/Decrease Maximum Upload Size through Media Uploader
If you need to increase or decrease file uploads, all you need to do is to add the following code to your site’s .htaccess file:
php_value upload_max_filesize 64M
php_value post_max_size 64M
The above code will increase your upload size to 64mb. You can change it to something like 2M to lower the upload size to 2MB or to something like 256M to increase it further to 256MB.
If your uploads time out, add the following:
php_value max_execution_time 300
php_value max_input_time 300
By default, the maximum execution time for PHP scripts is 30 seconds.
If a script runs longer than that default time, PHP terminates it and reports an error.
The above code snippets make it so that PHP scripts can run for up to 300 seconds. You might need to adjust it especially if you increase your upload size limit to even larger file size.
40. Redirect to a Maintenance Page
If you need to put your site in maintenance mode, you may want to redirect everyone to your maintenance page to let them know that your site is currently being updated/maintained.
For example, let’s say your maintenance page is located at yoursite.com/maintenance.html, then you need to add the following code to your .htaccess file:
# Redirect all traffic to maintenance.html file
RewriteEngine on
RewriteCond %{REQUEST_URI} !/maintenance.html$
RewriteCond %{REMOTE_ADDR} !^123\.123\.123\.123
RewriteRule $ /maintenance.html [R=302,L]
Now, as long as this code is active in your .htaccess file, everyone will be redirected to your maintenance page. Don’t forget to remove this after you’re done with your maintenance!
41. Custom Error Pages
If you want to create your own custom error pages, all you need to do is to edit your .htaccess file to point to your custom error pages.
ErrorDocument # /directory/your-error-file.html
Replace # with the error code, /directory/ with the path to your error file and your-error-file.php for your error file’s filename.
For example, the below code snippets declare custom error pages for 403, 404 and 500 errors. The files are called “XXX-error.html” and since there’s no path, this assumes that these files are in the root directory of the website.
# Custom error page for error 403, 404 and 500
ErrorDocument 404 /404-error.html
ErrorDocument 403 /403-error.html
ErrorDocument 500 /500-error.html
42. Highlight Author Comments
Sometimes, you want to make author comments stand out among the rest. All you need to do is to add a custom CSS via Appearance > Customize > Additional CSS:
.bypostauthor { background: #eee; }
This will highlight the author’s comment with a grey background. You can change it with whatever color you want and add additional styling.
43. Stay Logged-in for a Long(er) Period
By default, WordPress keeps you logged in for 2 weeks if you check the “Remember me” option while logging in.
Add the following code snippet to your theme’s function.php file so you can stay logged in to your site for a year. You can convert any time to seconds and update accordingly if you want it to be longer or shorter.
add_filter( 'auth_cookie_expiration', 'stay_logged_in_for_1_year' );
function stay_logged_in_for_1_year( $expire ) {
	return 31556926; // 1 year in seconds
}
44. Enable Shortcodes on Widgets
Shortcodes work out of the box on many widgets, but not all. To make sure that your widgets properly handle shortcodes, add the following code snippet to your theme’s functions.php file:
add_filter( 'widget_text', 'do_shortcode' );
45. Change Excerpt Length
By default, the length of the excerpts in WordPress is 55 words. To change it, add the following code snippet in your theme’s functions.php file:
function custom_excerpt_length( $length ) {
	return 20;
}
add_filter( 'excerpt_length', 'custom_excerpt_length', 999 );
This will change your theme’s excerpt length to 20 words as indicated by the line that says return 20; but you can change it to any number you like.
46. Display Most Commented Posts via Shortcode
If you wish to display a list of your most commented posts anywhere on your site, all you need to do is to add the following code snippet to your theme’s function.php file:
function display_most_commented_posts() {
    // start output buffering
    ob_start();
    ?>
    <ul class="most-commented">
    <?php
    // Run WP_Query
    // Change posts_per_page value to limit the number of posts
    // Set ignore_sticky_posts value to 1 to not include sticky post
    // 		this is because even if it has 0 comment, it will always appear on top
    // 		if you wish to include sticky post, remove the parameter or set it to 0
    $query = new WP_Query('ignore_sticky_posts=1&orderby=comment_count&posts_per_page=10');

    //begin loop
    while ($query->have_posts()) : $query->the_post(); ?>

    <li><a href="/<?php the_permalink(); ?>" title="<?php the_title(); ?>"><?php the_title(); ?></a> <span class="dmcp-comment-count"><?php comments_popup_link('No Comments;', '1 Comment', '% Comments'); ?></span></li>
    <?php endwhile; // end loop ?>
    </ul>
    <?php

    // Turn off output buffering
     $output = ob_get_clean();

    //Return output
    return $output;
}

// create the shortcode
add_shortcode('dmcp_most_commented', 'display_most_commented_posts');
// make sure widgets accept/parse shortcodes properly
add_filter('widget_text', 'do_shortcode');
Once you’ve added the code snippet and saved the file, you can now use the shortcode:
[dmcp_most_commented]
...anywhere on your site and the list of the top 10 (or whatever value you set to posts_per_page) most commented posts will be displayed.
47. Customize Texts After the Comment Form
Add the following code to your theme’s functions.php to customize the text after the comment form. Replace the text with your own preferred text.
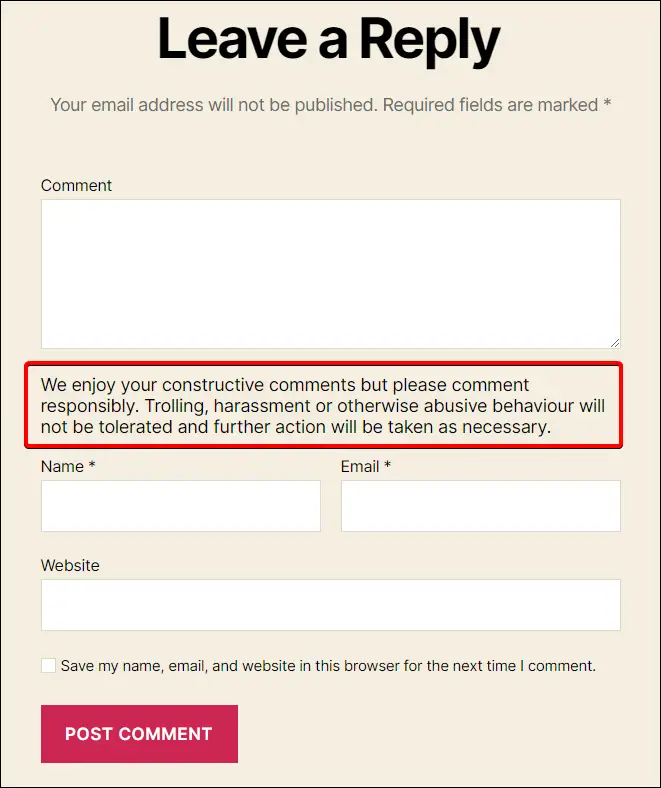
function collectiveray_comment_text_after($arg) {
	$arg['comment_notes_after'] = "<div id='cmtnotes'>We enjoy your constructive comments but please comment responsibly. Trolling, harassment or otherwise abusive behaviour will not be tolerated and further action will be taken as necessary.</div>";
	return $arg;
}
add_filter('comment_form_defaults', 'collectiveray_comment_text_after');
The above example will look like this:
48. Identify Unused Tags
If you manually deleted posts using SQL queries, the tags you used on those posts will remain in your database and become unused.
To identify all of your unused tags, run the following SQL query:
SELECT *
FROM wp_terms wterms INNER JOIN wp_term_taxonomy wttax ON wterms.term_id = wttax.term_id
WHERE wttax.taxonomy = 'post_tag' AND wttax.count =0;
NOTE: if you use a different database prefix for your WordPress site (the default is wp_), make sure you change the above code snippet accordingly (specifically the wp_terms and wp_term_taxonomy terms).
Running the above query will return a list of all unused tags. You can then delete them safely from your WordPress dashboard.
49. Remove Help and Screen Options from Dashboard
This WordPress tip cleans your admin dashboard from unnecessary clutter. You can see the options “help” and “screen” on the top right-hand side of your WordPress dashboard.
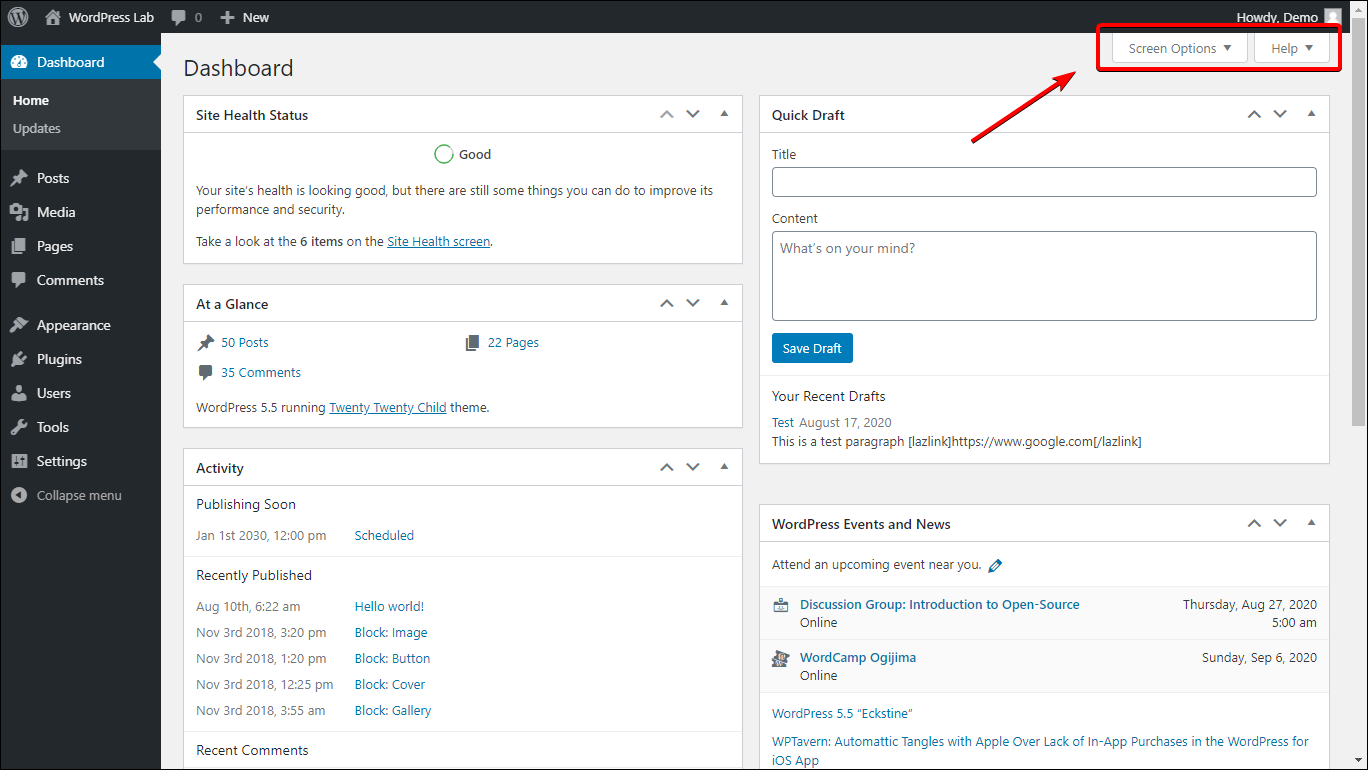
Add the following code snippets to your theme’s functions.php file to remove these items from the dashboard.
add_filter( 'contextual_help', 'wpse_25034_remove_dashboard_help_tab', 999, 3 );

add_filter( 'screen_options_show_screen', 'wpse_25034_remove_help_tab' );

function wpse_25034_remove_dashboard_help_tab( $old_help, $screen_id, $screen ) {
    if( 'dashboard' != $screen->base )
    return $old_help;
    $screen->remove_help_tabs();
    return $old_help;
}

function wpse_25034_remove_help_tab( $visible ) {
    global $current_screen;
    if( 'dashboard' == $current_screen->base )
    return false;
    return $visible;
}
50. Show Popular Posts in the Sidebar
To show the 5 most popular posts according to the comments count, place the below lines in your theme’s sidebar.php file.
If you want to show more or less than 5, just change the value 5 to another value you prefer in the $result line.
<h3>Popular Posts</h3>
<ul>
<?php $result = $wpdb->get_results("SELECT comment_count,ID,post_title FROM $wpdb->posts ORDER BY comment_count DESC LIMIT 0 , 5");
foreach ($result as $post) {
    setup_postdata($post);
    $postid = $post->ID;
    $title = $post->post_title;
    $commentcount = $post->comment_count;

    if ($commentcount != 0) { ?>
        <li><a href="/<?php echo get_permalink($postid); ?>" title="<?php echo $title ?>"><?php echo $title ?></a> {<?php echo $commentcount ?>}</li>
<?php } } ?>
</ul>
51. Add Breadcrumbs to Your Theme
Many themes have built-in breadcrumbs, but if you’re using one that doesn’t have one, it’s easy to implement.
Install the plugin Breadcrumb NavXT. After installing and activating it, you will have a new widget called Breadcrumb NavXT that you can use to display your breadcrumbs wherever you put that widget on.
If you want more control over where you want your breadcrumbs to appear, you can add the following code snippet to your theme’s template where you would like the breadcrumbs to show up (e.g. single.php, archives.php, etc.).
<?php
if(function_exaists('bcn_display')) {
    bcn_display();
}?>
You can customize your breadcrumb’s style and appearance by going to Settings > Breadcrumb NavXT.
52. Customize Your Sidebar for Individual Posts
If you want to display a custom sidebar for individual posts or pages, you can use this plugin called Custom Sidebars.
This plugin allows you to display not only a custom sidebar but even widgets that are meant to appear only on certain areas of your WordPress site (like, for example, on the footer or header).
After installing and activating the plugin, you’ll get a new widget in the post editor that allows you to choose which specific widgets or sidebars you want to appear on a certain location per post or page.

As you can see from the image above, you can, for example, even display your left sidebar on your footer. With some creative tweaking you can create quite a lot of flexibility.
53. Link to External Links from your Post Titles
Usually, titles of blog posts in the homepage are linked to the post's URL.
However, if the sole purpose of publishing a particular blog post is to share a particular external link, you may not want to entice the users to open up your post. Instead, the users can visit the external link by simply clicking the blog post title from the homepage itself. Add the following code to your theme’s functions.php file.
function print_post_title() {
    global $post;
    $thePostID = $post->ID;
    $post_id = get_post($thePostID);
    $title = $post_id->post_title;
    $perm = get_permalink($post_id);
    $post_keys = array();
    $post_val = array();
    $post_keys = get_post_custom_keys($thePostID);

    if (!empty($post_keys)) {
        foreach ($post_keys as $pkey) {
            if ($pkey == 'external_url_title') {
                $post_val = get_post_custom_values($pkey);
            }
        }
        if (empty($post_val)) {
            $link = $perm;
        }
        else {
            $link = $post_val[0];
        }
    }
    else {
        $link = $perm;
    }
    echo '<h2><a href="' . $link . '" rel="bookmark" title="' . $title . '">' . $title . '</a></h2>';
}
Next, find the following code snippet, which is usually found in content.php, archive.php, category.php and other template files. Do note that your theme might not use exactly the same snippet, but as long as its close, that should be it. One indicator is the presence of “the_title()” function.
<?php the_title( sprintf( '<h2 class="entry-title"><a href="/%s" rel="bookmark">', esc_url( get_permalink() ) ), '</a></h2>' ); ?>
Replace this with:
<?php print_post_title() ?>
Now you’re done with the code part. Next, in the post where you want an external link to the title, you’ll need to use a custom field.
In the name, use 'external_url_title' and then put your external link in the value.
Custom fields might not be enabled by default so you may have to enable it first.
If you’re using the classic post editor, click Screen Options in the upper right corner of the page and then find Custom fields and tick it to enable.
If you’re using Gutenberg, click the triple dot beside the gear icon in the upper right corner of the page, then click Options in the dropdown, then under Advanced panels, tick Custom fields.
There are other changes you can do to titles and site taglines for SEO purposes, you can find more details here.
54. Add Featured Image Support for Your Theme
Almost all themes today come with featured image support out of the box.
But if you’re building a custom theme or if you have a theme that doesn’t have this feature, you can easily enable it by adding the following code snippet to its functions.php file:
add_theme_support( 'post-thumbnails' );
Now your theme should have featured image enabled.
55. Custom CSS for Individual Posts
If you want to be able to add custom CSS for individual posts, add the following code snippet in your theme’s header.php file just before the closing </head> tag:
<?php
if ( is_single() ) {
    $customstyle = get_post_meta($post->ID, 'customstyle', true);
        if ( !empty($customstyle) ) { ?>
            <style type="text/css">
            <?php echo $customstyle; ?>
            </style>
    <?php }
} ?>
To add a custom style to an individual post, simply add a custom field with the name customstyle and then add your CSS code in the value.

56. Create Custom User Roles
WordPress provides the following user roles by default — administrator, editor, author, contributor, and subscriber.
However, at times, you may need to assign some customized user roles.
To do that, add the following lines to your theme's functions.php file.
You can change the various functionality availability by setting the appropriate setting to true or false.
You can also change the custom role name by editing the my_custom_role and My Custom Role strings to your preference (the first one, with underscores, is the role name and the second one is the display name — which will be shown in the WordPress dashboard).
add_role(
    'my_custom_role', __(
    'My Custom Role'),

    array(
        'read' => true, // true allows this capability
        'edit_posts' => false, // allows user to edit their own posts
        'edit_pages' => true, // allows user to edit pages
        'edit_others_posts' => false, // allows user to edit others posts not just their own
        'create_posts' => false, // allows user to create new posts
        'manage_categories' => false, // allows user to manage post categories
        'publish_posts' => false, // allows the user to publish, otherwise posts stays in draft mode
        'edit_themes' => false, // false denies this capability, user can’t edit your theme
        'install_plugins' => false, // user can't add new plugins
        'update_plugin' => false, // user can’t update any plugins
        'update_core' => false // user can't perform core updates
    )
);
57. Disable Admin Bar Except for Administrators
If you want to disable admin bar access to other all users except admin, add the following snippet to your theme’s functions.php file to disable access to non-administrator users:
add_action('after_setup_theme', 'remove_admin_bar');
function remove_admin_bar() {
    if ( !current_user_can('administrator') && !is_admin() ) {
        show_admin_bar(false);
    }
}
Now, all registered users except for the administrators will not see the admin bar when viewing the front-end even when they are logged-in.
58. Add Author Bio Wherever You Want
Simply add the following lines to your theme’s single.php file to show author bio in your preferred location.
<?php global $post; ?>
<?php $author_id = $post->post_author; ?>
<?php if (get_the_author_meta('description', $author_id)) : ?>
    <div class="author-box">
        <div class="author-img"><?php echo get_avatar(get_the_author_meta('user_email', $author_id)); ?></div>
        <h3 class="author-name"><?php the_author_meta('display_name', $author_id); ?></h3>
        <p class="author-description"><?php the_author_meta('description', $author_id); ?></p>
    </div>
<?php endif; ?>
Use the following CSS to style the author bio:
.author-box {
    background-color: #fff;
    padding: 20px;
    margin: 0 0 40px;
    display: inline-block;
    width: inherit;
}
.author-box .author-img {
    float: left;
    margin-right: 20px;
    margin-bottom: 20px;
}
.author-box .author-img img {
    border-radius: 50%;
}
.author-box .author-name {
    font-weight: bold;
    clear: none;
    display: inline;
}
59. Replace "Howdy" Message from the Dashboard
If you want to replace the “Howdy” message from the dashboard, add the following code snippet to your theme’s function.php:
function replace_howdy ( $wp_admin_bar ) {
    $avatar = get_avatar( get_current_user_id(), 16 );
    if ( ! $wp_admin_bar->get_node( 'my-account' ) )
        return;
    $wp_admin_bar->add_node( array(
        'id' => 'my-account',
        'title' => sprintf( 'Logged in as: %s', wp_get_current_user()->display_name ) . $avatar,
    ) );
}
add_action( 'admin_bar_menu', 'replace_howdy' );
Now, the message will be “Logged in as”.
60. Make Featured Image Required for Publishing a Blog Post
If you want all posts to have a featured image, you can enforce it such that no one can publish a post unless it has a featured image.
Simply install the plugin called Require Featured Image and now all posts (by default) will now require a featured image before you can publish them.
The plugin works on both the classic and the Gutenberg editor and can also check custom posts as well — you just need to enable checking them in the plugin’s settings via Settings > Req Featured Image.
61. Add Confirmation Box When Publishing Pages & Posts
In the new Gutenberg editor, you have to click the Publish button twice to publish your post.
This ensures that you don’t accidentally publish an unfinished post. In the classic editor, however, there’s no such thing. Once you hit the publish button, your post goes live no matter if it’s ready or not.
However, there’s a simple trick to prevent you from accidentally publishing your posts when using the classic editor. All you need to do is to add the following code snippet to your theme’s functions.php file:
add_action( 'admin_print_footer_scripts', 'publish_confirm' );

function publish_confirm() {
    echo "<script>
    jQuery(document).ready(function($){
    $('#publishing-action input[name=\"publish\"]').click(function() {
    if(confirm('Are you sure you want to publish this?')) {
    return true;
    } else {
    $('#publishing-action .spinner').hide();
    $('#publishing-action img').hide();
    $(this).removeClass('button-primary-disabled');
    return false;
    }
    });
    });
    </script>";
}
From now on, when you click the Publish button, a confirmation box will pop up asking you whether you really want to publish the post or page.
62. Redirect to Custom Page After Registration
If you want to redirect users to a custom page after registering to your website, you can use the following code snippet (add this to your theme’s functions.php file):
function __my_registration_redirect(){
    return home_url( '/custom-page' );
}
add_filter( 'registration_redirect', '__my_registration_redirect' );
Where custom-page is your custom page url.
63. Add Social Profile Information on the User Profile Page
A few years back, users could add their AIM, Yahoo IM, Jabber/Google Talk contact info in their profile page before, but WordPress has removed this because most of these are old and outdated.
Today, by default, a user or an author can only add their email and website in the Contact Info section.
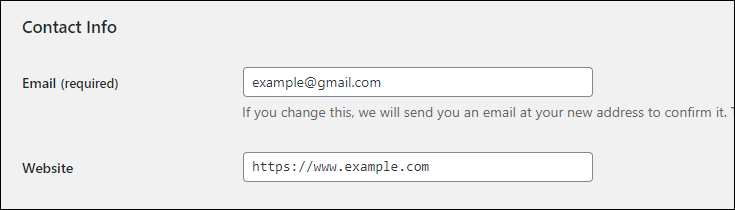
With this WordPress trick, you can easily add additional contact fields here such as Facebook, Twitter, etc. To do that, add the following code snippet to your theme’s functions.php file:
function my_new_contactmethods( $contactmethods ) {
    // Add Twitter
    $contactmethods['twitter'] = 'Twitter';
    // Add Facebook
    $contactmethods['facebook'] = 'Facebook';

    return $contactmethods;
}
add_filter('user_contactmethods', 'my_new_contactmethods', 10, 1);
The above code snippet will add fields for Twitter and Facebook. You can add other social networks as well if needed by using the format:
$contactmethods['new_contact_name'] = 'Field Label';
The new_contact_name is your new contact info identifier (which is also the one you’ll need to call when you need to display it on your frontend) while the Field Label is what will be displayed on the WordPress dashboard as the label for the new contact info item.
To display these new contact info, you need to add this code snippet to your theme’s author.php file:
<?php echo the_author_meta('twitter'); ?>
The above will return the user’s Twitter contact info. You can do the same for any other fields that you add.
64. List All Authors of Your Blog in a Page
To list all authors of a page, we're going to use the functions.php file, to add a new shortcode. Add the snippet below to your theme's functions.php file:
function collective_ray_list_authors() {
    $authors = get_users(array(
        'orderby' => 'post_count',
        'order' => 'DESC',
        'count_total' => 'false',
        'role__in' => ['author']
    ));

	$output = '';

    if($authors):
        $output .= '<div class="author-list">';
            foreach($authors as $author):
                $author_id = $author->ID;
                $user_archive_url = get_author_posts_url($author_id);
                $user_posts_count = count_user_posts($author_id);
                $user_avatar = get_avatar(get_the_author_meta('user_email', $author_id));
                $user_display_name = get_the_author_meta('display_name', $author_id);
                $user_bio = get_the_author_meta('description', $author_id);
                $output .= '<div class="author-box">';
                    $output .= '<div class="author-img">' . $user_avatar . '</div>';
                    $output .= '<h3 class="author-name">' . $user_display_name . '</h3>';
                    $output .= '<p class="author-description">' . $user_bio . '</p>';
                    $output .= '<a href="' . $user_archive_url . '">' . 'View all posts by ' . $user_display_name . ' (' . $user_posts_count . ')</a>';
                $output .= '</div>';
            endforeach;
        $output .= '</div>';
    endif;

	return $output;
}

add_shortcode('author_list', 'collective_ray_list_authors');
After that, add the following CSS code to your theme’s Additional CSS:
.author-box {
    background-color: #fff;
    padding: 20px;
    margin: 0 0 40px;
    width: inherit;
}

.author-box .author-img {
    float: left;
    margin-right: 20px;
    margin-bottom: 20px;
}

.author-box .author-img img {
    border-radius: 50%;
}

.author-box .author-name {
    font-weight: bold;
    clear: none;
    display: inline;
}

.author-box a {
	text-decoration: none;
}
Now you can use the shortcode [author_list] to display all authors on a post or page of your choice.
65. Add Guest Author to WordPress without Registration
Most guest authors are onetime publishers, especially if you are taking guest posts on your site. So there is no point in creating a separate profile for them. But then, how do you display the guest author’s information?
Simple, there’s a plugin called (Simply) Guest Author Name that allows you to add a guest author on a per post basis. You can even add a link to the guest author’s homepage or social media profile or anywhere else for that matter.
After installing the plugin, there will be a new field at the bottom of your posts allowing you to input a guest author’s information.
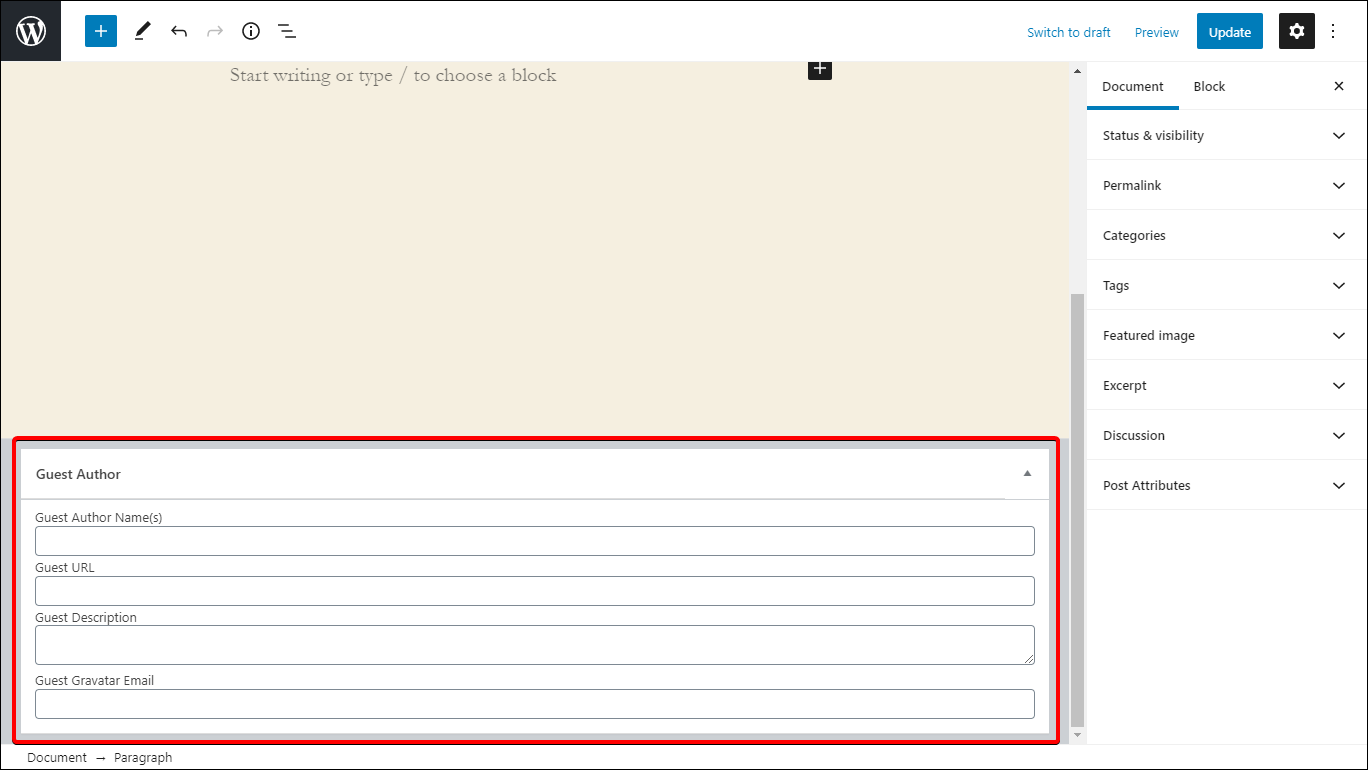
Simply fill this out and this information will be displayed in the author metadata of the current post.
66. Insert Google Analytics Code
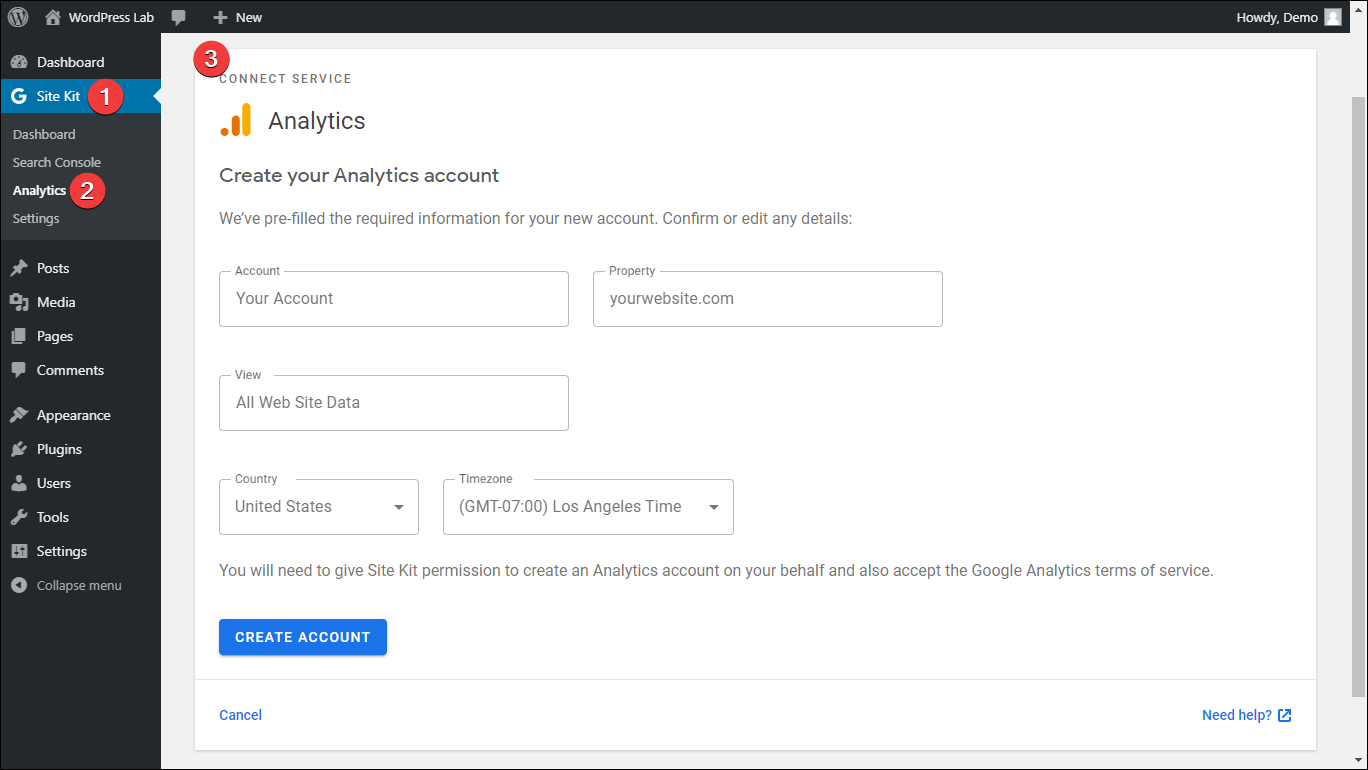
Back in the day, you needed to use a third-party plugin or manually add code snippets to your website’s header. Today, there’s an official plugin from Google themselves called Site Kit by Google.
This will allow you to connect your website to Google and automatically activate Google Analytics for your site.
Simply install the plugin and follow the on-screen instructions. After setting it up, you can then connect your site to Google Analytics by going to Site Kit > Analytics and then configuring it.
67. Setup A/B tests Using Google Optimize
After setting up Google Analytics on your site using the Site Kit by Google plugin, you will now be able to do A/B test by going to Settings > Connect More Services > Setup Optimize.

This will allow you to connect your Google Optimize account to your website which will then allow you to conduct A/B tests easily. Note: You might need to set up your Google Account’s Optimize ID before proceeding.
After setting up Optimize and connecting it to your website via Site Kit, go to https://optimize.google.com/ and create your experience and publish it once you’re done.
68. Track file downloads using Google Analytics and Google Tag Manager
To track file downloads using Google Analytics, set up Tag Manager in Site Kit by Google. To do that, go to Site Kit > Settings > Connect More Services tab and then setup tag manager.
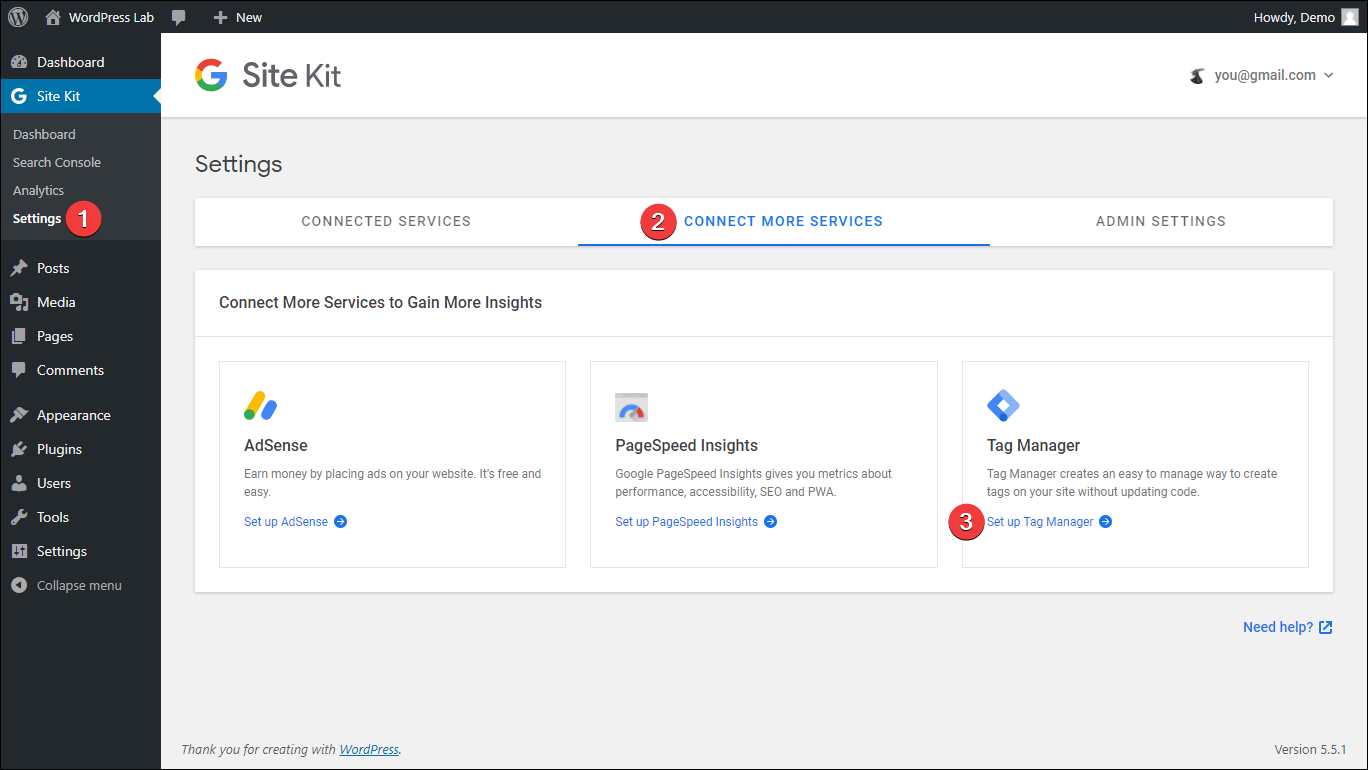
This will prompt you to connect your Google Tag Manager account to your website via Site Kit.
Once you’ve set it up and it’s connected to your site, go to https://tagmanager.google.com/. Select the container you’ve connected to your WordPress site (make sure the container ID matches).
Then, on the left side of the page, click Tags and then click New.
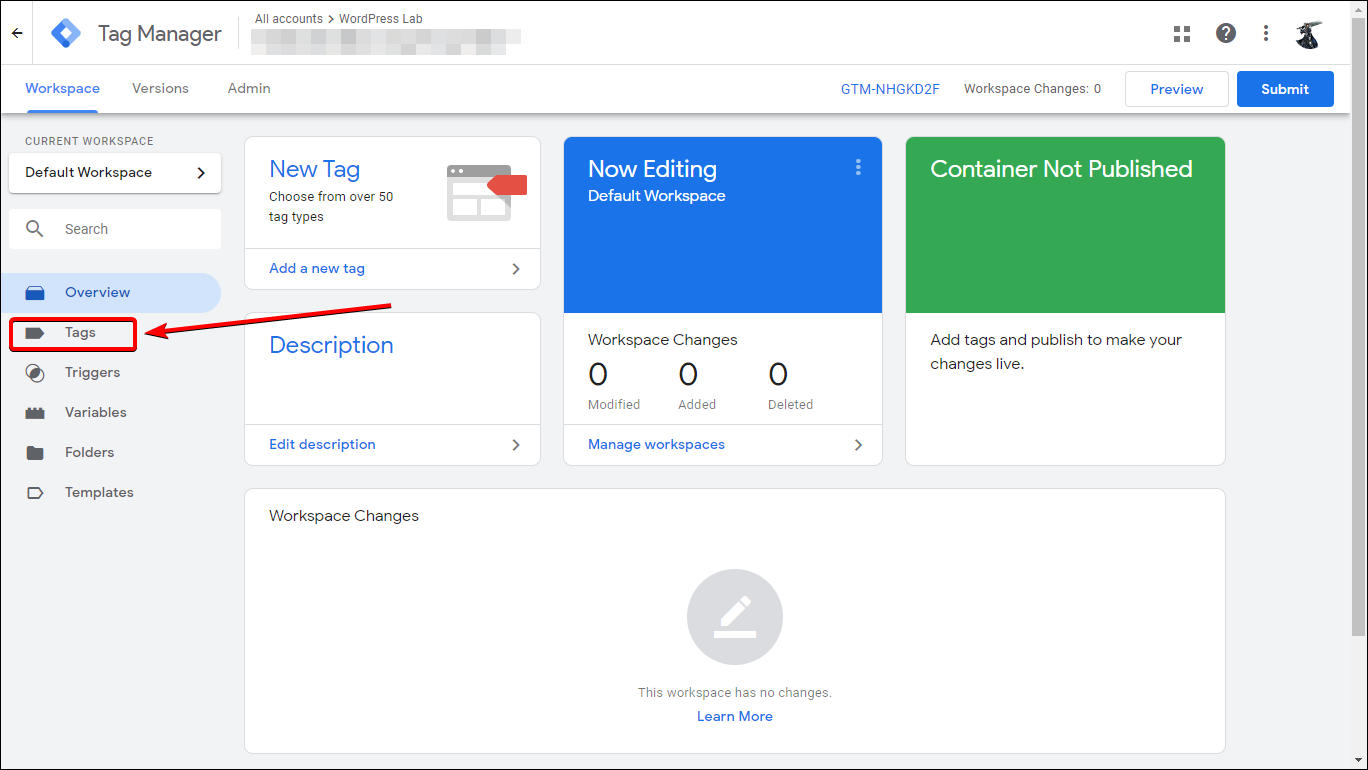
Name it whatever you want, but for this example, we’re going to call it “Track Downloads.”

Next, click the Tag Configuration box and in the menu that appears, click Google Analytics: Universal Analytics.
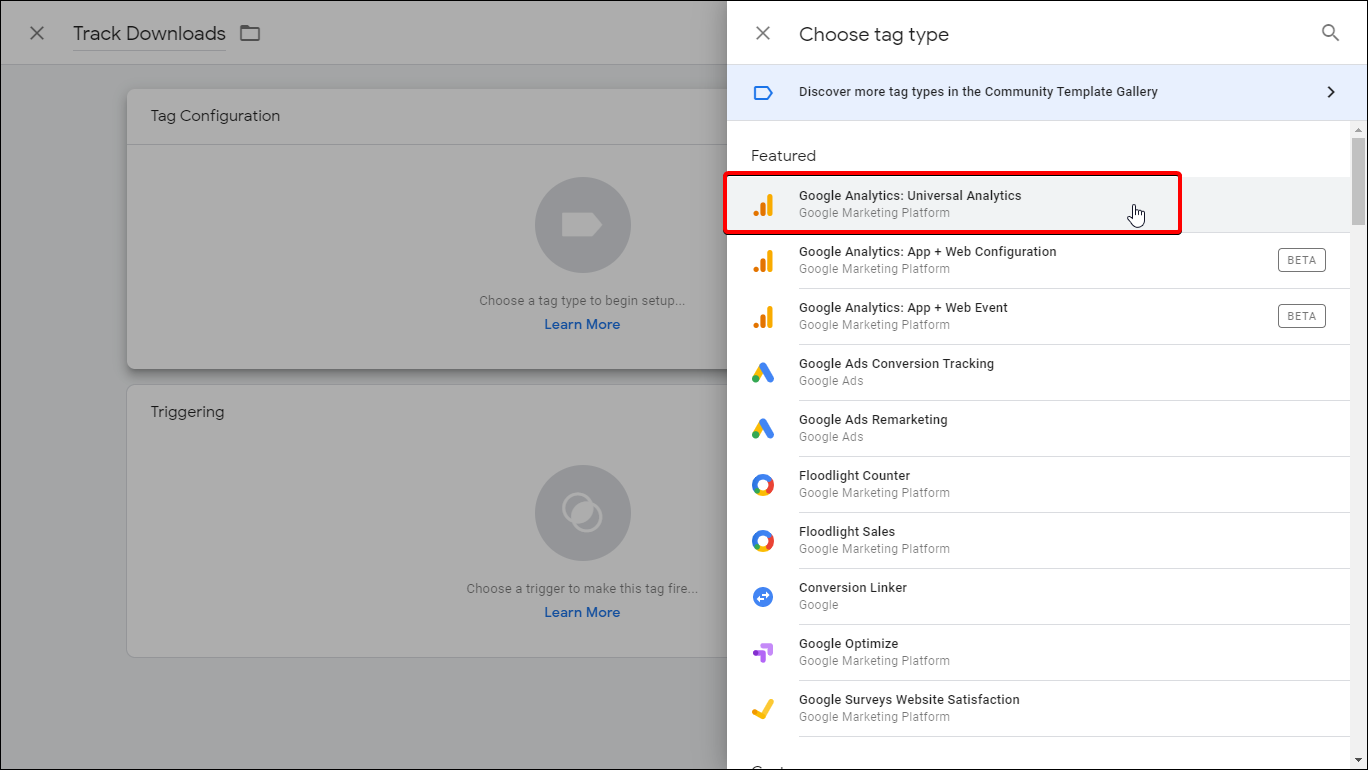
Then, follow the settings below:
- Track Type: Event
- Category: Document Download (type it out — note that this can be whatever you want)
- Action:
- Click the button with a + inside a battery like icon.
- This will open a sliding window asking you to choose a variable.
- Click “Built-ins”.
- Find and select Click URL.
- Label:
- Click the button with a + inside a battery like icon.
- This will open a sliding window asking you to choose a variable.
- Find and select Page Path.
- Google Analytics Settings:
- Click New Variable
- In the variable configuration window, put your Tracking ID in the tracking ID field.
- Save
Leave all other settings to default.
Next, click the Triggering area. In the Choose trigger screen that will appear, click the + button in the upper right area.
Click the Trigger Configuration area and you will be prompted to Choose a Trigger Type. Select Just Links under the Click section. Then, choose Some Link Clicks under This trigger fires on. Follow the settings below:
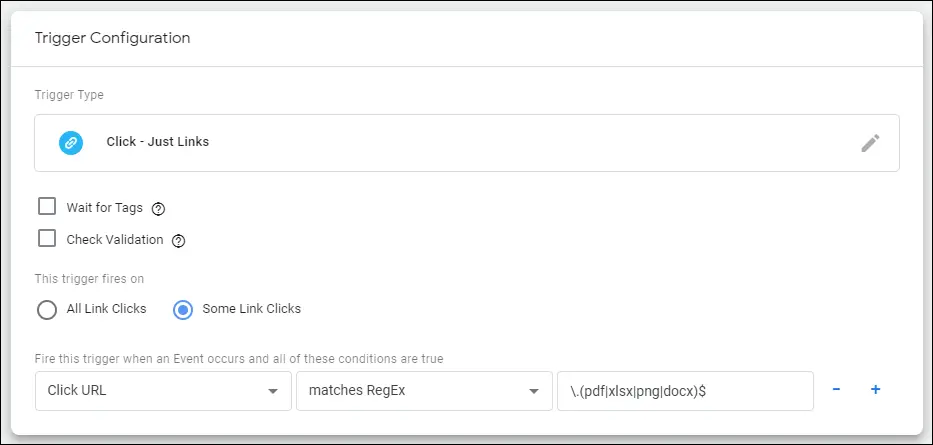
Here’s the regex expression we used:
\.(pdf|xlsx|png|docx)$
This will let you track downloads of any files with pdf, xlsx, png and docx extensions.
Save your trigger (you will be asked to name it if you haven’t already — just name it whatever you want — but for this example, we named it “Track Downloads”).
Your final screen should now look like this:
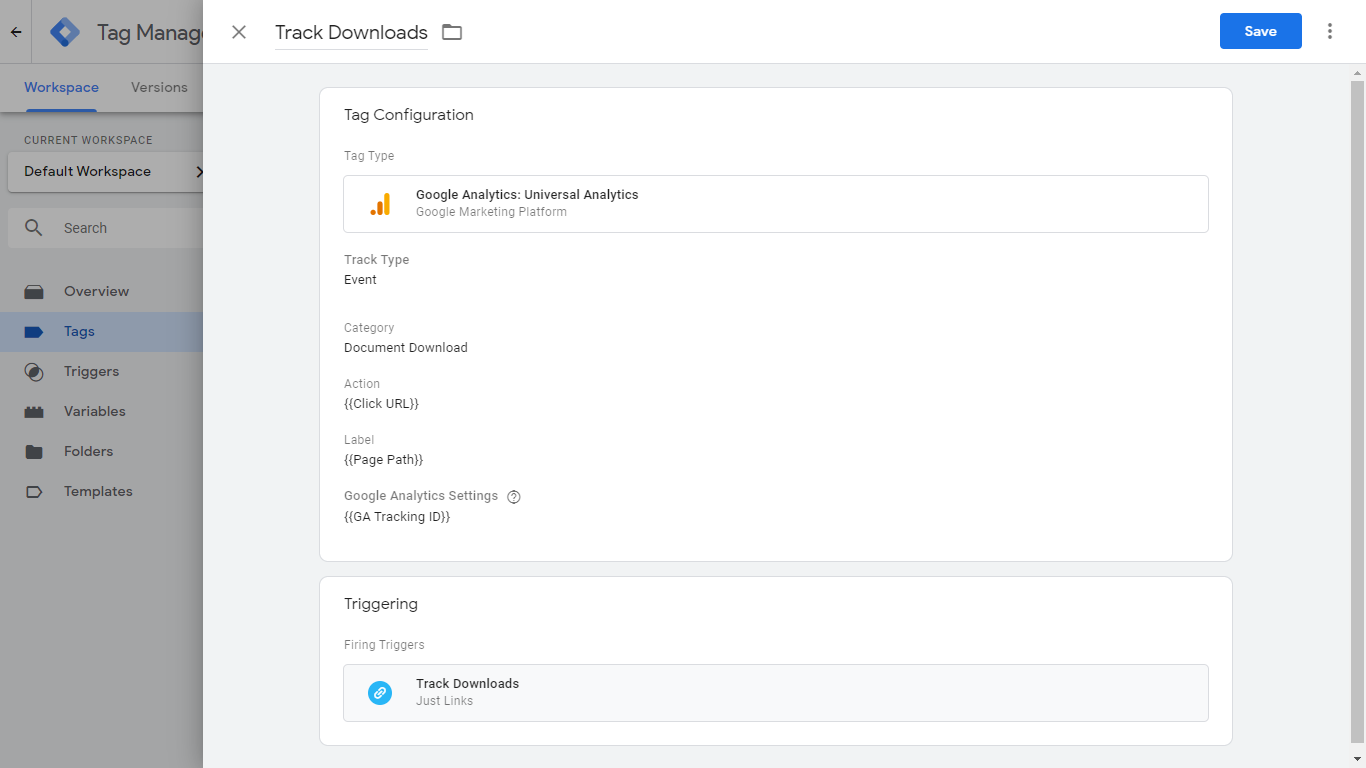
You’re now ready to Save it and you’re done!
69. Hide Ads for Single Posts
If you are displaying advertisements on every blog post and want to hide ads for a certain post, just add the following code snippet to your single.php file. Make sure you replace xx with the post id and insert your ad code to the below code snippet.
if(get_the_ID() != xx) {
    Your ad code here
}
70. Wrap Ads in Post Wherever You Want
Sometimes, you want to decide where your ads appear manually, through a shortcode. You don't need a plugin to do this. Here's how:
In your theme’s functions.php file, add the following code snippet. In addition, make sure you insert your ad codes inside it. Replace YOUR ADSENSE CODE GOES HERE with your own AdSense code snippet.
function display_adsense() {
    ob_start();
    ?>
        YOUR ADSENSE CODE GOES HERE
    <?php
	return ob_get_clean();
}

add_shortcode( 'col_ray_adsense', 'display_adsense' );
Now, all you need to do is to put the shortcode [col_ray_adsense] within your posts or pages and your ads will be displayed in its exact location.
71. Export Email Addresses from User Submitted Comments
Execute the below SQL query against your database to export all user-submitted email addresses with no duplicates. This can be helpful for building your email list.
SELECT DISTINCT comment_author_email FROM wp_comments;
Following the implementation of GDPR, this needs to be exclusively specified and agreed to as part of your privacy policy. You also need to double opt-in users added to your mailing list this way.
72. Block Specific IP Address
Add the following lines to the .htaccess file to deny certain IP addresses from accessing your site.
<Files *>
Order Allow,Deny
Allow from all
Deny from xxx.xxx.xxx.xxx
</Files>
You can change the xxx to various patterns to block either one, several, whole ranges of IPs or whatever else you may need. Learn more how to do this here: https://htaccessbook.com/block-ip-address/
73. Exclude Pages from Search
If you want to avoid displaying pages in the search results, add the following code snippet to your theme’s functions.php file.
function modify_search_filter($query) {
    if ($query->is_search) {
        $query->set('post_type', 'post');
    }
    return $query;
}

add_filter('pre_get_posts','modify_search_filter');
74. Add Promotional Content in Homepage Above the Articles
To do this, you need to edit your theme’s index.php file. Then find the <div class="content-loop"> and directly under it, you can add your promotional content such as newsletter signup form, ads, and others.
Do note that not all themes use the same exact code and structure to produce their index.php file. Sometimes it’s could be one of the following:
- <div class="primary">
- <main id="main">
- <div id="page-content">
- <main id="site-content" role="main">
Again, not all themes will use these, some use other combinations, but they should always be in the index.php file and are always near the top.
75. Limit Access to Login Page for Specific IP Addresses
Add the following to your site’s .htaccess file:
<Files wp-login.php>
Order Deny,Allow
Deny from all
Allow from xx.xx.xx.xx
</Files>
Replace xx.xx.xx.xx with your own IP address. With this, only you can access the login page.
76. Create a Manual Backup of your Database
Log in to phpMyAdmin, select the WordPress database you want to backup.
Go to the Export tab, and click the Go button at the bottom of the page. When your browser prompts you to download the backup, click yes. You now have a backup of your database!
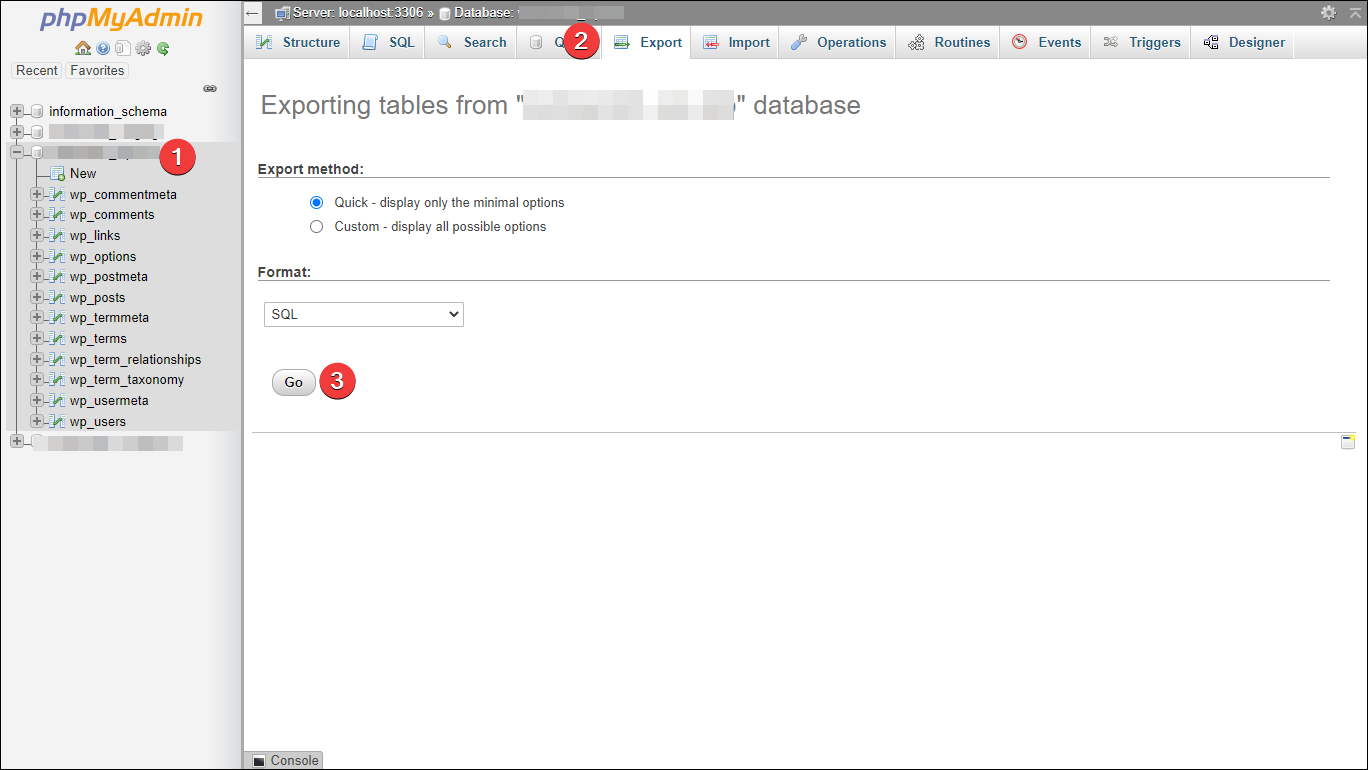
77. Restore your WordPress Database
If you've created a manual backup of your site as per the previous tricks, you might eventually have the need to restore it.
Log in phpMyAdmin, select your WordPress database, go to the Import tab, click Choose File and select the database you would like to restore from your hard disk. Then, click the Go button.
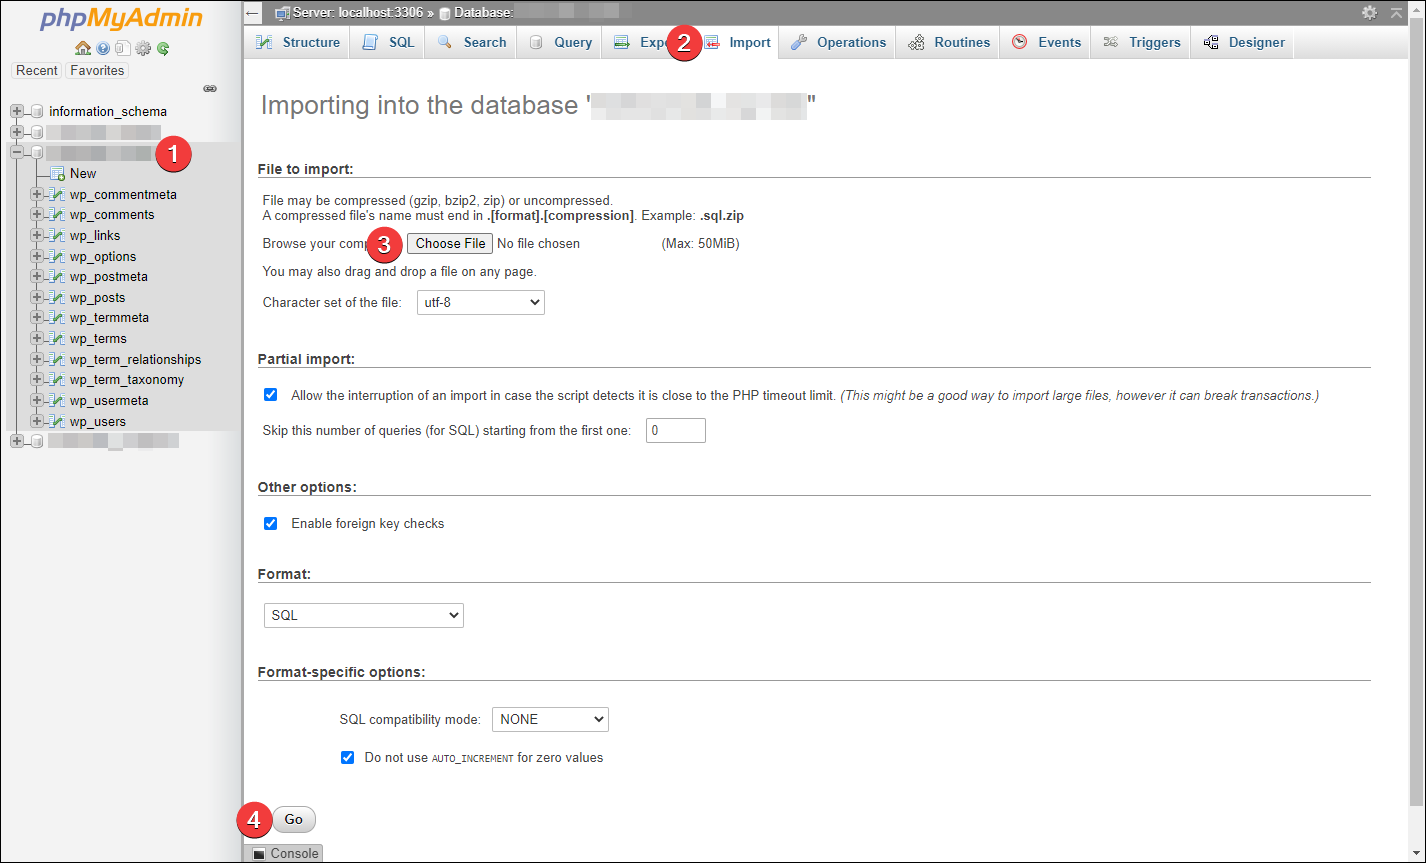
78. Use SSL Mode for Login
If you have an SSL certificate installed on your server, you can force your WP installation to use SSL mode for secure user login.
For that, add the below code to wp-config.php file.
define('FORCE_SSL_ADMIN', true);
Incidentally, if you want to avoid all of the hassle associated with getting an SSL yourself, our host, InMotion, actually supports SSL hosting, via their InMotion shared accounts. Read our full review here: https://www.collectiveray.com/inmotion-hosting-review.
79. Restrict Access to wp-includes Folder
Adding this to your .htaccess file will deny all access to your WordPress site’s wp-includes files and directory:
# Block wp-includes folder and files
<IfModule mod_rewrite.c>
RewriteEngine On
RewriteBase /
RewriteRule ^wp-admin/includes/ - [F,L]
RewriteRule !^wp-includes/ - [S=3]
RewriteRule ^wp-includes/[^/]+\.php$ - [F,L]
RewriteRule ^wp-includes/js/tinymce/langs/.+\.php - [F,L]
RewriteRule ^wp-includes/theme-compat/ - [F,L]
</IfModule>
80. Disable Template File Editing
Any WordPress user with administrator access can edit templates by navigating to Appearance > Editor. If you have multiple administrators on your site, it is a good idea to disable this feature.
You can do that by adding the following line of code to wp-config.php:
define( ‘DISALLOW_FILE_EDIT’, true );
81. Hide Version Number
Specific WordPress versions might have vulnerabilities that can be exploited. If a hacker manages to identify which version of WordPress you’re using, he can use that information to gain control of your website through such known vulnerabilities.
By inserting the below code to your functions.php you will hide the WP version number, which will be an added protection for your site.
remove_action('wp_head', 'wp_generator');
82. Disable access to specific file types
Create a new .htaccess file, add the following code and upload the file inside the wp-content folder.
# Disable access to all file types except the following
Order deny,allow
Deny from all
<Files ~ ".(xml|css|js|jpe?g|png|gif|pdf|docx|rtf|odf|zip|rar)$">
Allow from all
</Files>
This will disable access to all file types except the mentioned files in the code.
83. See Recently Modified Files
If you have SSH access to your server, sign in and run the command below to see the recently modified files. This command comes in handy especially if you are suspecting vulnerable access to your server without your consent.
The below command will show changes made in the last 2 days in the specified directory.
find /home/yourdirectory/yoursite/ -mtime -2 -ls
84. Manually Reset Your Password
Log in to phpMyAdmin, select your website’s database, go to the SQL tab and paste the following command in the text box and click the Go button:
UPDATE `wp_users` SET `user_pass` = MD5( "PASSWORD" ) WHERE `wp_users`.`user_login` = "ADMIN";
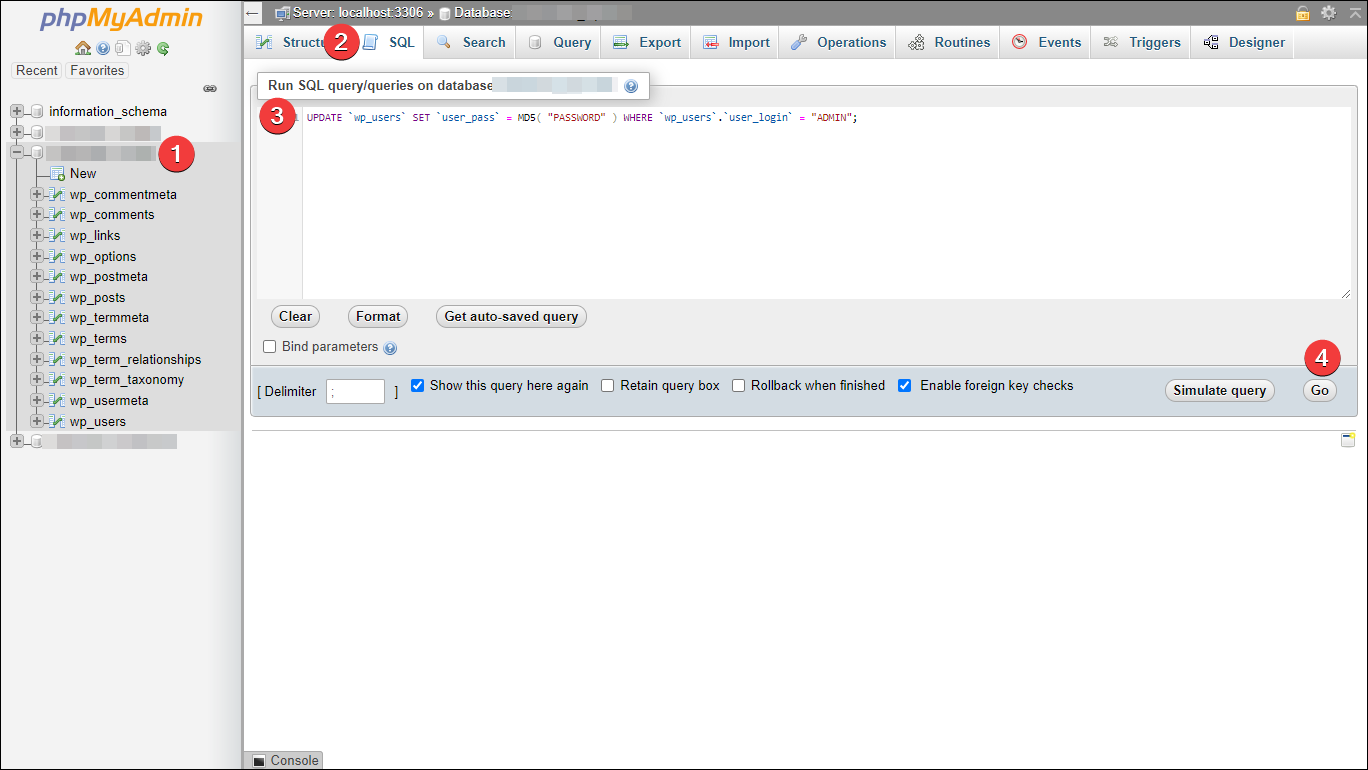
Note: Make sure you change the “ADMIN” to your actual username and “PASSWORD” to your preferred password. Do NOT use PASSWORD as the actual password because your website will get hacked.
85. Deactivate All Plugins Even if You’re Unable to Access the Dashboard
Often, you may need to deactivate all plugins for troubleshooting.
However, if for some unfortunate reason you are unable to log in to your dashboard, you can deactivate all plugins via FTP or CPanel, File Manager Access.
Go to wp-content/ directory and change the folder name from plugins to something else, such as wp-content-backup. This will automatically deactivate/disable all of your plugins, allowing you to access your dashboard again if one of those plugins is creating a problem.
86. Show All Active Plugins
For maintenance purposes, you might want to get the list of active plugins on a specific WordPress install.
Paste the following code to functions.php file, and you'll start seeing a widget displaying all active plugins on your dashboard.
add_action('wp_dashboard_setup','wpse_54742_wp_dashboard_setup');

function wpse_54742_wp_dashboard_setup() {
    wp_add_dashboard_widget('wpse_54742_active_site_plugins', __('Active Plugins'),'wpse_54742_active_site_plugins');
}

function wpse_54742_active_site_plugins() {
    $the_plugs = get_option('active_plugins');
    echo '<ul>';

    foreach($the_plugs as $key => $value) {
        $string = explode('/',$value);// Folder name will be displayed
        echo '<li>'.$string[0].'</li>';
    }

    echo '</ul>';
}
87. Easily Prevent Comment Spam
Instead of marking comments as spam each time, you can block the spammers outright from publishing comments on your blog. The following code will look for HTTP referrer and automatically blocks the comment if the referrer is not valid.
Add the following code in your theme’s functions.php file:
function check_referrer() {
    if (!isset($_SERVER['HTTP_REFERER']) || $_SERVER['HTTP_REFERER'] == "") {
        wp_die( __('Please enable referrers in your browser, or, if you're a spammer, bugger off!') );
    }
}

add_action('check_comment_flood', 'check_referrer');
88. Remove Post Date Stamp from SERP
If your content is not time-sensitive, make sure you avoid displaying WordPress post date stamps on SERP, which will increase the CTR of your posts that display on SERP.
Go to single.php file and find something like this:
<?php the_time('F jS, Y') ?>
Replace it with the following code:
<script language="javascript" type="text/javascript">document.write("<?php the_time('F jS, Y') ?>");</script>
Some themes won’t have the same exact code and some themes, like GeneratePress allows you to remove dates completely by adding a filter, so if this doesn’t work, you can consult your theme’s developer for more information.
89. Prevent Image Hotlinking
Protecting your images from hotlinking will help you save lots of bandwidth by preventing other sites from displaying or even embedding your images on their own sites.
Simply go to .htaccess file and add the following code. Make sure you replace the ‘your-domain-name-here’ part with your actual domain name.
RewriteEngine on
RewriteCond %{HTTP_REFERER} !^$
RewriteCond %{HTTP_REFERER} !^http(s)?://(www\.)?your-domain-name-here [NC]
RewriteRule \.(jpg|jpeg|png|gif)$ - [NC,F,L]
89. Disable HTML in comments
Spammers are used to submitting tons of HTML links in comments, which can have negative impact in bringing organic traffic to your website. You can fix this by preventing all HTML from the comment, leaving only the text.
Simply open functions.php and insert the following code to disable HTML elements in comments.
// This will occur when the comment is posted
function plc_comment_post( $incoming_comment ) {
// convert everything in a comment to display literally
$incoming_comment['comment_content'] = htmlspecialchars($incoming_comment['comment_content']);
// the one exception is single quotes, which cannot be #039; because WordPress marks it as spam
$incoming_comment['comment_content'] = str_replace( "'", ''', $incoming_comment['comment_content'] );
return( $incoming_comment );
}
// This will occur before a comment is displayed
function plc_comment_display( $comment_to_display ) {
// Put the single quotes back in
$comment_to_display = str_replace( ''', "'", $comment_to_display );
return $comment_to_display;
And who else besides search engines is important to our websites? Social networks of course! Here are WordPress social network tricks.
Of course, your blog would be nothing if it's not social today - here's a few more WordPress tips tricks and tweaks for socialing your blog.
90. Restrict Bots Access
By preventing abusive bots from accessing your website, you can tighten the security of your WordPress blog. Copy the following code to .htaccess file.
SetEnvIfNoCase User-Agent ^$ keep_out
SetEnvIfNoCase User-Agent (pycurl|casper|cmsworldmap|diavol|dotbot) keep_out
SetEnvIfNoCase User-Agent (flicky|ia_archiver|jakarta|kmccrew) keep_out
SetEnvIfNoCase User-Agent (purebot|comodo|feedfinder|planetwork) keep_out
Order Allow,Deny
Allow from all
Deny from env=keep_out
91. Disable Self Pingbacks
If you have enabled pingbacks on your site, each time you link to your own posts, you'll create a pingback. You can disable this through the following code snippet.
Add the following code to your functions.php file to disable the self pingbacks.
function disable_self_trackback( &$links ) {
    foreach ( $links as $l => $link )
        if ( 0 === strpos( $link, get_option( 'home' ) ) )
        unset($links[$l]);
}
add_action( 'pre_ping', 'disable_self_trackback' );
92. Redirect Traffic from non-www to www
You can easily 301 redirect all the traffic from non-www to www version by adding the following code to the .htaccess file:
RewriteEngine on
RewriteCond %{HTTP_HOST} ^yourwebsite\.com
RewriteRule ^(.*)$ https://www.yourwebsite.com/$1 [R=301,L]
Don’t forget to replace “yourwebsite.com” with your own domain name.
93. Show the Number of Search Results Found
Display the number of search results found in your WordPress search results page by adding the following line of code to your theme’s search.php file.
<h2 class="pagetitle">Search Result for <?php /* Search Count */ $allsearch = new WP_Query("s=$s&showposts=-1"); $key = wp_specialchars($s, 1); $count = $allsearch->post_count; _e(''); _e('<span class="search-terms">'); echo $key; _e('</span>'); _e(' — '); echo $count . ' '; _e('articles'); wp_reset_query(); ?></h2>
94. Exclude Categories from Search
When a user does a search on your site, sometimes you may want not to show search results from a particular category that contains promotional contents, portfolio items, etc. Simply add the following code to functions.php file to exclude specific categories from search.
function exclude_category_from_search($query) {
    if ($query->is_search) {
        $query->set('cat', '-24,-45,-52');
    }
    return $query;
}
add_filter('pre_get_posts','exclude_category_from_search');
The important part here is this line:
$query->set('cat', '-24,-45,-52');
This tells WordPress which categories we want to exclude from search via their IDs. In this example, we are excluding categories with IDs of 24, 45 and 52. You must replace them with the category IDs of the ones you want to exclude (note: the minus sign [-] must be included!).
95. Delete All Pingbacks
Execute the following SQL command via phpMyAdmin against your database to delete all the pingbacks you received. As usual, these WordPress tips where we delete stuff from the database can cause irreparable harm to your website.
Take backups!
DELETE FROM wp_comments WHERE comment_type = 'pingback';
96. Disable HTML in comments
Spammers used to submit tons of HTML links while commenting, which can have a negative impact in bringing organic traffic to your website. Simply open your theme’s functions.php file and insert the following code to disable HTML elements in comments.
add_filter( 'pre_comment_content', 'wp_specialchars' );
97. Show Selective Tweets
If you're using a personal twitter account, you might not want to show every tweet to your blog readers. In such cases, you can display only selective tweets to your blog readers with a certain keyword or hashtag.
Go to Twitter Widgets>> click the button ‘create new’ >> click the ‘search’ tab.
In the search query box, enter from:dartcreations webdesign
Replace the dartcreations with your twitter handle and webdesign with your preferred query. Save your widget and copy it to the widgets section of your WordPress site.
98. Redirect Feeds to FeedBurner Feeds
Add the following code to .htaccess for turning WP feeds to FeedBurner feeds.
<IfModule mod_rewrite.c>
RewriteEngine on
RewriteCond %{HTTP_USER_AGENT} !FeedBurner    [NC]
RewriteCond %{HTTP_USER_AGENT} !FeedValidator [NC]
RewriteRule ^feed/?([_0-9a-z-]+)?/?$ https://feeds.feedburner.com/yourfeed [R=302,NC,L]
</IfModule>
Make sure you customize the above code with your FeedBurner feed URL (https://feeds.feedburner.com/yourfeed — replace this with your URL) before saving.
99. Category-specific RSS feeds
It is a good idea to offer your readers to subscribe to a particular category of your blog especially if you cover a wide range of categories on your blog.
Simply add /feed to the end of the category URL. Note: this only works if you have custom permalinks enabled!
100. Delay Posting to RSS feeds
When you publish a blog post, it will immediately send your subscribers notification about the new post via RSS feeds. You can delay posting to RSS feeds for an hour. This can be useful, for example if you forget to check for broken links or typos before publishing your posts.
function Delay_RSS_After_Publish($where) {
    global $wpdb;
    if (is_feed()) {
        $now = gmdate('Y-m-d H:i:s');
        $wait = '60';
        $device = 'MINUTE';
        $where.=" AND TIMESTAMPDIFF($device, $wpdb->posts.post_date_gmt, '$now') > $wait ";
    }
return $where;
}

add_filter('posts_where', 'Delay_RSS_After_Publish');
101. Add Social Media Sharing Buttons
Social media sites are very popular today. Hundreds of millions of people use different social media platforms on a daily basis, so it makes sense to have your content be shareable across them.
One of the best plugins for adding social media sharing buttons is Shared Counts. It’s a simple and lightweight plugin that allow you to add:
- Facebook Share Button
- Pinterest Pin Button
- Yummly Button
- Twitter Tweet Button (using the third-party Twitcount.com API)
- Email Sharing (with reCAPTCHA support to prevent abuse)
- Share Count Total
- Print Button
- LinkedIn Share Button
Wrapping Up
Of course, we've included these 101 WordPress tips tricks and tweaks in this article because we believe these are some of the best optimizations for WordPress which you can implement quickly and easily without having to hire a developer.
These are small changes in the code which you can quickly achieve yourself without risking breaking your website or your WordPress template ;-)
Need help getting stuff done? Try these top-rated gigs on Fiverr! (from $5)
![]()
Click here to find experts on WordPress.
Click here to create a full WordPress website.