Website slow and trying to improve it? You've probably seen this warning but are not sure what it means or how to fix it...but we've got you covered. To leverage browser caching is a way to make your website faster, but instructing the browser to store or "cache" files for some time, so that they don't have to be downloaded again on a subsequent visit. That's all this means in short.
But do stay and read all about how to make sure you make your website faster by fixing this error or warning.
Essentially, if you want to leverage browser caching, you need to specify how long web browsers should keep images, CSS and Javascript files stored locally, on the client browser. Using these specifications and settings, the user's browser will use less data while browsing through your website pages (because it needs to download fewer files). To leverage browser caching WordPress means an improvement in the loading speed of your website.
If you're short on time, this is the easiest way to leverage browser caching WordPress:
How to Fix Leverage Browser Caching WordPress Warning
- Download the plugin which can be found here
- Go to the Dashboard of your WordPress, then visit: Dashboard > Plugins > Add New
- Search for "Leverage Browser Caching" or click Upload Plugin and choose the file you downloaded and click Install Now
- Activate the plugin
- Test your website again to confirm that the new settings are working correctly and the warning is gone
By implementing these minimal changes, you will see that your score on such sites as GTMetrix, Pingdom Tools, or Pagespeed Insights will increase significantly.
In fact, this is one of the easiest ways to make your WordPress website faster.
It involves very little effort at all from your side and is one of the high priority tasks recommended by Google to make your website load faster. It is also recommended by sites such as GTMetrix or Google Pagespeed Insights to make your load faster.
What is Browser Caching?
You can leverage browser caching through the process of setting a long-expiry date on the static content of your website. This enables browsers to "leverage" caching and reuse these files over and over again, without having to download them. By caching these files they don't have to be downloaded again, so your website is faster to load.
Before we actually show you how to implement this, we are first going to discuss what leverage browser caching in WordPress means and how it works!
Once we explain how it works, you can understand how it helps to make your pages load faster.
Essentially, when somebody visits a page, the browser needs to download all the resources server on that domain from the server. These include HTML, CSS file, JS, text, images and any other assets) in order to load and display the current page.
Now, rather than actually downloading everything over and over again each time you visit a different page on the same site, the browser uses what is called a Web Cache. This is a feature used by browsers to ‘temporarily store’ or ‘cache’ web page assets on the device's local storage. This storage or data is called ‘ Web Cache’ or ‘HTTP Cache‘.
Have a look at this fun diagram which explains how web caching works:

We can see above, that the first time the user device (left) asks the server (right) for the images/logo file, the request is intercepted by the web caching mechanism (which checks whether it has a copy of that file). If it doesn't, it fetches it from the server. On the next visit, instead of going to the server, it gets it from its own copy.
So, the beauty of this function is that when a user visits the same site again, or a different page on the same domain, the browser will use the copy which is currently residing in the temporary cache - rather than having to download the resources all over again. The browser will only download anything which is different.
As many websites will only have minimal changes from one page to another and between visits, reusing the caching copy enabled the page to load much much faster.
This also helps reduce the bandwidth consumption by your web server and also reduces the load on the server. You might also have encountered a warning when optimizing your pages for speed.
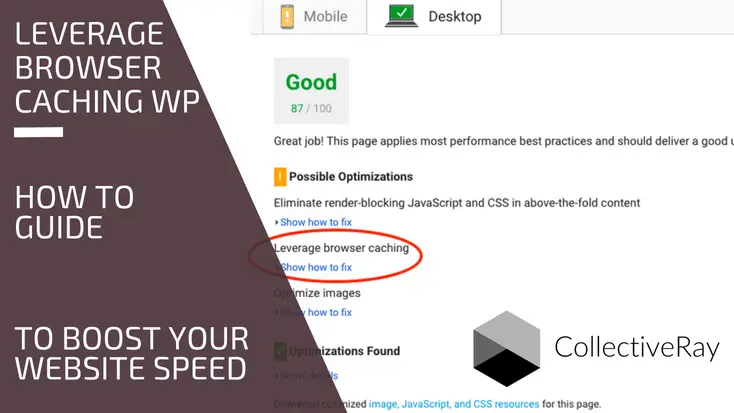
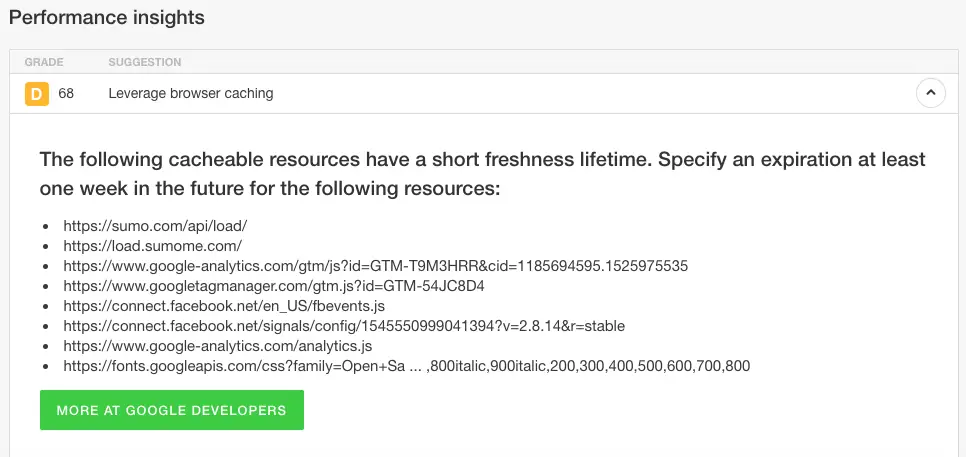
Pagespeed warning to Leverage browser caching
Sites such as GTMetrix or Pagespeed Insights can show the following leverage browser caching warning, which you'll need to fix if you haven't activated the settings below.
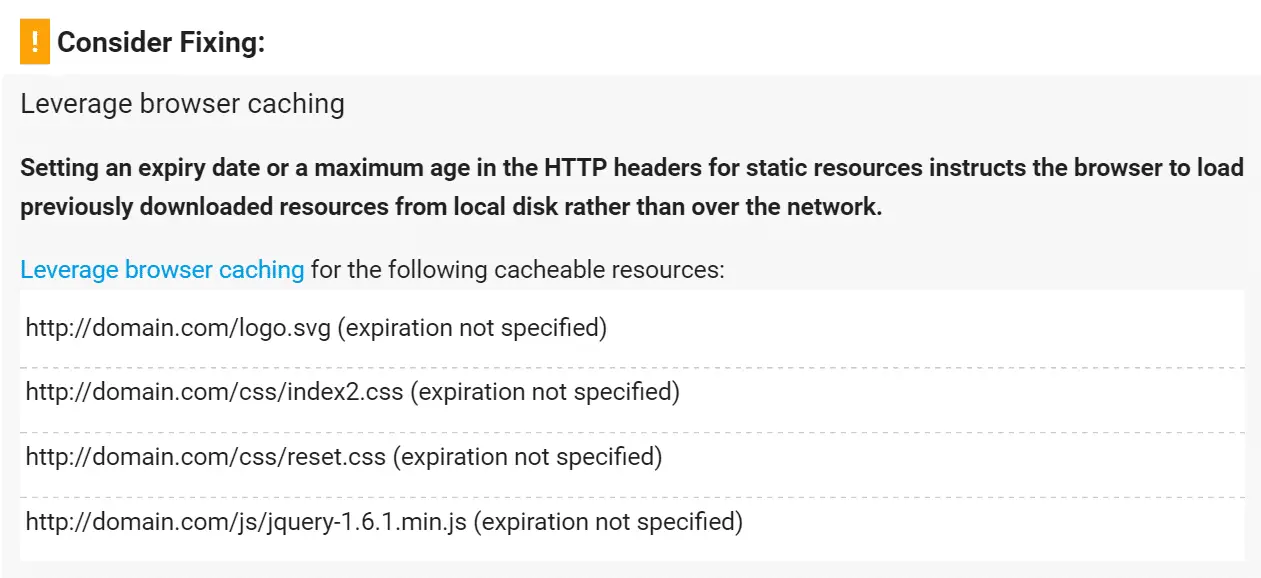
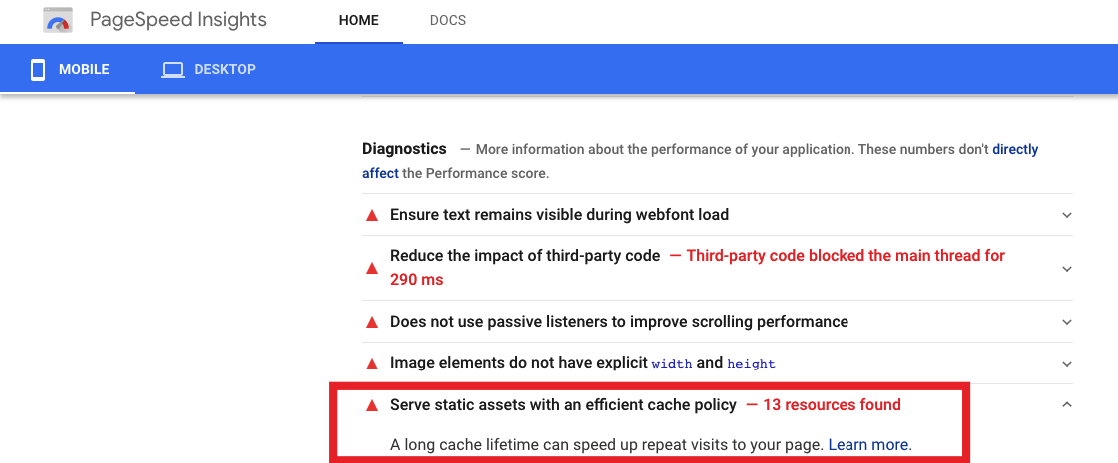
but this was actually the warning shown in an older version of Pagespeed Insights. The newer warning looks a bit like this:
Serve static assets with an efficient cache policy
Now, what does this actually mean?
Although the above-described function is great in theory, by default most websites will "mark" the content to expire after 8 days or a short period of time. What this means is that if a user visits your domain again after 1 week, they will need to download the resources all over again.
When we set up a method to leverage browser caching, what we actually do is instruct the browser to extend the lifetime or expiry date of the resources which are downloaded by our visitors and consequently optimize performance.
By extending the lifetime of the cache (or how long a file takes to become old), you are making sure that your visitors do not need to wait to download the same things every time they visit your site.
This involves very little changes and is not very complicated to implement - and you'll find the exact syntax below.
What the change actually does, is set content expiry dates by adding Cache-Control Headers and ETag Headers in HTTP headers. The Cache-Control header declares the caching period of a particular file or type of file. The ETag is then used to verify any changes which exist (or not) between the cached and requested resources.
The setting typically allows you to specify the period in days, months or years to store the caching files locally. Of course, if you expect to change the resources every so often, it is advisable to set expiry dates with a frequency which corresponds roughly to the period when you expect to change these.
Incidentally, if you are looking to make your WordPress fast, there are a few plugins such as this one which can make a real difference in performance in a few minutes (with little to zero effort).
Not ready to use a plugin for now? Read on...
If you're interested in making your website faster - we would highly recommend visiting our article: [25 Actions] Speed up WordPress: Get a Super-Fast Website Today - A Complete Guide.
1. Using .htaccess file
Here are the exact instructions you need to perform:
- Access the CPanel of your hosting account
- Go to the root folder of the website
- Open the .htaccess file with your File Editor. If you don't find the file, check whether you are able to view hidden files (the .htaccess file is hidden by default)
- Add the following edits to the bottom of the file
- Add Expire Headers with long expiry times
- Add Cache-Control Headers
- Unset ETag Headers
- Do not make any other changes
- Save the file
- Rerun the test
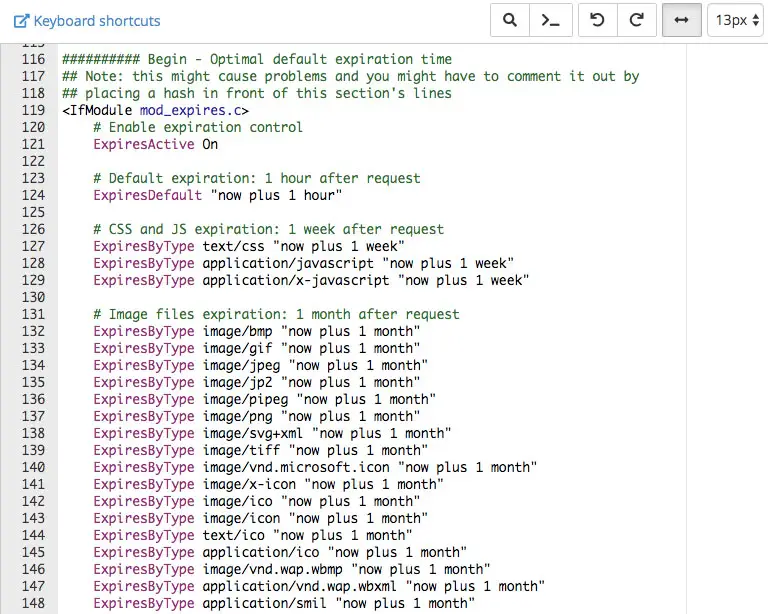
To set the expiry time of resources such as images and CSS files requires a slight modification to your .htaccess file. This is found in the root of your hosting server. You can change the expire headers values to boost performance.
Set these values as long as it makes sense for your site - 1 month is typically good enough.
#Customize expires caching start - adjust the period according to your needs
<IfModule mod_expires.c>
  FileETag MTime Size
  AddOutputFilterByType DEFLATE text/plain text/html text/xml text/css application/xml application/xhtml+xml application/rss+xml application/javascript application/x-javascript
  ExpiresActive On
  ExpiresByType text/html "access 600 seconds"
  ExpiresByType application/xhtml+xml "access 600 seconds"
  ExpiresByType text/css "access 1 month"
  ExpiresByType text/javascript "access 1 month"
  ExpiresByType text/x-javascript "access 1 month"
  ExpiresByType application/javascript "access 1 month"
  ExpiresByType application/x-javascript "access 1 month"
  ExpiresByType application/x-shockwave-flash "access 1 month"
  ExpiresByType application/pdf "access 1 month"
  ExpiresByType image/x-icon "access 1 year"
  ExpiresByType image/jpg "access 1 year"
  ExpiresByType image/jpeg "access 1 year"
  ExpiresByType image/png "access 1 year"
  ExpiresByType image/gif "access 1 year"
  ExpiresDefault "access 1 month"
</IfModule>
#Expires caching end
Think you're not comfortable doing these changes yourself?
![]()
If you're not sure about doing such a change, you can opt to do these via a cheap gig on Fiverr.
Find Top Website Speed Optimization Gigs on Fiverr
With the above changes, we are setting assets that refresh quickly such as the HTML of your page to expire after 600 seconds (this is because HTML typically changes more frequently). We are also changing such things as the CSS and Javascript to only expire once a month (such files only change if you make changes to your template or plugins).
This means, that if your visitor visits the page again within a month, they don't need to redownload your CSS and JS assets again. If you know that you rarely perform these types of changes on your site - you can set the value higher, to 1 year, similar to the jpeg, png expires header.
This is the most effective way to leverage browser caching for WordPress or other websites that make use of an .htaccess file.
Set Image files to a long expiry time
As you can also see in our example above, our images are set to expire only once a year. Sometimes this might be too long, so a month is typically good enough too. One needs to figure out what makes sense for your website.
This makes sure that the largest media which takes the most time to download are kept on the visitors' machine, and won't have to be downloaded again until the next year. Due to this change in your .htaccess file, you are using leverage browser caching in WordPress correctly - the images do not download again for one whole year.
This makes the experience of a returning customer much more positive - because it takes less to load each page. The files which are cached are now reused.
After you've set the expiry dates, it's important to also set the correct Cache-Control headers such that the above setting actually works correctly. This is another setting in the .htaccess file, which you can find below.
Add Cache-Control Headers
The following setting should also be added to the file to set the cache-control headers as discussed above.
# BEGIN Cache-Control Headers
<IfModule mod_expires.c>
  <IfModule mod_headers.c>
    <filesMatch "\.(ico|jpe?g|png|gif|swf)$">
      Header append Cache-Control "public"
    </filesMatch>
    <filesMatch "\.(css)$">
      Header append Cache-Control "public"
    </filesMatch>
    <filesMatch "\.(js)$">
      Header append Cache-Control "private"
    </filesMatch>
    <filesMatch "\.(x?html?|php)$">
      Header append Cache-Control "private, must-revalidate"
    </filesMatch>
  </IfModule>
</IfModule>
We've already set the expiry dates so we don't have to set it again here.
Unset ETag headers for Multi-server sites or CDNs
The final thing which we need to do is (un)set the Etags setting.
Essentially, this is important only if you are using a CDN to serve some of your resources. Etags are headers that are typically constructed using attributes that make them unique to each specific machine hosting a site (technical reason - it uses an MD5 generated by the server, making it unique to the server generating it).
If a website is using a CDN or multiple servers to serve their pages, there is NO guarantee that the same server will be used - therefore the tags will not match when a browser gets the original component from one server and later tries to validate that component on a different server.
For this reason, it would be best to UNSET them if you are using multiple servers or a CDN to host your website. This allows the Cache-control headers to actually control the caching rather than the ETags. Given that we've put in settings to control the caching through the Cache-Control headers, the ETags are no longer necessary - so we'll switch them off.
Add this to your .htaccess file to unset them.
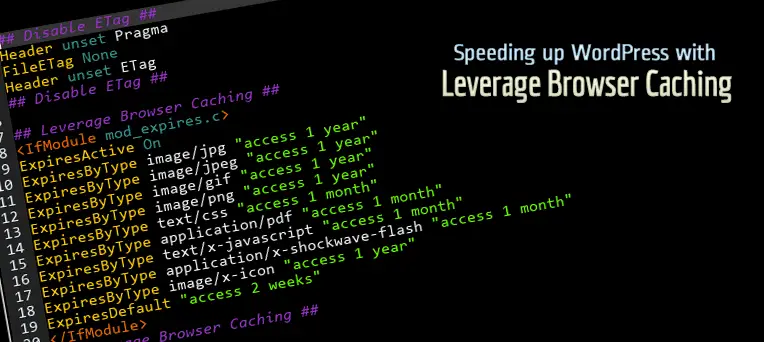
# Disable ETags
<IfModule mod_headers.c>
	Header unset ETag
</IfModule>
FileETag None
If you need to read more about what the Etags do, you can find more details and read about them in this article: https://en.wikipedia.org/wiki/HTTP_ETag
2. Using Plugins
Tweaking and playing around with the .htaccess file can actually break your site. If you make a small mistake, your webserver won't be able to parse it, will start throwing blank pages, or throw error 500 and the site will be dead!
So if you're averse to doing this, you can install a simple plugin that takes care of handling all of this.
Of course, there are plenty of other plugins that are able to do this. Most plugins that are intended to make your pages faster will be doing most of these settings in the background.
Essentially, besides handling all of the settings to leverage browser caching WordPress, these will be able to perform a number of other caching optimizations, such as creating temporary copies (file caching), database optimizations, Memcache and other optimizations which make your site faster overall.
These would include plugins such as WPRocket, WP Fastest Cache, and W3 Total Cache and premium caching plugins.
Let's see a few of these plugins.
Plugin by Rinku Yadav
This is the simplest of them all, it does nothing but fixes the leverage browser caching in WordPress.
- Download the plugin which can be found here.
- Go to the Dashboard of your WordPress, then visit: Dashboard > Plugins > Add New.
- Search for "Leverage Browser Caching" or click Upload Plugin and search the file you just downloaded.
- Click Install Now.
- Activate the plugin and you're done!
- You should now test your website again to confirm that the new settings are working correctly and the warning is gone.
If you're looking for a product that does a lot more to make your site faster, we would highly recommend looking at the rest of the plugins which we mention below.
WP Rocket
This is one of the fastest, most recommended plugins for WordPress which can handle all your speed optimizations with a few clicks. Essentially, this performs such speed optimizations as
- static files compression (GZip) - to make the total size of data to be delivered smaller (we have a full tutorial on how to enable GZip compression in WordPress here)
- enables a file cache (including cache preloading) - to put less stress on the server (fetching a prerendered copy of each page)
- Google Fonts optimization - to make sure heavier fonts are loaded quickly),
- lazy loading - such that images are only loaded when the user scrolls down to the section of a page where the image is required
- Minification and combination - shrinking the size and combining text assets to deliver them faster to the end-user
- Defer JS loading - such that the page renders quickly instead of waiting for all the assets to download. This is something we've covered on CollectiveRay.
- Integrates and enables a CDN - such that your heavier media is delivered faster
- DNS prefetching - to reduce the time it takes to resolve the source of 3rd party content
All the above might sound like gibberish to anybody who is not involved in infrastructure optimizations, but in reality, these are all the things you need to do to make your website load faster.
The great thing is that with WP Rocket you don't have to do the heavy lifting and the configuration - it's all done for you! We highly recommend trying out this plugin, which has been rated as the best way to make your website faster.
W3 Total Cache
This is one of the most popular caching plugins ever. It's been around for quite a long time and has had a lot of time to mature very nicely to embed most of the features one would expect from a caching plugin.
The problem is this. Myself, somebody who has been around WordPress and web design for a very long time, and it is such a frustrating experience working with it. The plugin is not straight-forward to set up and you really have to understand it and know it well to be able to get it up and running nicely.
If you're looking for a good way to leverage browsing caching in WordPress using a plugin, we would highly recommend WPRocket above as opposed to W3Total Cache.
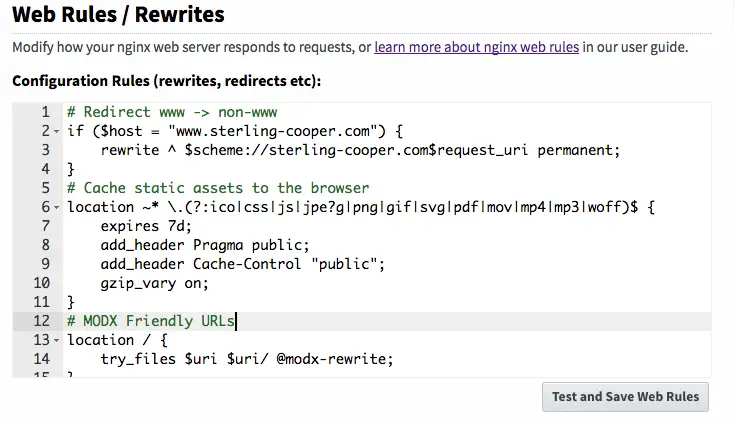
3. Leverage Browser Caching in Nginx
If your website is actually using Nginx as its server, you will need a different code, because Nginx does not have an .htaccess file. However, it's still relatively easy to implement this, because you just need to perform a few edits in the conf file of the server.
You need to add the code below inside of an existing server block in your conf file. This will typically be in /etc/nginx/sites-enabled/default
server {
    listen       80;
    server_name  localhost;

    location / {
        root   /usr/share/nginx/html;
        index  index.html index.htm;
    }

    location ~*  \.(jpg|jpeg|png|gif|ico|css|js)$ {
        expires 365d;
    }

    location ~*  \.(pdf)$ {
        expires 30d;
    }
}
Add Cache-Control Headers for Nginx
location ~* \.(jpg|jpeg|png|gif|ico|css|js)$ {
expires 90d;
add_header Cache-Control "public, no-transform";
}
As you can deduce from the code above, we're setting the expiry location for image files to 1 year or 365 days, whilst we're setting PDFs to expire after 30 days. You can add more file extensions to customize the expiration making it different for other filetypes.
Any file types which are added will be cached accordingly.
4. How to Cache 3rd party resources
While it is fairly easy to apply the above setting, you'll find that even after you perform the above changes, you will still keep getting this message in website speed testing tools and Google Pagespeed Insights.
This is because, most 3rd party scripts and services do not specify a long expiration time - for various different reasons.
You have no control over these scripts, unfortunately, so we strongly advise you to use the MINIMUM 3rd party scripts possible. If you can live without the script, eliminate it from your website. By choosing to include it, it will be dragging the loading time of your pages down.
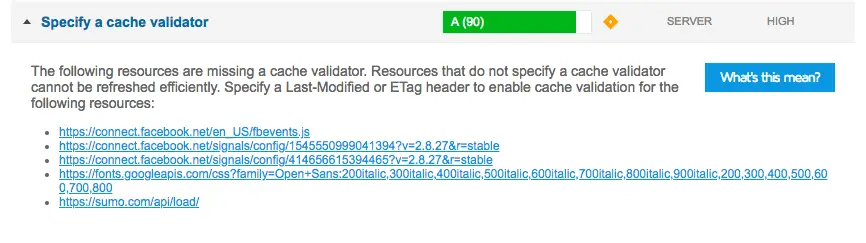
5. Specify a Cache Validator
This is another warning frequently shown by GTMetrix, typically coming from 3rd party scripts. Essentially, this is the same problem we have just described in the previous section, where certain scripts do not specify either an ETag header or a Last-Modified header as described.
Unfortunately, there is not much you can do to resolve this problem, if these specific errors are coming from domains that are outside of your control such as Facebook, or in the case of the below image, Sumo - so there is nothing you can fix.
Your only solution, in this case, would be to remove these scripts from your domain completely if you want to be sure that this warning does not appear.
Frequently Asked Questions
How do you resolve leverage browser caching?
The easiest way to leverage browser caching is to install a plugin that allows you to specify the caching lifetime of different types of static content. An alternative but simple method is to specify the caching time in the .htaccess file of your website. We've got detailed instructions on how to do this here.
How do I enable cache in WordPress?
To enable cache in WordPress, you can simply install a plugin that enables several levels of cache, including a server-level cache, a page-level cache and a browser-level cache. Our recommended plugin of choice for this is WP-Rocket, but there are several alternative choices that we mention in this article that will also make your website load faster.
How do I leverage browser caching for 3rd-party scripts?
You cannot change the browser caching value for 3rd-party scripts such as Facebook, or Google Analytics because these are set at the server-level and you don't have any control over them. Your best option, in this case, is to use as few of these scripts as possible
Conclusion
Above we've shown you a bunch of ways to implement to make sure you are able to leverage browser caching and make sure content that is downloaded is reused over and over again. Make sure you've implemented this on your site, to stop the error from showing up on tools which analyse your site's speed metrics.
If you feel that this is somewhat beyond your own capabilities, we would recommend you leave this stuff in the hands of the PROs and installing a plugin such as WP Rocket to ensure you get the maximum benefits of this and plenty of other actions to make your website load faster.