Index of Joomla Tutorials
Joomla Administration Tutorials
How to add Google Analytics to your Joomla site or template
Since we first stumbled upon Google Analytics to track website visitor statistics, we make it a point to install it on each and every site. Analytics is a great visitors statistics tool for everyone, from newbies to the more advanced designers wishing to fully optimize the content of their websites so adding to Joomla Google Analytics codes should (and usually is) one of the very first steps you do when launching a new website.
Using Google Analytics with Joomla is something which can be achieved very simply.
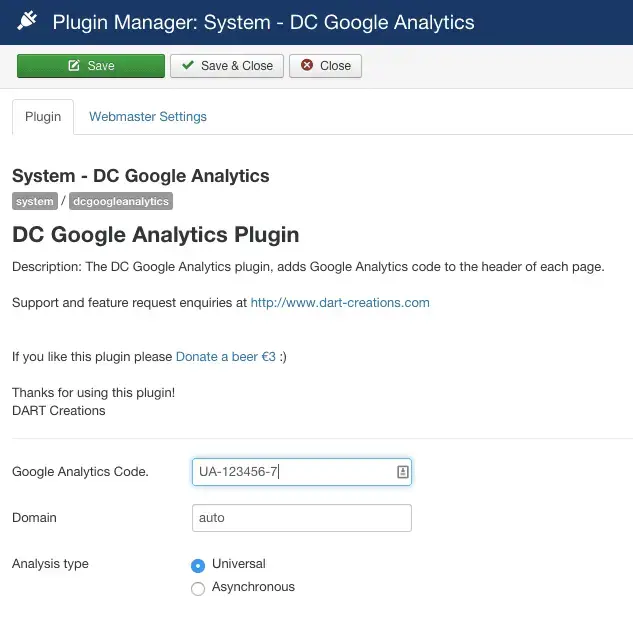
Joomla Google Analytics Plugin
Of course, for those who don’t like messing around with code, there is the option of using a Joomla Google Analytics plugin which automatically inserts the code in each page.
As with most Joomla plugins, you just need to install it, set the Google Analytics code which you fetch from Google Analytics, enable it and you’re good to go!
Joomla Google Analytics – The manual method
To make sure that the analytics code is available in all pages, you’ll need to add the script code to the index.php file of the default template you are using. To do this, simply go to the /templates/
This will generate the tracking code on each Joomla page, and thus Analytics will be logging each hit on each page, which is exactly the result you want to achieve 😉
How to create a Joomla Favicon
Since a few years ago, favicons which had lost much of their relevance have been resurrected since more and more browsers now support them, and infact make them a very visual part of their user’s experience. Tablets and smartphone browsers also make use of these icons. This has led to an increased importance to having a good favicon. However, the ways these icons are presented vary according to the client browsing the website. Desktops require a certain icon, Apple devices require something different, different sizes also complicate matters.
A simple solution – Free Online Icon Generator for Apple and Favicon icons
Iconifier.net is a simple solution which given a square JPG, GIF or PNG will generate an icon set of various sizes so that you can use and choose the ones you want to support on your website. You just then need to download the generated icons and embed into your website’s code
Embed the favicons icon(s) in your Joomla template
After having created the favicon.ico icon using Iconifier.net above, and placing it in the root of your website add the following code between the and of your website’s Joomla template
The following is the easiest way to create a favicon in your Joomla website:
- Create a 16 * 16 pixel ICON image, name it favicon.ico
- Using the Media Manager (Site > Media Manager), upload and replace the default icon with your own icon
The Favicon Maker is a site which allows you to upload your image (most major formats) and converts it to stylish 16 * 16 icon image. So if you don’t have a way of creating the .ico but have an image (such as your logo) that you want to convert to the favicon – you can use one of the free favicon image generators found online.
If you’re not happy with Favicon maker there are plenty of others you can use:
Copy the file to the /joomla/templates/
How to create Favicons for Apple Devices
After having created the various icons using the above website, you will also have to include a slightly different code for Apple (and possibly Android) devices. Again upload the icon files generated to the root of your website and place the following code in between the HEAD tags.
iOS Devices will automatically handle this in their browser and resize and add some effects accordingly for it to match the styling of the device they are being seen on
How to create FavIcons for Android Devices
Android has built upon the Apple touch icons but expect the icons to be in their final version already. This final version is “PRECOMPOSED”, and Android devices expect this tag to be in place. So upload new versions, with slightly different names (such as adding pre-composed in the name) and then add the following markup. The all important part is the rel=apple-touch-icon-precomposed. Put the files in the root of your website and add this code between the and tags of your html
More details on Favicons can be found on Wikipedia: https://en.wikipedia.org/wiki/Favicon
Joomla SMTP Settings – How to send emails using SMTP in Joomla
The default Joomla installation uses the php mail function to send emails. If you would like to use Joomla SMTP rather than phpmail, maybe because your hosting server does not support it, this is a fairly easy procedure.
The phpmail also might give you an error in Joomla:
“Could not instantiate mail function error” – using SMTP will avoid this error.
Joomla SMTP Settings
Please note that to use SMTP, you must have a valid email address to send the emails from – this is obviously good practice in general, so make sure you have created an email address. The typical address would be This email address is being protected from spambots. You need JavaScript enabled to view it., however if you don’t want to read these often, you can use a generic email such as bounce or no-reply…
The steps to configure Joomla 3 to use STMP follow
1. Logon to the Joomla administrator
2. Click on System > Global Configuration
3. Click on the Server tab
Joomla Mail Settings
4. Under the Mail Settings, enter the following details
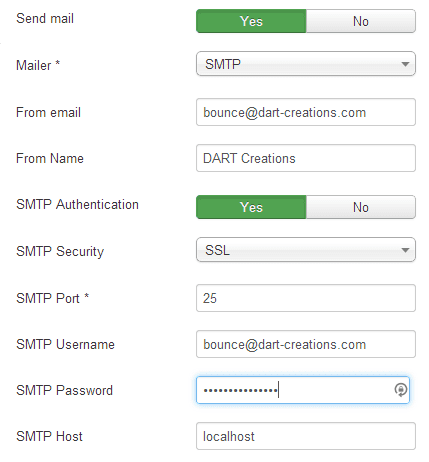
Set SMTP to Yes
Set SMTP Authentication to Yes
(You’ll need to get these details from your hosting server) Check if your SMTP server uses SSL/TLS or nothing, and then chose the appropriate option from SMTP Security. If you are going to use SSL or TLS you’ll need to enter the port required for your SMTP server.
Enter your SMTP username – this is usually your full email address
Enter your SMTP password – this is the password you created when you were setting up the email address
The SMTP Host is either localhost, if the SMTP server is same as your server, or else the SMTP server which is defined by your hosting service. (You’ll need to check these details with your hosting service).
That should be it! Check whether it is working correctly, by either registering a new user, or maybe sending an email using your newsletter component. If it doesn’t work, double check to make sure that the username/password and SMTP Host details are correct. However, under most conditions this is all you need to do to get Joomla SMTP setup and should get this working.
[How to] Improve authoring with Content versioning in Joomla 3
Content version control is one of the new great features of Joomla 3.2 – this is a great feature for many Joomla webmasters particularly either for those webmasters who forget what they change (like myself), or websites where there are multiple users administering the content.
This is also really good for users who want to revert to previous versions of articles, maybe articles which for some reason or other require a lot of complex code from various sources and which might break in the process of adding something new. Essentially this is like a backup at article level which is supported natively by the CMS.
How does Content Version Control Work?
When you create a new or an existing article, you will find a new button in the toolbar – Versions. When you press this you will see the version history of the article in a pop up window. There are a number of things to note about the Item Version History
- The STAR which indicates the current version of the article
- You can choose to “Keep Forever” on one or more of the versions. Since the versioning keeps a limited amount of versions, the “Keep Forever” setting will ensure that those specific articles which are locked will never get overwritten or removed from the history (you can still opt to delete this version though)
- The RESTORE obviously allows you to restore a different version from the current article. Note that when you restore an article – this does not remove the currently published article. It is up to you to decide whether you want to publish the newly restored version or not.

Comparing Versions of a Joomla article
A nice feature of version control is the Compare function. Basically, this allows you to see the differences between two versions of an article so that you can see what has been changed. Take a look at the screenshot below. The columns on the left shows the current article (including new text). The image in the middle shows the original article, whilst the column on the right shows the actual highlighted differences between one Joomla article and the other.
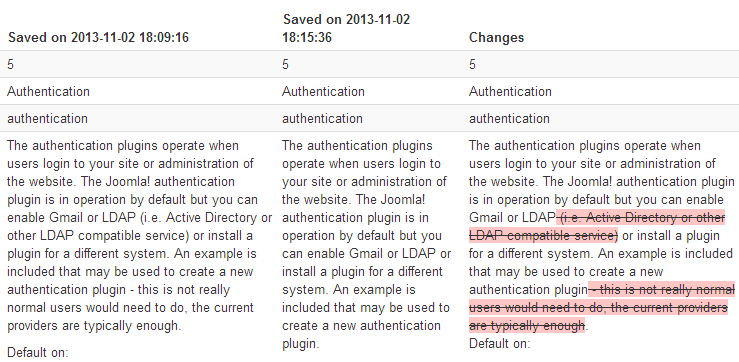
Another feature of the version control is that you can choose the see the article in various modes
- View only the changes in HTML
- View only the changes in text
- View all the values in HTML
- View all values in text
By all values, it means that’s its not just the content of the article which is shown, but other meta changes such as switching the article from one category to another, or what article options where changed from one article to the other.
The HTML change view is also great when you have been tweaking a lot of HTML for a particular article, especially if you have been using a Content Editor which likes to strip away some of the HTML.
Versioning is another great Joomla 3.2 feature, which makes the CMS more mature for those people who want to use Joomla in a “busy” environment. It also catches up on this feature when compared to WordPress.
Like this article? Sharing is caring 🙂
Disabling Joomla Extensions via PhpMyadmin
Have you ever had that moment, when you enable a module, plugin or component in Joomla, nd suddenly it starts giving such a severe error that it takes down your whole site – even the administrator part so you can’t disable it? When this happens, there is no way to disable the problem module or plugin from the “Administrator” panel.
Luckily, there is quite an easy way to fix this problem – disabling the Joomla plugin, module, or other extension via PhpMyAdmin. If you are not really sure which plugin may have created the problem in the first place, it would be best to start disabling 3rd party plugins and components one by one in the following way – until the problem goes away.
This is how to disable Joomla plugins or modules via PhpmyAdmin in various flavours of Joomla, including Joomla 3
- Log in to your PHPmyadmin and find the database of the Joomla website you want to fix
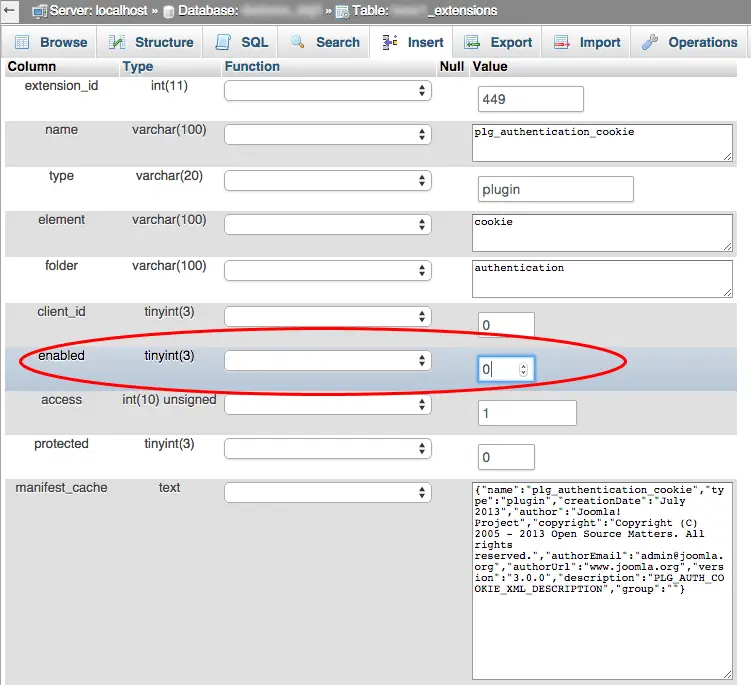
- Find the table which ends with ‘_extensions’ (the first few digits/letters are randomly generated and vary by installation)
- Find the problematic plugin, component or module and edit it’s row. Change its ‘enabled’ field from status ‘1’ to ‘0’ and click save!
- This will disable that specific plugin
See below the field you’ll need to find and change to 0 instead of 1
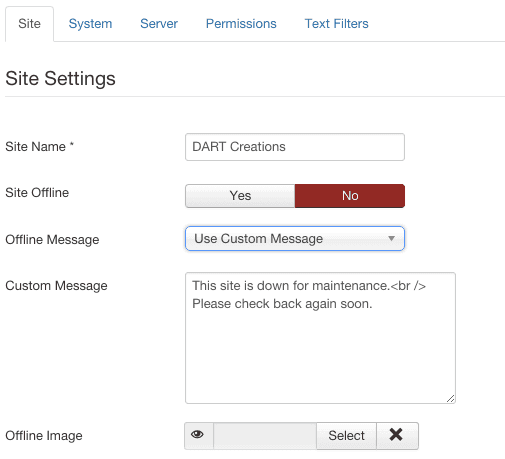
Changing the Joomla offline message and offline image
When you are performing drastic changes to your website, it is advisable to turn switch your Joomla website to Offline mode (Site > Global Configuration > Site Offline > Yes). Of course, the default offline message is ok – however, many times it’s much better to create a specific message which is tailored for the needs of your specific Joomla website and audience.
The offline image can also be changed so that rather than having a Joomla logo – you can create a custom image of your own. We recommend putting up something amusing, so at least after the users get annoyed with the website being offline, at least they know you have a good sense of humour and hopefully come to check again later 🙂
- Change the Offline message in the Site Settings of the Global Configuration, and insert your custom message. This is the basic configuration
Creating Links in the Joomla Footer
One of the very first things most people need to do with Joomla, is change the footer to create their own links. Typically one adds stuff like privacy policy, a sitemap, terms and conditions and other generic links.
You can add as many more tds as you need to add as many links as you require.
Joomla 3 changes to footer
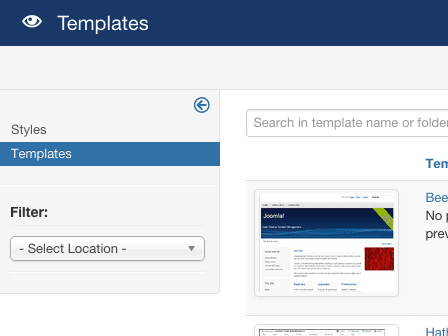
As with Joomla 2.5 before it, Joomla 3’s default installation runs on a template (Protostar), which like most modern templates, allows you to edit the files directly via the Template Manager. Therefore, to change the footer go to Extensions > Templates > click on Templates then click on “Protostar” Details and Files. If you are using a different template, of course you’ll need to select the name of the template you are using instead of “Protostar”.
Click on index.php and at the very bottom of the file you will find the following code:
©
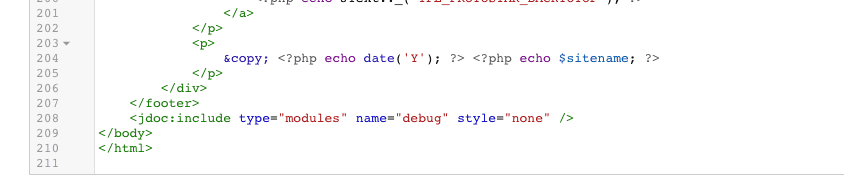
This is the code which generates Copyright
© Designed and developed by CollectiveRay.com
Change the footer in Joomla 3 (or 2.5)
The footer now often comes as part of the template. For the Beez template you can remove it or change it by changing the actual code in the template. For example, you want to have such text as “Designed by CollectiveRay.com” Go to
Extensions > Template Manager and click on Templates
Click on your current default template and click on Details and Files
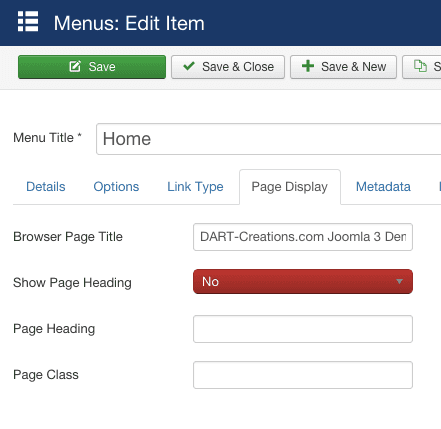
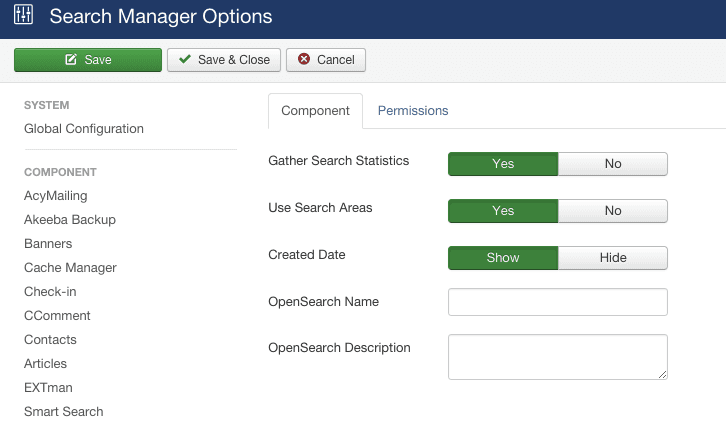
Click on Edit main page template At the bottom you’ll find a Change the HTML here to what you desire and insert the links you would like as normal . If you want to remove the “Powered by Joomla” removed the powered by JText. If you want to add copyright, date and year, insert the following code: or something which is relevant to your website. One of the annoying things in Joomla is the way you can’t seem to ever get rid of the Welcome to the Frontpage message! Here is how to change it or any Joomla page title in any menu item. This message can be found or defined as the “Browser Page Title”. Many times, for SEO purposes you would need to define this title to specific keywords which you need for specific pages. To customize the title, you’ll need to go to Menus > Main menu (or any menu item you want to change) > Select the menu item, (such as home) > Page Display > Browser Page Title. You can change the message or keywords to anything you need to show. Many times you’ll want to target specific keywords. Sometimes you need to display the current date or ideally the current year, typically in copyright notices or anywhere else required by your template. The following simple php function will allow you to easily achieve this. Find the area where you want to display the year, this is probably somewhere in the index.php of your template, or possibly in the footer.php. Then addd the following code: This takes the current date and displays only the year. Obviously, if you don’t need the copyright notice you will need to change the text to what you require, but this is basically what you will need. There are more options which you can use with the PHP date function, you can find more information on what you can do with the date function @ https://www.php.net/manual/en/function.date.php There are many variations which you can use for the displaying information related to dates. In terms of creating a user friendly / accessible site, one of the best things you can do is create a good sitemap in your website. This allows your users to be able to quickly access any part of your site. There are loads of extensions which allow you to create Sitemaps, but did you know you could create a neat site map without requiring any extension? The menu module already does everything we need: it’s essentially a tree with all the items in the system. All we need to do is make it look like a component. There are times when you need to hide specific menu items when a user has logged on to your Joomla website. This depends on which version of Joomla you are using, in the older versions of Joomla this could not be done using standard functionality, however from Joomla 1.7 onwards there is a very simple way to do this with ACLs. The article below will show both methonds. The Joomla Access Control functionality allows you to easily set items which should be displayed to guests, but hidden from logged in users. If you go to the User Manager options you will see a setting for the default group that registered users are placed, you will also see a default group for guests (non logged in users). The latter group can be used to create a new group at the same level in the ACL tree for guests. To hide menu items or module, what you will to do is assign any menu link or module to the newly created Guest level and because it is at the same level in the ACL tree as Registered anything assigned to guest will not be visible to registered users. [How to] Feature an article with image preview in Joomla Typically each website has a number of “popular” articles which you want people to view if they landed on your site. To make these features more attractive, we typically create a Featured or Popular Content section, which attracts the attention of your user to the article. And what better way than featuring an article than by linking to it via an attractive image. Here’s how to do it in Joomla, Whether it’s a special hosting package you are offering. a nice new product which you have a special offer on, or simply a popular article which you want to highlight, using an image to link to the article is always an attractive method to use. So how to go about doing it? We use the swiss knife of Joomla module, the Custom Html module. This is a module, which allows us to create our own content at will … Desired End Result: Upload the image you want to use via the Media Manager (Site > Media Manager), then we create our custom module. So we go to Extensions > Module Manager > New > Custom HTML > Next This creates a new Custom HTML module, where we can now insert our pretty image into. Below on the left hand side, we can insert our Custom Output. What we will be doing is, inserting the image, and creating a link to the article on the image… Forum and comment spam is a pain in the neck. If you’ve ever experienced this type of spam you know how annoying it is to clean up after the messes they leave. It is time consuming and tedious and you have much better use of your time. Recently we’ve discovered a great tool which has been extremely effective in blocking forum spam on our website. This is the zbblock spam bot security script. This script checks against several known spam forums lists for known spamming users, or IPs and stops them from accessing or registering on your Joomla! website. It has been a really great discovery and fake users registering has dropped to an absolute minimum. Installing zblock is really easy. Download the script from here and upload the “zbblock” directory to the root of your website. Unzip in the root of your site, and it should put itself in it’s own /zbblock/ subdirectory (not a zip-bomb). Then load https://YOURSITE/zbblock/setup.php and follow the instrutions to enable the script. You need to choose a method which depends on your hosting server. Make sure you chose a method which is marked as “BEST” for your website. Once you are done you should do a couple of small changes, basically you need to insert the script “hook” into two index.php files 1. the index.php in the root folder of joomla 2. the index.php in your template (/templates/templatename/index.php) Change the first line from to where xxxxxxxx is the home folder of your website. Don't worry about having to figure this all out, zbblock setup will make it easy for you by providing the exact hook which you need to use. Once this is done, check your killed_log.txt often to see which spam bots have been stopped and enjoy the new found peace. Neil from Webalicious has this great article on protecting Joomla from spammers, we'd recommend you having a look at this, his chosen methodology is very effective too. Spamming, comment spam and bots (automated programs and scripts that simulate users without requiring manual intervention) constantly bombarding your website with fake users just so that they can post links for their rubbish products is something which is so prolific that a lot of effort is done to make sure that there are effective ways to deal with this problem as effectively as possible. Joomla has not been left behind in addressing this issue. One of the ways to deal with spam effectively is using a Captcha. In short a Captcha is any “process” which trips an automatic script by requiring input which is difficult to perform without the intervention of a real human – the most captchas require you to recognize a pattern, (letters or numbers or solve a puzzle) which is relatively simple for humans, but which is practically impossible to be solved by an automated script. One of the most common captcha’s out there, is the ReCaptcha. This is basically a project which creates a captcha, which at the same time is helping to digitize books, newspapers and old time radio shows. Read more about recaptcha here. ReCaptcha is extremely effective as a captcha whilst also being very popular on the web, meaning that many people are very familiar with it. This ensures that the captcha does not become a barrier to entry on your website. It’s really really easy J Well there are a few steps, but no rocket science 🙂 The Joomla core has a plugin which is available by default which allows your website to start using recaptcha. You only need to go through this very simple process: Try to register a new user on your Joomla website and you will see that the ReCaptcha is now displayed! Quick tip for the Joomla 3 newbies 🙂 In Joomla 3, once you enable Search Engine Friendly URLs (obviously for better Jooml Search Engine Optimization), you will probably get index.php in your address. Something like www.yourdomain.com/index.php/about-us. If you want to remove the index.php, it is very simple. Besides enabling the Search Engine Friendly URLs, you'll also need to enable URL rewriting. Quick recap: If you want more SEO benefits it would be a good idea to install sh404SEF, one of our recommended Best Joomla extensions There are two ways to fix this message - which fixed our problem 1) Fix your HTML code - Many times what happens is that this content has either been migrated from a previous version of Joomla or migrated from somewhere else. Try opening the article in the back end and save the article. Many times, this will fix the problem. Your 2nd option is to actually switch to the HTML code of the article, find the email address and see if there are any mismatched html tags surrounding it, such as non-closed tags, or other mismatched tags or HTML issues which will interfere with the cloaking functionality. 2) Disable the email cloaking - In case you want to disable this in Joomla, the only thing you need to do is Extensions Manager > Plug-In Manager > find the "Content - Email cloaking" plugin and disable it. Now that message will be gone, but so will your Spambot protection. For Spambot protection in Joomla, we do use a very good script, ZBBlock which works well on any PHP based website. We also use Joo Recaptcha, to protect registration and contact pages from Spambots. The two together have worked very very effectively to rid us of the huge amount of SPAM we used to receive. Now it's mostly legit requests which we get! Joomla loads a bunch of scripts by default - many of these are necessary for something or other, but sometimes (if you know what you are doing) you may want to remove them or stop them from loading. To do this, there is a specific function that you can use. Add the following to the index.php of your template. Add or remove files from the dontInclude - the ones you add here will be unloaded. Anything which you do not include will not be unloaded. There are quite a few plugins that allow you to remove such scripts if you don't want to include them. We use the MooTools Enable / Disabler plugin by Roberto Segura which is tiny plugin, which unloads the plugin from everywhere except the places where it is required. For example, you can choose the Auto enable the scripts for the users' login and for article addition. We also use the same plugin to unload other stuff that we want to exclude by simply adding the URL of the JS file we want to exclude: As you can see, we're dropping infinite scrolling and pagination scripts which are included by default in our template, but which we do not need - and would just add page loading time literally for nothing. We're also dropping the ionicons CSS, which once again would just be unnecessary bloat. In our quest to bring our site to load in a few milliseconds as possible, this tool has been a great addition. Another alternative whose setup is a little more complicated is This is much more configurable but usually makes sense in the hands of a developer who is very comfortable with Joomla. One of the best things we learned whilst researching for our article on how to make Joomla website load fast (1.29 seconds to be exact), we discovered a great gem of a tool. Here is a little trick to help you out a real lot - use JCH Optimize. The great thing about JCH Optimize is that it implements a huge number of Google PageSpeed and other recommendations to make your website load as fast as possible - incidentally if you want to use the Apache Pagespeed module on your hosting server, take a look at our review of InMotion VPS hosting. And you don't have to mess around with any code, all of this is done by the plugin - it preserves all your original coding, so you won't break anything by messing around. Also, usually it actually does those optimizations which are usually the hardest to perform. To mention a few, these are the ones which are done really well It also allows you to tweak some advanced options such as excluding certain files to ensure that if any extension does not work after running it through JCH Optimize, this will work anyway. The PRO version, which is available at a measly $29 will give you access to a number of other optimization options such as including inline CSS and Javascript in the optimizations, and loading the Javascript asynchronously to not block the loading of the site. Take my word for it, install the plugin, enable it and check out your before and after results. If you don't get an improvement by a good amount, come back here and complain, but I'm pretty sure you won't be coming back 🙂 Joomla! uses mootols to do a variety of things. If your website or components don't use mootools, then not loading it is a good idea. However, if your components use it, then there are still some speed optimizations you can do. One of these optimizations is that you can use a compressed version of mootools which is loaded directly from Google. To do it requires very little changes. Go to your template, find the following link in your index.php and insert the following code. Essentially this is removing the link which loads mootols from your hosting server, and loads the compressed version directly from Google. That brings the overall size of each web page request by 50Kb. That may not sound like much, but in the overall scheme of things if you are obsessively working on reducing the load time of your website, then this is a very good leap forward. unset($document->_scripts[$this->baseurl . '/media/system/js/mootools.js']); ?> There are lots of times you might want to work in raw HTML in a Joomla article or module. For example, embedding flash objects, a YouTube video, or maybe embed a widget in a module like Feedburner. Unfortunately, the editor screen you are using will strip out the HTML code, or cause an error if you haven't specifically set the parameters not to clean your HTML. Rather than having to turn the editor on/off in global configuration, you can use the following idea to keep a standard HTML Editor user. Create a super administrator, I call him "HTMLEditor". In the User Manager, find the user manager and in the editor parameter choose "No Editor" or "None". Now anytime you need to edit raw HTML just login using this user. You have now a user which you can always use to play with your HTML whilst you keep your normal admin user for normal editing of articles. Joomla provides a various sorting options for articles, sections, categories, menu items and other content. These tend to confuse users due to so many different possibilities. The best thing is to define all items in the Global options (for example if you choose Ordering - this means that the items will be shown in the Order which is shown in the backend). Then if you manually adjust the Ordering to show them in the way you want to - you will never go wrong - because you are sorting all the items in whichever way you choose. However, instead of using the Ordering dropdown where you would have to go into each menu and select the ordering from the dropdown (and sometimes the dropdown may misbehave and not do exactly as specified) you should be using the content items listing to change the ordering. Now - if you click on the first column where there is the sort icon ^v - you will be able to drag and drop content items around (click and hold the vertical ellipses) to physically move the articles around until you are happy with the way they are ordered. How about that for total control over the way articles are displayed and ordered in Joomla? There are of course loads of other sorting and ordering article options - you can choose to sort and order by As you can see there are lots of optiosn besides manual "Ordering". However - for various reasons, all of these will have some unexpected behaviour (in our opinion) so the best way to make sure this works well, choose ordering and then physically arrange the articles to work in the way you want them to. Remember that the Global Options will only apply if you do not set an overriding article ordering option in the menu. If you chose another ordering option - the one for the menu item will apply. This is fairly simple and straightforward - you just select the exact order in which you want the menu item to appear. Before which item and after which one, or whether you want it to be the first or the last. Version: Joomla 1.0.x By default, Joomla does not allow certain characters to be used in usernames (e.g. hypens, brackets, square brackets etc.). This is done for good reasons, especially security. However, sometimes for different reasons, you will need to allow certain usernames. To change the characters allowed by Joomla you need to change the core code as described below. You will need to edit several core files. Always make sure you have a full backup of the original source code before doing any changes. Also remember that any update will cause these changes to disappear, so make sure to keep track of the changes you have done. My personal way of doing this is to create a hacks.txt file, with the exact file changed, the code before and the code after, which is stored both locally and on the webserver, ideally in a hidden folder. In the example below we are removing just the hyphen character. We are simply removing the hyphen - from the regular expression which searches for invalid characters. The is an escape character, whilst the pipe is used as a delimeter, so both have to be removed as well. File: includes/joomla.php if (eregi( "[<|>|"|'|%|;|(|)|&|+|-]", $this->username) || strlen( $this->username ) < 3) { File: components/com_user/user.html.php To File: administrator/components/com_user/admin.users.html.php To: That's it. You should now be able to register a new user without a hyphen. PS. Remember to backup before doing any core code changes. Written by, Created Date and Time, Modified Date and Time. Many users want to remove these fields asap. Fortunately, this is very easy to do. Go to Content > Article Manager, and click on Options icon (top right near Help Icon), from here you can find a number of settings, including Created (Show Create Date), Modified (Show Modify Date), Published (Show Publish Date) etc. Select Hide or Show as necessary. See the switches below - switch on and off as necessary. Please note: These settings will apply across the board - i.e. on all the articles on your site. However, be aware that you are able to override these settings on an article by article basis. So you may choose to go into a few specific articles and make the below settings different. This also has the side effect that if you change the Global settings AFTER you have changed the individual articles, the articles for which you have created specific settings won't take the settings from the Global Configuration. On the other hand - the individual article settings will still apply. If you want to customize timezone to suit the needs of the particular geography which your websites is addressed to, you can switch the Timezone of your Joomla 3 website. This is a fairly easy step which done via the Joomla Global Configuration. Go to System > Global Configuration Click on the Server tab and go to Location Settings Select the Server Time Zone you want your Joomla 3 website to have. As you can see below there is a whole list of server timezones you can have. Choose the timezone which you would have. This will change the time of articles published mostly, and other server times. Although (as you can probably tell), we have a love affair with the Joomla CMS, for various reasons, some times you don't want to show that your website is driven by Joomla. Something which will give away your content management system is the meta generator tag. Fortunately, it is very easy to remove this. There are two ways of doing this. The first way is to hack the core and remove the lines which generate this code. However, this will break when you perform an upgrade, and thus we will not even suggest it here 😉 The second is to insert a very simple line in the head section of your Joomla template: setGenerator('My Company Ltd or any generator which you prefer'); ?> This simple line will change the generator tag to anything which you put in between the quotes. The following is how it will look on the default rhuk_milkayway template: ... setGenerator('My Company Ltd or any generator which you prefe'); ?> You can also choose to add this in your index.php for Joomla 2.5 templates JFactory::getDocument()->setGenerator(''); Another trick to customize your Joomla website 🙂 If for some reason or other you need to find out who is receiving system emails: here's a neat trick on how to find these. Go to your phpmyadmin, find the _users table and Search in the #_users table in the database where sendEmail=1 So basically you'll need to run the following SQL query using phpmyadmin SELECT * The results of the query will be those users who are enabled to receive joomla 3 system emails! The default Joomla statistics (and other statistics components) capture a lot of mostly useless data, might cause your database to grow and then degrade the performance of your website. The data gathered by these components is mostly insignificant anyway. On the other hand, it is strongly recommended to switch on only your search strings statistics, because knowing what people are searching for on your site is quite useful and gives you insight on what your users need when they come to your website. Switching on Search statistics allows you to understand a user's intent - i.e. why did they land on your site and what are they looking for. If you can understand this, you'll be able to optimize your site in such a way to make sure you give them what they need BEFORE they actually have to search for it. To turn on Joomla Search statistics System > Global Configuration > Search Make sure that Gather Search Statistics is set to Yes. To view the data, you'll need to access this via the Search Component i.e. Components > Search Often when designing a Joomla website, you find that there are certain pages where you require certain modules, whilst other pages where these shouldn't be visible. This is easily done via Joomla's functionality of assigning modules to menu item links. However, this brings about a new problem. The position in the template. How do you create a template which can collapse a module position which is currently not being used? This can be done by counting the number of modules currently assigned to this position by using a few Joomla function calls countModules or in older versions mosCountModules. An example of this is found below. As we can see, in the code above the user4 position is only rendered when there are modules assigned to position user4. The count modules function allows us only to render the position when modules are assigned to it, and collapses the template position if there are no modules assigned. One of the very first thing you need to do when installing Joomla is to find the absolute path. This is basically the folder on the hard disk where Joomla will be installed. When we bought our account from a new web hosting company, we did not always know the exact path, because this will be hidden, and the path varies from company to company, from server to server and from account to account. So you'll need to discover it before you even start installing. Thankfully, this is not a very difficult thing to do. Create a file named absolutepath.php using Notepad or any other text editor and in it place the following code: $path = getcwd(); Using your FTP software, upload the file to your hosting account. Open your browser and type in https://www.yourdomain.com/absolutepath.php. Once this is done, delete the file because this will create a security problem. Thankfully, Joomla 1.5 does this transparently without any involvement from the user. Have you ever wanted to hide one of your menus or module / module positions once you have check that joomla users have logged on? The following small template hack will hide your menu once your user has logged on. The idea behind this is to actually load a particular position (the menu position) only if the user has not logged in: $user =& JFactory::getUser(); This returns the user id of the user. Therefore the code to do this is check whether the current user has a valid id (i.e. they are logged), if not load the module: ?> if( !$my->id )mosLoadModules ( 'left' ); and should be placed in the index.php of the template you are using (/templates/ if( !$my->id )mosLoadModules ( 'hidingmenu' ); Disclosure: This page may contain links to external sites for products which we love and wholeheartedly recommend. If you buy products we suggest, we may earn a referral fee. Such fees do not influence our recommendations and we do not accept payments for positive reviews.
[How to] Change “Welcome to the FrontPage” text
Change welcome message in Joomla 2.5 / Joomla 3
[How to] Display the Year in your Joomla template
[How to] Create a Joomla Site Map using Native Menus
You can quickly and easily create a Joomla Site Map using Native Menus
[How to] Hide a Joomla menu item when user logs in
You can customize which menu item show when user is logged in
Assign modules or menu links to the new group
How to use Mod HMTL to Feature a Joomla article with an image preview


[How to] Fully Protect Joomla from forum and comment SPAM
Similar articles for protecting Joomla against SPAM
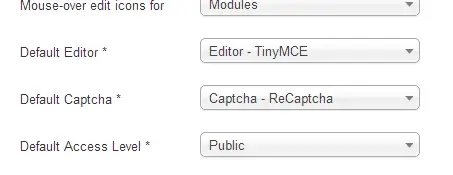
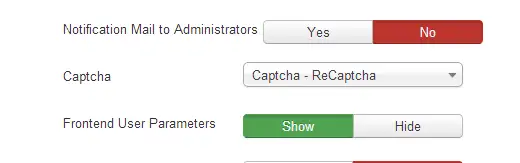
Enabling Joomla recaptcha to protect against spammers
So how do you use recaptcha with Joomla
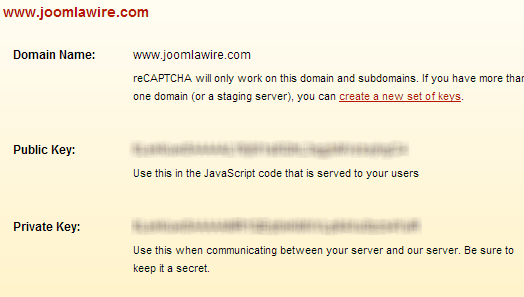
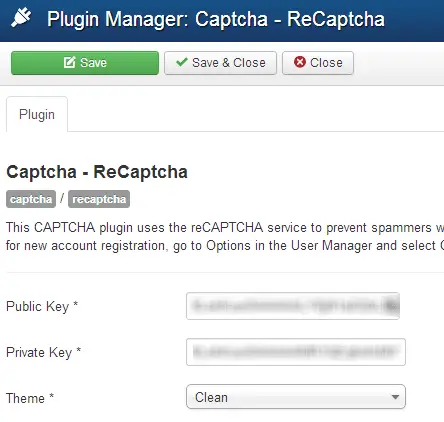

Reasons why it may not work
[How to] Remove index.php from URLs in Joomla 3
[FIX] - This email address is being protected from spambots. You need JavaScript enabled to view it
Unload Joomla Scripts
Manual Code
$doc = JFactory::getDocument();

$dontInclude = array(
'/media/jui/js/jquery.js',
'/media/jui/js/jquery.min.js',
'/media/jui/js/jquery-noconflict.js',
'/media/jui/js/jquery-migrate.js',
'/media/jui/js/jquery-migrate.min.js',
'/media/jui/js/bootstrap.js',
'/media/system/js/core-uncompressed.js',
'/media/system/js/tabs-state.js',
'/media/system/js/core.js',
'/media/system/js/mootools-core.js',
'/media/system/js/mootools-core-uncompressed.js',
);

foreach($doc->_scripts as $key => $script){
    if(in_array($key, $dontInclude)){
        unset($doc->_scripts[$key]);
    }
}Joomla Plugin To Unload Scripts
Mootools Enabler / Disabler plugin

jQueryEasy
Joomla Performance Tutorials - or how to make Joomla Faster
Use the excellent JCH Optimize to make Joomla faster
![]() As many people do when striving to make a website load faster, they refer to the Google PageSpeed recommendations site, and rightly so, because if Google makes a statement, usually it's worth listening to. However, sometimes it is quite messy to do all the optimizations, and you might not have the skills to actually do these changes.
As many people do when striving to make a website load faster, they refer to the Google PageSpeed recommendations site, and rightly so, because if Google makes a statement, usually it's worth listening to. However, sometimes it is quite messy to do all the optimizations, and you might not have the skills to actually do these changes.
[How to] Optimize website loading time using compressed mootools library
$document =&JFactory::getDocument();
[How to] Editing HTML directly in the Joomla editor
Create a specific user to edit raw HTML in Joomla
[How to] Change the Sorting and Order of Articles and Menus
Change the Sort and Ordering of menus and Articles in Joomla


Ordering Menus and menu items

Change characters allowed in Joomla usernames
Changes to core code
From:
$this->_error = sprintf( addslashes( _VALID_AZ09 ), addslashes( _PROMPT_UNAME ), 2 );
return false;
}
To:
if (eregi( "[<|>|"|'|%|;|(|)|&|+]", $this->username) || strlen( $this->username ) < 3) {
$this->_error = sprintf( addslashes( _VALID_AZ09 ), addslashes( _PROMPT_UNAME ), 2 );
return false;
}
From:
var r = new RegExp("[<|>|"|'|%|;|(|)|&|+|-]", "i");
var r = new RegExp("[<|>|"|'|%|;|(|)|&|+]", "i");
From:
var r = new RegExp("[<|>|"|'|%|;|(|)|&|+|-]", "i");
var r = new RegExp("[<|>|"|'|%|;|(|)|&|+]", "i");Remove Author names, created and modified date
Joomla 2.5 / 3

Change TimeZone in Joomla 3

[How to] Remove the meta generator Joomla! - Open Source Content Management
You can remove or change the "meta generator Joomla! - Open Source Content Management"
...
[How to] find who is receiving Joomla system emails
FROM `xxxx_users`
WHERE sendemail=1[How to] Switch off Joomla Statistics, switch on search stats
Joomla 3

Use Joomla Collapsible Template Positions to save space where necessary
Joomla 2.5 / Joomla 3
countModules('user4')) : ?>
Joomla 1.5
Find the Joomla absolute path
echo "Your Absoluthe Path is: ";
echo $path;
?>Hiding a menu or module positions once you check if a user is logged in
Joomla check if a user is logged in
(1.5, 2.5 and 3.x)
$user_id = $user->get('id');
$user =& JFactory::getUser(); $user_id = $user->get('id'); if (!$user_id) { ?>
}Joomla 1.0

![]()
![]()
Did you know that people who share useful stuff like this post look AWESOME too? 😉
Please leave a useful comment with your thoughts, then share this on your Facebook group(s) who would find this useful and let's reap the benefits together. Thank you for sharing and being nice!

![]()
![]()
![]()
![]()
![]()
![]()
